
This is not the prop. This is not the beginning of the prop. This is, however, the prop of the beginning. (With apologies to Winston Churchill).
Which is to say; this is a full-scale mock-up constructed in order to work out both aesthetic balance, try out some detail ideas, and get a sense for what construction methods may be appropriate.
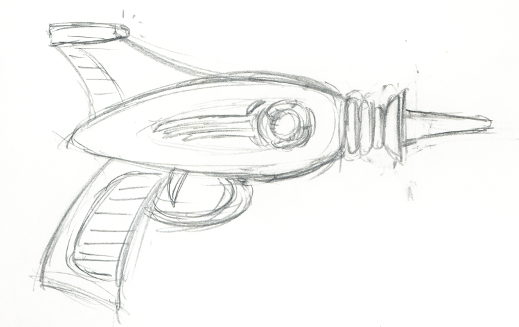
After several weeks of chasing down various pathways, we finally stumbled on a direction that we both liked. This was the sketch that got approved:

This is not, mind you, a construction drawing. It is merely the first attempt to translate the sketch into a scaled concept that can then be checked for overall balance and practicality.
And, indeed, it flunked the first test:

Based on the look and feel of the first cutout, I adjusted dimensions and transferred to foam-core. The re-sized foam-core cutout felt a lot better, but I needed a little more to really get a sense of it. So; added cheap expanded foam (recycled from the last time someone in the neighborhood had furniture shipped to them:

And carved the foam by hand into an approximation of the right shape:

Well, I was still learning from this mock-up, so it was worth taking it just a little further. Note, however, it is in no way suitable for a final prop, or even for a master to take a mold off. If I had meant to do this, I would have used a spine of MDF, omitted all the turned parts (like the front nozzle, which is meant to be acrylic, or the front dish -- which I am still trying to source), used dense foam and skinned it with Bondo for strength.
Instead this is spackle and filler primer, white glue as a foam sealer and Bondo spot putty in the later stages. It can only take gentle handling.

So several coats of primer and spot putty...built up the dish and insulator rings with Apoxie Sculpt...spray-painted gloss black, then hit it with silver coat. When that is properly dried I'll come back with a few bits of detail paint.
Incidentally, I took that top picture in my kitchen at 10 PM, and somehow my old Oly C3020 auto-balanced on to a fantabulous effect. It was originally a rich sepia that looked like a picture from the turn of the (last) century, but I tweaked the hue in GIMP using a color layer to achieve the very Republic Serial tonality of the above. I'd love to be able to reproduce that effect on demand!
No comments:
Post a Comment