..but give them what they want, not what they say.
If you are professional, you do the job they hired you for. Even if the client is screaming at you, even if the show stinks, you sit there and you finish the job you contracted on.
But I've worked with more than a few people who think the job stops there. That if the client is an idiot and wants them to turn off all the lights in the middle of the act, turn the subwoofer to eleven and turn all the wedges backwards...then you just do it, and rationalize the horrible lighting and sound by knowing you did exactly what was asked of you.
Well, we are not golems. This kind of petty exact-letter-of-the-orders crap is not professionalism. Find a way to get the client what they really want; the kind of look, the kind of sound, and talk them into how the equipment has to be set up to do it -- even if you have to go behind their backs to do it.
Just remember; they have the last say. Their vision is what belongs on stage, not ours. If they were after the look of a blacklight effect, then we should get as close as possible, but if their artistic goal was actually to kill the lights on the performers and leave the audience puzzled, then we should respect that.
And they might know what they are doing. We are not wizards. We don't know everything, and we can have off days, too. So before you nod and smile and pretend to turn the guitar up without actually touching a fader, take a long hard look at what is actually going through the sound system. And maybe even try nudging that fader. Because it could be the client has a better idea of what that band on that day really needs.
Sure, it is harder to fight for a good show. Sure, it is attractive to take your anger at being yelled at out on the client by sitting there in your self-righteous sulk and letting the unhelmed ship plunge directly towards the pier.
But at the end of the night, the paying audience, the gods of theater, your own artistic growth, and yes even the annoying client; they all deserve better from you.
And that's professionalism.
(No; the show I just concluded was pretty much a pleasant experience. And the rest of the tech staff mouthed off a lot backstage, but they still put out the best performance they could manage. But they reminded me of how many times I have seen techs cross that line. And how many times I've let myself cross it, as well.)
Tuesday, January 27, 2015
Look Ma, no wires.
I'm having to put together a proposal fast for twelve-plus channels of wireless lavalier mics.
The options haven't gotten better in the way I had hoped, not yet. Only one company so far seems to have brought a digital system into the middle price range, and it is a gigahertz system. I'm not interested. My XBee work has informed me far too well of the difficulties in punching through a reliable signal at 2.4 gHz.
The way things seem to be settling out now, is the price ranges correspond to a set of assumptions from the manufacturers. At the low end, they are generally fixed-frequency systems. Through both low and middle, the manufacturers seem to assume their biggest problem is the users are idiots; so all the effort is towards choosing compatible bands for you. With the result being you really can't use more than one system in the same space at the same time, not reliably. You must purchase a system pre-built with two lavs or eight hand-helds or whatever other package deal they have.
In the high middle of the price range are, finally, systems that are properly programmable, as well as being in wireless bands that are going to remain open for at least part of the next decade, full diversity, standard batteries, etc. So this range starts at maybe $500 a channel and progresses up to the low $1,000 range.
You have to jump up to the low end of the high-end gear, and very much break the $1K per channel of wireless cost group, before you get any of the recent work in adapting to the FCC's latest moves. And these aren't digital. They are other clever ways to shrink the bandwidth and deliver more effective channels in the limited frequency ranges still available.
And some of them are very clever. Top-line Shures can get you fifty microphones jammed into the bands available, and still let you run IEMs for the pit and wireless headsets on your backstage crew.
Thing about Shure is, once you leave their flagship gear -- any time you find an "X" as part of the model name, or the dreaded "PG," -- their quality takes a huge drop-off. Many working audio techs don't know this because they have only worked with Shure; they haven't had the experience of comparing the Shure SLX with similarly-priced units from other manufacturers. To them, the SLX behaves just like they expect; like a Shure you didn't spend quite enough money on.
I'm still looking at Audio-Technica, and even Electro-Voice, but even outside of being in frequency bands the FCC already has in their gunsights, and other issues, they just don't offer on paper anything remarkably better than the Sennheisers. And I know the sennies very well, and can speak to both their peccadilloes and their general reliability.
So I'm probably going to have to recommend purchasing something pretty similar to what I was already in position to rent to them. Sigh.
Saturday, January 24, 2015
MY smart phone rant
As a Sound Engineer for musical theater, I already had reason to hate the new smart phones and similar devices. Their market is so much more powerful, chunk after chunk of the ever-shrinking bandwidth needed for wireless microphones is going there as the spineless FCC follows every other Federal agency burdened with "protecting" a natural resource.
And in my opinion, this is a bad trade-off. If you want to watch a movie on your phone, you can transfer the file at home, using a wire or available pipe. You don't have to have a unique media pipeline -- because there is no option for the actor in a musical to reach the sound board with their voice. There's no equivalent of a flash drive for them. It has to be real-time streaming or the musical is going to sound very, very strange.
But I've been riding BART and Muni a lot this week, and I'm seeing something new. I'm seeing a lot of people who are crammed into too-small seats on the lurching cars of crowded trains, and you can't do creative work in that kind of condition. You can barely concentrate enough to read a book. So it makes sense that all these people (a good two out of three, at least to my jaundiced eye) are on their smart phones. And the ones I can see over the shoulder are browsing forums or flipping through music, listening to a couple seconds then skipping to something else. Bandwidth city.
Oh, there's a few who are texting. A few probably posting to forums. And I've met them, both at work where some of my bosses and co-workers have sent replies from whatever transit nexus or automobile or dinner date or other meeting they are at.
And you know what? As content, those texts suck. I almost never get a useful answer for the work that needs to be happening. Between the limitations of the texting format and the much greater limitations of the situation (and the implicit belief in multi-tasking behind it), the information content ranges from minimal to negative. I can not BEGIN to list how many times we've wasted hours hanging lights only for Mr Too Busy To Do Anything But Send a Text to finally breeze in only to declare "That's not what I thought we were saying at all!"
Same for forum posts. There's a buttload of the content now on the interwebs that is feel good and metwo posts. And this is why. People who aren't in a position where they can be analytical, but still want to contribute. And we've constructed this social media edifice that claims that every meandering self-indulgent blog is Worthy and every fly-by night posting actually adds something to human knowledge.
I spit on these phones. Because they aren't constructed for creative work. Not deep, meaningful work. They are constructed for the illusion of work, while they do their best to suck you in to a care-free life of consume, consume, consume. They are the tools and vanguard of a movement to retake the Internet and move as many as possible back to the model of one licensed creator to ten thousands grub-like consumers (but with plentiful cash in hand).
Laser Rifles and Dying Fairies
Not, not "Wizards, The Musical" (which one day, in some other life, I would love to have a part in producing).
I took a short job in The City -- for low enough pay a third of it is going to pay BART fare -- and once again an application came up for a DuckLight. Which is currently in the form of a PCB being manufactured in China. That is, the prototype board is. I figure there's about a 50% chance the first board will actually work correctly.
Once again, I would have saved a lot of time if I could have just reached into my kit and pulled one out. But also, once again, I hadn't imagined anything like this application until it came long.
Tinkerbell. There's a spot in the musical where Tink needs to go into her little house and stay there for a while. I had already planned for one of the default animations on the DuckLight to be a flicker or shimmer, but I didn't even know why I wanted that. Now I do. Dial up a nice Tinkerbell green and the effect is half-way there.
 Only half-way, because this production is children's theater. No onstage actor is going to be able to hit a switch. So it needs the next element, the next board up in my Eagle-and-fab list; the XBee backpack.
Well, I did pull a morning of very swift soldering, and set up a single-channel AVR-controlled Cree and attached an XBee to it in line-passing mode. There was some strangeness going on with lines floating or automatically resetting or something but by adding a double-click detect I finally got it reliable enough to use it over the closing performances.
 Otherwise Tink is being played by a laser. Which still makes me uncomfortable, even though I opened up the beam focus until the power is much spread out. To hit his targets the follow-spot operator went and attached the laser to three-foot long stick of wood that he braces against his shoulder. Naturally I took to calling this contraption his "Laser Rifle."
Being one of the bargain bulk optical goods from the industrious young engineers in Shanghai, this particularly laser diode is not stable enough, cooled enough, or otherwise suitable for leaving on for longer than a few seconds at a time. As a stop-gap, I put an AVR-powered switch on it that randomly blinks it off for half a second or so every few seconds. That seems to help, but I'm betting I'll still be out a laser diode before the show closes.
The blinking looks quite natural and Tink-like. Particularly tonight's performance. Right after Wendy said, "Wouldn't you say so, Tinkerbell?" the light blinked several times in quick succession as if Tink was making an acerbic reply.
 Here's the full circuit in better light, by the way:
The 8-pin dip is the ATtiny85 running the random blink routine. The Tip-120 switches laser power, with a blinkenlight wired in parallel as a status monitor. Another one monitors the battery connection, which is switched on and off by the momentary button. That's the nice thing about these AVR's; supply power, and it boots up softly in milliseconds and starts running the program loop.
This was all in all another informative show. I need that serial Xbee connection for reliable triggering, and this makes twice now that 3 watts of RGB was a little marginal. Unfortunately the jump to 10 watts of LED power brings in a whole new level of current regulator and thermal management complexity.
I took a short job in The City -- for low enough pay a third of it is going to pay BART fare -- and once again an application came up for a DuckLight. Which is currently in the form of a PCB being manufactured in China. That is, the prototype board is. I figure there's about a 50% chance the first board will actually work correctly.
Once again, I would have saved a lot of time if I could have just reached into my kit and pulled one out. But also, once again, I hadn't imagined anything like this application until it came long.
Tinkerbell. There's a spot in the musical where Tink needs to go into her little house and stay there for a while. I had already planned for one of the default animations on the DuckLight to be a flicker or shimmer, but I didn't even know why I wanted that. Now I do. Dial up a nice Tinkerbell green and the effect is half-way there.
Only half-way, because this production is children's theater. No onstage actor is going to be able to hit a switch. So it needs the next element, the next board up in my Eagle-and-fab list; the XBee backpack.Well, I did pull a morning of very swift soldering, and set up a single-channel AVR-controlled Cree and attached an XBee to it in line-passing mode. There was some strangeness going on with lines floating or automatically resetting or something but by adding a double-click detect I finally got it reliable enough to use it over the closing performances.
Otherwise Tink is being played by a laser. Which still makes me uncomfortable, even though I opened up the beam focus until the power is much spread out. To hit his targets the follow-spot operator went and attached the laser to three-foot long stick of wood that he braces against his shoulder. Naturally I took to calling this contraption his "Laser Rifle."Being one of the bargain bulk optical goods from the industrious young engineers in Shanghai, this particularly laser diode is not stable enough, cooled enough, or otherwise suitable for leaving on for longer than a few seconds at a time. As a stop-gap, I put an AVR-powered switch on it that randomly blinks it off for half a second or so every few seconds. That seems to help, but I'm betting I'll still be out a laser diode before the show closes.
The blinking looks quite natural and Tink-like. Particularly tonight's performance. Right after Wendy said, "Wouldn't you say so, Tinkerbell?" the light blinked several times in quick succession as if Tink was making an acerbic reply.
The 8-pin dip is the ATtiny85 running the random blink routine. The Tip-120 switches laser power, with a blinkenlight wired in parallel as a status monitor. Another one monitors the battery connection, which is switched on and off by the momentary button. That's the nice thing about these AVR's; supply power, and it boots up softly in milliseconds and starts running the program loop.
This was all in all another informative show. I need that serial Xbee connection for reliable triggering, and this makes twice now that 3 watts of RGB was a little marginal. Unfortunately the jump to 10 watts of LED power brings in a whole new level of current regulator and thermal management complexity.
Wednesday, January 21, 2015
Lot of work for so little pay
Inventoried stock and ordered the remainder for the next round of Stage Lights. Also reminded the purchaser I was barely covering expenses on them and soon I'd have to charge more.
Struggled some more with parts libraries in Eagle. The software has been through some changes recently and some of the more common suggestions found online no longer work. But I got it together and sent off an order for the first try at a board to OSHpark.
Inventoried my Aliens Grenade supplies, made up an order for new material, and sat down with a bunch of snapcaps and shotshells to check dimensions. Watching snippets of the movie again. I am increasingly of two minds about my design.
There's almost a fanon when you get to stuff like this; how it may have actually looked in the movie, and how prop-makers are tending to make them look these days. Aliens has a bit of that; the original Pulse Rifles were painted brown, but they read olive drab under the lighting of the movie. So which is more accurate? The actual color of the prop, or the color the prop appeared in the movie?
In the case of the grenades, there are sadly few high-resolution images, and few documented screen-used with decent images available. So one could make in a sense two different arguments; one for what the prop-makers probably provided, and what is therefor most accurate to a world in which a film was made about a bunch of space marines. And one for what is just at the verge of visibility, possibly hidden in blur and lighting effects; the world in which Weyland-Utani managed to get a bunch of them killed on a remote colony world.
In re the outer world, I have more than strong suspicions that the grooves were made with a thread-cutting tool, and are probably v-shaped. The spring-loaded trigger, of which there were unlikely more than one or two to begin with, was top-loaded. The nose is a simple chamfer and there is no "nose ring." And the cap was off-white, painted in various colors (seemingly red, dark blue, a rather washed-out green, and perhaps one or two in yellow), with a strip of teflon plumbing tape or a hand-painted white line. Oh, yes; and I have reason to believe there was a fairly large cut-out in the bottom, with the primer sticking out like a very short lamp post.
In the inner, diagetic world, these have more distinction in their markings. My head canon is that originally the caps were shaped differently to reflect the various loads, and as well some of the bodies are distinctive. Manuals and other materials were released on the basis of those models, but in the usual business of military contract bidding they ended up sharing molds and the items issued at the time of the film had lost some of those distinctions. And furthermore, GI's of any generation are playful, and once they found out the protective caps were interchangeable, would start putting them on randomly in whatever suited their own color/fashion sense.
And at some nearly orthogonal angle to either of these directions of approach, are the prop-maker's aesthetics. The major reason to keep those in mind is because one cosplayer may have props from more than one supplier. And more than one cosplayer may appear in the same picture. So if everyone is making their M51A's a bright baby blue, it makes a certain sense to follow suit.
The major elements found in fan-made grenades are however varied. Some have the tree-stump firing pins, others look more shotgun-like. Some have chamfered noses, some have rounded noses. However, almost all have squared-off grooves.
Which leaves me basically floundering between two untenables; follow the best guess of the best information and end up with a result that doesn't meet expectation: or do what fulfills my personal aesthetic judgment and is somewhat defensible both diagetically and historically -- but only somewhat, as the design combines elements I can not be sure of with elements I am reasonably certain are wrong.
Oh, yes. And I also got another reweld mentioned at me. A ZB-30, which from a brief look appears insane.
Monday, January 19, 2015
CAD Woes
Trying to get the PCB ordered on my prototype "DuckLight." The first Eagle layout looked pretty good, but it seemed possible to shrink the board's footprint until it was only 2xAAA wide. Which you can run on, but it runs the LEDs a little cold.
Anyhow, I shrunk the layout and ran traces by hand. I was also conscious of the potential difficulties in soldering SMDs so I made a point of holding the traces far outside of the pads of those parts. So that took a couple of evenings. But got it down to one via (well, I also ended up omitting a duplicate VCC on the second header. It would have required multiple vias in order to get the connection.)
I used a part with internal connections (a tactile switch) as a jumped in one spot, and Eagle kept flagging it. So I went to the forums for the first time with a question. And it turns out not only have lots of people asked about this, there is no current solution.
But then I went to order the parts to make sure the ones in the CAD were actually available stock. I'd used the SparkFun Eagle library in several places, and you'd think this would be a shoe-in, right? But no. The part in their library doesn't actually have an analog in their store.
They did have something in their store that I could modify the package to, however. And after a bit of struggling re-routing around the new (and larger) dimensions, I had confirmation of available parts.
The final DRCs, and Eagle starts throwing up mask errors. Turns out that, yes once again, many of the library parts I was using have a silkscreen that goes over the copper traces. Which can be a problem at smaller fab houses that don't have the software to fix this on the fly. So back once again to the package designs, now to edit all the silkscreens.
Nice of various people to make libraries available to everyone, but really, could they adhere a little closer to reality?
DONE!
If I ever do a reweld again, I am never going to weld the bolt into the receiver. The true cost of that became clear during final assembly. There are so many parts that require the bolt be moved out of battery in order to put them together.
Okay, sure, I could have simply omitted much of the unseen, internal hardware, and just fixed bits like the charging handle in place with epoxy. But I had come this far with real steel, it seemed a shame to do that.
Plus, if you are going that route, having a bolt-substitute that travels means you can cock and dry-fire.
The fake bolt got in my way not just in putting on the last parts, but even in drilling some of the last holes. It also stands just slightly proud where the magazine lips sit, and won't quite let the magazine go far enough in to engage the magazine catch. Which I could have fixed, but I really needed to finish this project and move on.
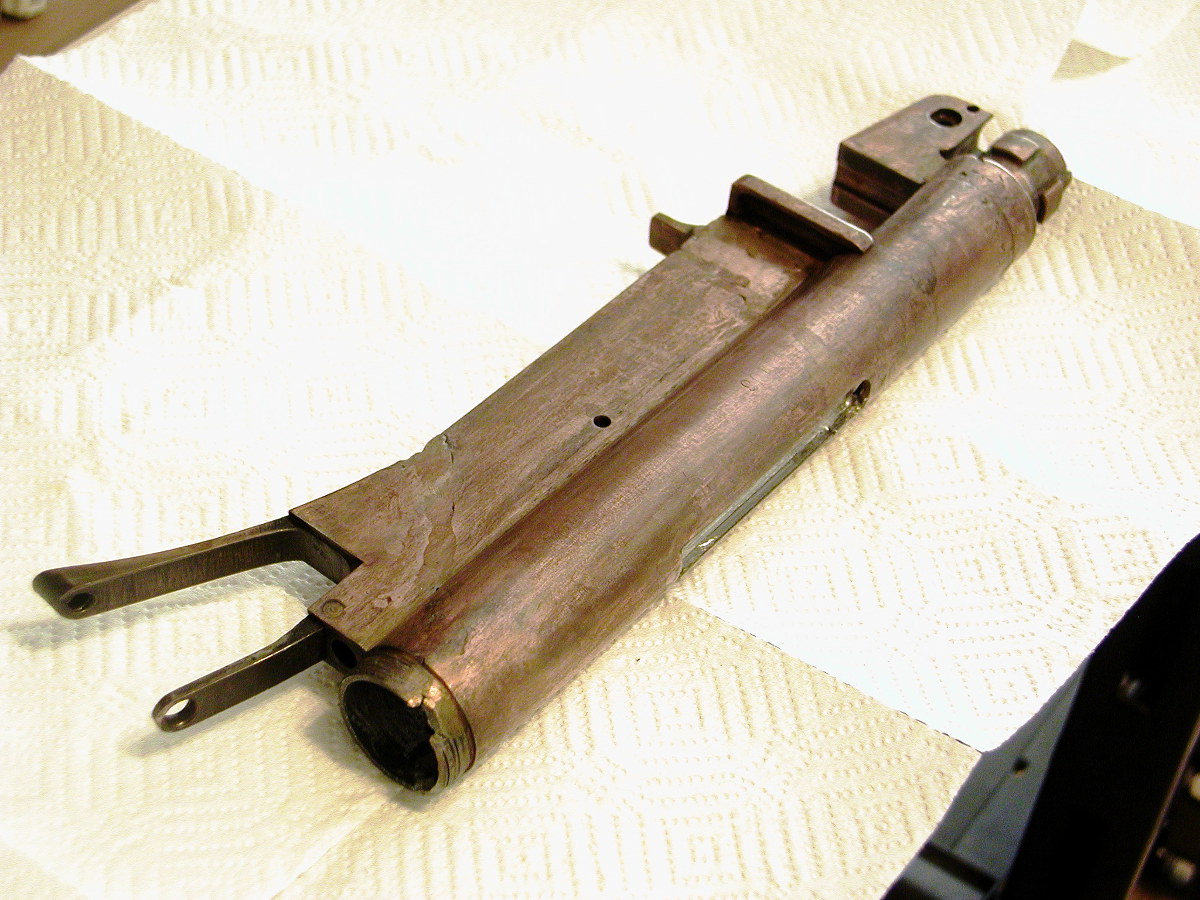
So here it is:

That out-of-period hex nut is my imperfect solution to securing the barrel shroud lever. In the original, the stem was pounded down to make a rivet. I milled the broken stub flat, drilled a hole, and tapped it for a metric stud, which is fixed in with Locktite.
For the top sight, I drilled for friction pins, but ended up seating them with Locktite too when the holes got a little chewed up. The fake bolt kept catching on the drill bit. So all in all, I spent about four hours on the mill, mostly using it as a stable platform to align everything for the last couple of mounting holes.
And here is a shot looking more-or-less from the good end (taken in poor light, sorry):

The repaired part more-or-less blends in; the rest of the metal is a pretty good mix, from the somewhat rust-colored barrel (with most of the factory bluing worn off) to the flat black paint on the magazine. And all of the other parts are original, and essentially un-touched by my process.
Okay, sure, I could have simply omitted much of the unseen, internal hardware, and just fixed bits like the charging handle in place with epoxy. But I had come this far with real steel, it seemed a shame to do that.
Plus, if you are going that route, having a bolt-substitute that travels means you can cock and dry-fire.
The fake bolt got in my way not just in putting on the last parts, but even in drilling some of the last holes. It also stands just slightly proud where the magazine lips sit, and won't quite let the magazine go far enough in to engage the magazine catch. Which I could have fixed, but I really needed to finish this project and move on.
So here it is:
That out-of-period hex nut is my imperfect solution to securing the barrel shroud lever. In the original, the stem was pounded down to make a rivet. I milled the broken stub flat, drilled a hole, and tapped it for a metric stud, which is fixed in with Locktite.
For the top sight, I drilled for friction pins, but ended up seating them with Locktite too when the holes got a little chewed up. The fake bolt kept catching on the drill bit. So all in all, I spent about four hours on the mill, mostly using it as a stable platform to align everything for the last couple of mounting holes.
And here is a shot looking more-or-less from the good end (taken in poor light, sorry):
The repaired part more-or-less blends in; the rest of the metal is a pretty good mix, from the somewhat rust-colored barrel (with most of the factory bluing worn off) to the flat black paint on the magazine. And all of the other parts are original, and essentially un-touched by my process.
Saturday, January 17, 2015
The Blues
Last night I took the Suomi as far as was worthwhile with ever-finer grades of emery paper -- the last passes were wet-sanding with 400 grit, then a going over with 0000 steel wool.
There are deep scratches from the various machining and grinding processes that wouldn't go away unless I took almost a hundredth of an inch off. That, and there are remaining voids and pockets that aren't going to clean up anyhow. Plus some visible mis-alignment of several of the pieces. So this degree of polish would have to suffice.

Of course, it needs to look at least something like the other parts of the gun. I am actually not sure what process the Finns used on the originals -- probably a hot-bluing tank, but really could have been any number of processes. But rust never quite sleeps (it only grows lethargic) and the final look of the original hardware is a nice mixture of blue-black and rust brown.
After a lot of research online, it appears that at least some people have achieved a decent-looking period finish by combining Plum Brown with cold bluing. (Cold blue also doesn't wear well, but this is getting only small amounts of handling. It isn't as if anyone will be taking it to the range!)
The Plum is a strong acid. I degreased with hot soapy water and 70% alcohol, then put on a coat. Almost instantly the receiver turned a rich coppery brown:
I'll have to remember that in the future. It was also a remarkably even coat, especially considering the cap on the bottle broke and I got drips of the stuff all over the work table.
The Birchwood Casey Perma-Blue, on the other hand, went on very spotty. But I can't blame the liquid. I think it reacted with the layer of Plum Brown -- which is essentially red rust -- and perhaps with some of the water or even not-quite-deactivated Plum Brown.
But I wiped it on, let it sit for a few minutes, then rinsed in hot water. Rubbed off the loose material and buffed it up with steel wool, then did a second coat. This is where it stands at the moment:

The color match isn't bad. It needs more buffing out, and I'll want to go back with a Q-tip and touch up some spots that didn't get enough black. In life (as opposed to in photograph) it looks smoother, but a little lighter than the original part. But the final coat of gun oil is going to darken it, I'm sure. I'm also going to go back with steel wool and even emery paper to knock the bluing off some of the exposed edges -- weather it, in other words.
It looks like it is going to work. My major worry at this point is the treatment is too fragile and will get scratched up when I clamp into the mill to drill the last couple of holes.
There are deep scratches from the various machining and grinding processes that wouldn't go away unless I took almost a hundredth of an inch off. That, and there are remaining voids and pockets that aren't going to clean up anyhow. Plus some visible mis-alignment of several of the pieces. So this degree of polish would have to suffice.
Of course, it needs to look at least something like the other parts of the gun. I am actually not sure what process the Finns used on the originals -- probably a hot-bluing tank, but really could have been any number of processes. But rust never quite sleeps (it only grows lethargic) and the final look of the original hardware is a nice mixture of blue-black and rust brown.
After a lot of research online, it appears that at least some people have achieved a decent-looking period finish by combining Plum Brown with cold bluing. (Cold blue also doesn't wear well, but this is getting only small amounts of handling. It isn't as if anyone will be taking it to the range!)
The Plum is a strong acid. I degreased with hot soapy water and 70% alcohol, then put on a coat. Almost instantly the receiver turned a rich coppery brown:
I'll have to remember that in the future. It was also a remarkably even coat, especially considering the cap on the bottle broke and I got drips of the stuff all over the work table.
The Birchwood Casey Perma-Blue, on the other hand, went on very spotty. But I can't blame the liquid. I think it reacted with the layer of Plum Brown -- which is essentially red rust -- and perhaps with some of the water or even not-quite-deactivated Plum Brown.
But I wiped it on, let it sit for a few minutes, then rinsed in hot water. Rubbed off the loose material and buffed it up with steel wool, then did a second coat. This is where it stands at the moment:
The color match isn't bad. It needs more buffing out, and I'll want to go back with a Q-tip and touch up some spots that didn't get enough black. In life (as opposed to in photograph) it looks smoother, but a little lighter than the original part. But the final coat of gun oil is going to darken it, I'm sure. I'm also going to go back with steel wool and even emery paper to knock the bluing off some of the exposed edges -- weather it, in other words.
It looks like it is going to work. My major worry at this point is the treatment is too fragile and will get scratched up when I clamp into the mill to drill the last couple of holes.
Friday, January 16, 2015
Suomi Update
Welding is done on this project. It was a long but productive day at TechShop. Unfortunately I didn't stop to take any pictures.
First up was milling some scrap steel down to the correct thickness for the side plates. That meant figuring out how to use the t-slot clamps. Put the metal on a sacrificial piece of aluminium scrap and gingerly navigated an end mill around the clamps.
Once that was done, painted the scrap with "Prussian Blue" (layout fluid) and transferred the shape of the voids to it. I meant to bring in a pencil so I could do a rubbing on to scrap paper. But as it turns out, my hands were grimy enough from milling down steel I just needed to rub my fingers across the receiver to transfer the edges I needed to the paper templates.
Cut the bits out with the band saw, used grinding wheel and files to get the final fit, then superglued them in place.
Logged out of the mill and hopped on a vacant lathe; milled down a 1" chunk of aluminium rod to make a backer for the new welds I was going to be putting on the threaded end of the receiver tube. And fit the barrel plug back in to protect the space in front.
And then it was on to the MIG. I was getting good welds on a piece of scrap, so I didn't change the settings that were already on the machine. Welded the filler pieces for the side plates, tacked the front filler in place, filled a couple voids elsewhere.
So maybe aluminium backing is not the best choice. It took grinder, cold chisel, and pipe wrench to get the backing pieces back out again. But once they were out, clean-up in the voids they had filled was minimal, so perhaps it was a good thing after all.
The usual round of angle grinder, Dremel, then lots of hand files (I chose these because they are more accurate and allow me to get closer to a flat profile -- grinding tools tend to dish out).
I was very happy when the trigger group dropped back in. I thought the end cap was going to take a bit of work, but it also spun right on. The furniture is tight, though; I still need to remove some metal right near the magazine well. And even though there is visible warpage around the magazine well (some of which may be original, the remainder is probably largely from the demiliterization), the magazine catch and a test magazine both slide right in.
So most of what is left is drilling a few holes, final clean-up, and an attempt at bluing.
Wednesday, January 14, 2015
More Suomi
Milled off more of the side plates today, and milled up a stand-in trigger group and magazine/magazine catch out of half-inch aluminium to keep weld metal out of the places where it shouldn't go:

Now all I have to do is cut the slices of steel that fill in the missing portions of the side plates, and mill those down so there will be less grinding and filing once they are in.
Of course I still need to cut a plug for the rear of the cylinder, fill the remaining gaps with weld metal, and grind that down so the end cap fits properly. Pain not being able to lathe it. Actually...I might just be able to lathe it if I leave the plug in...
After that, it is just grinding, dressing with files, etc., to get it as nice-looking as I can before bluing. Chase the hole for the magazine catch, drill the studs for the rear sight, and adapt the barrel shroud lever for bolting it in place. The rest is drift pins and lock-tite. Probably another 4-5 days of work.
I went to Techshop and all I brought back...
...was this little bit of metal:

This is the lower part of the Rear Filler; it sits between the magazine well and the trigger group and keeps the latter from falling out of the gun. That is, the complete part does. I didn't want to take apart the rear of the magazine well and rebuild all that from scratch, so I just milled out a space:

I was using the wrong end mill and pretty much getting everything else wrong (notice the groove in the side rails from an incautious pass after something slipped on me!) Which explains why getting this far was eight solid hours of machining.
Well, I did re-mill and clean up the slot where the sight sits. I haven't made up my mind whether I'll try tap holes for screws, or just press-fit brass pins which I can then hammer out as rivets.
Sigh. I'm trying to avoid cutting too close to the magazine well because the rear slot would be a real pain to clean up. But based on what it all looks like now, I think I need to mill those side rails in a little further to properly expose the slot where the new part goes. And, yes, I am tempted to cut the entire old part away, but this is all hardened steel and it would be very hard to align it in bandsaw or anything else more suited to deep cuts than the manual mill.
Yes; at this point I've learned enough about how the weapon goes together, and how to derive the various dimensions of the parts, that I could now start from raw materials and fashion one completely from scratch. In aluminium, that would almost certainly be faster than all the work I've done so far re-welding and trying to clean up.
(Or even steel -- especially since you can get parts and parts kits that include, intact, the magazine holder, trunnion, and even lugs -- leaving pretty much the rear part of the tube and the side rails to fashion from scratch).
This is the lower part of the Rear Filler; it sits between the magazine well and the trigger group and keeps the latter from falling out of the gun. That is, the complete part does. I didn't want to take apart the rear of the magazine well and rebuild all that from scratch, so I just milled out a space:
I was using the wrong end mill and pretty much getting everything else wrong (notice the groove in the side rails from an incautious pass after something slipped on me!) Which explains why getting this far was eight solid hours of machining.
Well, I did re-mill and clean up the slot where the sight sits. I haven't made up my mind whether I'll try tap holes for screws, or just press-fit brass pins which I can then hammer out as rivets.
Sigh. I'm trying to avoid cutting too close to the magazine well because the rear slot would be a real pain to clean up. But based on what it all looks like now, I think I need to mill those side rails in a little further to properly expose the slot where the new part goes. And, yes, I am tempted to cut the entire old part away, but this is all hardened steel and it would be very hard to align it in bandsaw or anything else more suited to deep cuts than the manual mill.
Yes; at this point I've learned enough about how the weapon goes together, and how to derive the various dimensions of the parts, that I could now start from raw materials and fashion one completely from scratch. In aluminium, that would almost certainly be faster than all the work I've done so far re-welding and trying to clean up.
(Or even steel -- especially since you can get parts and parts kits that include, intact, the magazine holder, trunnion, and even lugs -- leaving pretty much the rear part of the tube and the side rails to fashion from scratch).
Tuesday, January 13, 2015
Lit: Books for Theatrical Sound Design
Just a quick answer to the question, "What are good books for the Sound Design student?" When I get the time I'll put proper IDSNs and links and such-like.
Sound Reinforcement Handbook -- Gary Davis and Ralph Jones, Yamaha/Hal Leonard Corporation.
This is the big one. There's a lot to know in the aesthetics of design and the methods and history of stage, but you can't actually do anything if you don't know how to run the gear. This book tells you the physical gear. It is a little behind the times for increasingly all-digital systems, but you are still going to run into microphones and speakers and mixing desks and the basic concepts are going to hold whether you are using an SM58 or MAXmsp.
Sound and Music for the Theater -- Deena Kaye and James LeBrecht, Focal Press
I doubt it is the only good book out there on what sound effects and scores do for the stage play, but I have it, and it is a good introduction to the basic concepts, ways to approach and organize a design, and some nice anecdotes about how to deal with the practical aspects of insane directors, broken equipment, and so forth.
Instrumentation/Orchestration -- Alfred Blatter
Musical Instruments of the World -- Facts on File
What Makes Music Work -- Phillip Seyer, Allan Novick, Paul Harmon
You don't need to understand music theory, musicology, arrangement and orchestration, performance technique, ethnomusicology and music history. But it doesn't hurt: knowing something of what the pit is trying to do and what their choices are helps when mic'ing up a musical, and knowing something about historical and world musical traditions can help immensely when finding or creating the appropriate musical snippets for a play.
Complete Guide to Film Scoring -- Richard Davis
A History of Film Music -- (on loan at the moment, can't remember the author)
The Complete Guide to Game Audio -- Aaron Marks
Also not saying you need to understand film and game audio, but they have a wealth of approaches, techniques, solutions, and tricks that can be quite useful. There is little written about theatrical sound in specific, really; much of what we do is derived from other, larger activities (such as band sound and FOH engineering).
Wanna Flyyy with the Eagle, Make PCs...
...Try out the Eagle 'cause the non-profit version's free!

After reading that Fritzing was not recommended for SMT components, I loaded up EagleCAD again to give it a proper try this time. And I like it. Fritzing is still low-key, friendly, and amusing, and the graphics for the Breadboard mode are excellent for things like Instructables and also for working out gross component arrangement. But Eagle is serious CAD, with lots of good tools.
The organization of the parts libraries still confuses me, but I was able to at least create the custom parts I needed and place them in a directory where I could find them again. Above is the first attempt by the auto-router -- it looks surprisingly good, but I suspect I'll be hand-routing some traces.
Now that I've seen it is rout-able, I can work on the footprint a little more. I'm hoping to get it to the same width as a 2-pack of AAA batteries (even though my optimum design is now 3xAAA -- and that is also the version which is getting tested in a currently-running show).
The SOT-89 packages for the AMC7135's are the only SMDs on the board. I may turn some of the other discretes and blinkenlights into SMT components, but the big footprint hog right now is the I/O pins. I have them spaced right now for breadboard compatibility, but it may make more sense to move and condense them.
I'm also tempted to run off a 3-channel version with an ATtiny85 CPU. Smaller, sure, but also less parts to get wrong on my first venture into getting a board fabbed, and soldering my first SMDs.
Saturday, January 10, 2015
Computer-AIDED Design
There's still a trend in some circles to think of 3d printing, CNC, et al as being "too easy." That instead of all the work of carving and sanding and machining, you just "press a button."
Well, like the story of Basho and the Fish, getting to the point where you press that button is actually a lot of work. What these new tools are, is just another form of jig (or "tooling," if you want to use the fancy aerospace term).
I used a lot of jigs when I was a full-time theater carpenter (that is, a set builder). We'd spray-paint them red so they didn't get thrown out by accident. One show I had to make a whole bunch of fake bolt heads as decorations for some massive girders. Underside of a bridge or something; I don't remember now. Ripped down 1x to 2", cut it into 2" squares, cut off the corners to make a hex shape, then routed around the top. I spent most of a day making a complicated jig that would hold the thing in place for all the cuts and routes.
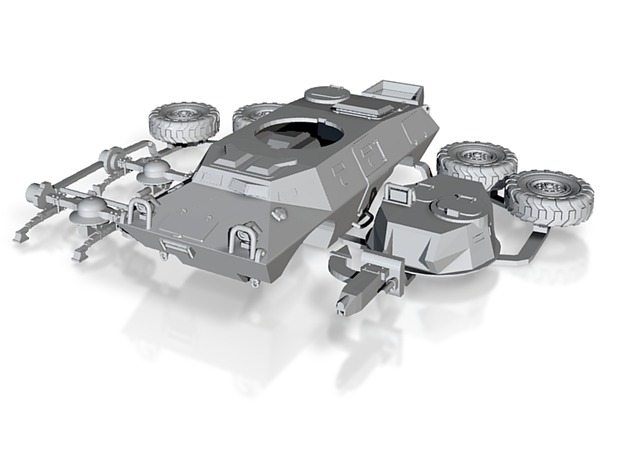 Which is the thing, here; if you save any time with 3d printing or CNC machining, it is when you are building multiple copies. The savings, if any, are one of those economies of scale. I could have scratch-built a V150 armored car in less time than it took to make the 3d model. But since the model was made, we've printed four or five of them (plus there's at least two others out in the world).
And, well, you'd think -- for all that computing power you have to throw behind the design process, it still takes horrendously long.
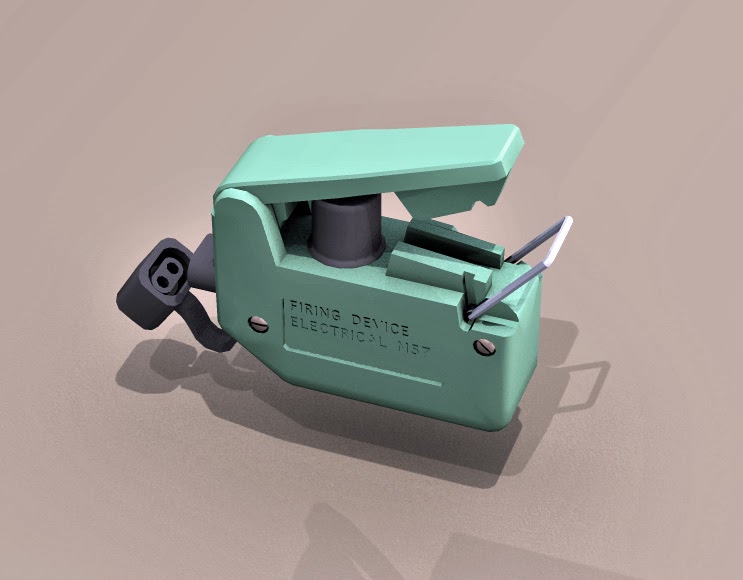 On the 3d side, I've been working on my M57 "Clacker" model to make it 3d-printable. Apparently, some people have used them to make an e-cigarette! Seems like it would be useful anyhow to work up as some sort of general-purpose button-powered prop. But low priority project. Also working on the V150 model again. Someone over at Shapeways has an interest in seeing it in 1/18th scale. Which requires a higher level of detail than is currently in the model, but I have also slowly been working it up as a Poser version anyhow, so that's been happening already.
My old penlight finally died and I thought of yet another project that would be very cute. To wit; a penlight in the shape of a Sonic Screwdriver. But not any of the existing ones; a very small one built around a single AAA cell -- not the dual AA versions which won't fit in a pocket, or the ones using weird rare batteries that are a pain to replace. AAA, with a boost circuit driving half a watt of narrow-beam colored light (we almost always use colored light backstage. Tradition.)
But that requires going into the CAD software and figuring out a casing that can be printed or machined that fits the available components and looks at least something like the sonic of choice (I'm partial to a War Doctor sonic, myself, which is basically a Tom Baker sonic with a different top).
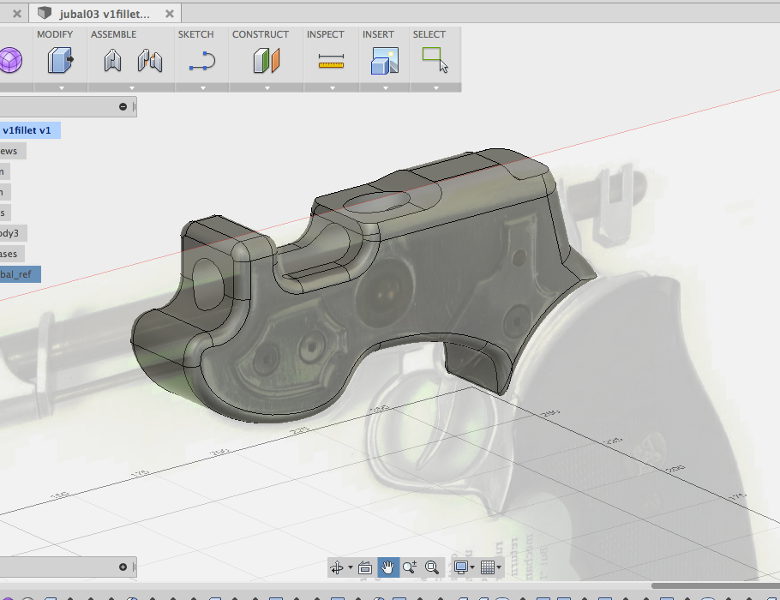
Also back on one of those rear burners is the Jubal Early CNC model. And a turned flash hider for a "King of the Rocketmen" pistol.
 I just got another order for "Aliens" grenades. And since I'm overdue for it, going to revisit the process and some of the measurements. And purchase some new lathe tools. And that's not (mostly) on the computer, but I still think about building my own versions of some of the variant ammunition, and that's probably best done in a CAD application. With an eye towards printing, casting, or even perhaps injection molding custom caps.
 Although I need to order metal and tooling now, the priority machining task is finishing up the Suomi. I have been reading about silver solder and I think I might fill some of the smaller remaining voids with that and deal with the way it will alter the finish in those locations. They are mostly hidden anyhow, so I think it may be okay. Most of the work on this is pretty primitive, though. I did a lot of the milling entirely by eye. Heck -- I didn't even calculate my feeds and speeds, but just set up the mill by ear and instinct.
I've been really pushing on the DuckLight PCB -- working it up in Fritzing at the moment, which seems to be working and saves me the time of learning Eagle properly. Using the prototype in another show helped a lot. I'm getting excited about this thing and think it may be a very useful little trick for the prop-maker's arsenal.
I'm going with an ATtiny84 now. Four channels of software PWM current-controlled to 350ma means you can run a cheap RGB "Cree" LED, an RGBW, or a single-channel LED of up to three watts in bridging mode. ICSP header for the experienced programmer, software serial I/O...and there's enough I/O pins left on the '84 to put in a Program Select button. So the end-user can dial up a bunch of basic effects right on the board, without needing to connect up a computer. The XBee option will be on a daughterboard, though; there's just no space for the pin footprint.
I fully intend this to be offered in kit form. And at this point I've solved enough of the electronics and programming issues I really am ready to make up the first batch of PCB's.
 If that wasn't enough light, I have a second order for the LED stage lights I built. Now I just need to get the client to pay a little better piece-work for assembling them...
Well, like the story of Basho and the Fish, getting to the point where you press that button is actually a lot of work. What these new tools are, is just another form of jig (or "tooling," if you want to use the fancy aerospace term).
I used a lot of jigs when I was a full-time theater carpenter (that is, a set builder). We'd spray-paint them red so they didn't get thrown out by accident. One show I had to make a whole bunch of fake bolt heads as decorations for some massive girders. Underside of a bridge or something; I don't remember now. Ripped down 1x to 2", cut it into 2" squares, cut off the corners to make a hex shape, then routed around the top. I spent most of a day making a complicated jig that would hold the thing in place for all the cuts and routes.
Which is the thing, here; if you save any time with 3d printing or CNC machining, it is when you are building multiple copies. The savings, if any, are one of those economies of scale. I could have scratch-built a V150 armored car in less time than it took to make the 3d model. But since the model was made, we've printed four or five of them (plus there's at least two others out in the world).And, well, you'd think -- for all that computing power you have to throw behind the design process, it still takes horrendously long.
On the 3d side, I've been working on my M57 "Clacker" model to make it 3d-printable. Apparently, some people have used them to make an e-cigarette! Seems like it would be useful anyhow to work up as some sort of general-purpose button-powered prop. But low priority project. Also working on the V150 model again. Someone over at Shapeways has an interest in seeing it in 1/18th scale. Which requires a higher level of detail than is currently in the model, but I have also slowly been working it up as a Poser version anyhow, so that's been happening already.My old penlight finally died and I thought of yet another project that would be very cute. To wit; a penlight in the shape of a Sonic Screwdriver. But not any of the existing ones; a very small one built around a single AAA cell -- not the dual AA versions which won't fit in a pocket, or the ones using weird rare batteries that are a pain to replace. AAA, with a boost circuit driving half a watt of narrow-beam colored light (we almost always use colored light backstage. Tradition.)
But that requires going into the CAD software and figuring out a casing that can be printed or machined that fits the available components and looks at least something like the sonic of choice (I'm partial to a War Doctor sonic, myself, which is basically a Tom Baker sonic with a different top).
Also back on one of those rear burners is the Jubal Early CNC model. And a turned flash hider for a "King of the Rocketmen" pistol.
I just got another order for "Aliens" grenades. And since I'm overdue for it, going to revisit the process and some of the measurements. And purchase some new lathe tools. And that's not (mostly) on the computer, but I still think about building my own versions of some of the variant ammunition, and that's probably best done in a CAD application. With an eye towards printing, casting, or even perhaps injection molding custom caps.Although I need to order metal and tooling now, the priority machining task is finishing up the Suomi. I have been reading about silver solder and I think I might fill some of the smaller remaining voids with that and deal with the way it will alter the finish in those locations. They are mostly hidden anyhow, so I think it may be okay. Most of the work on this is pretty primitive, though. I did a lot of the milling entirely by eye. Heck -- I didn't even calculate my feeds and speeds, but just set up the mill by ear and instinct.I've been really pushing on the DuckLight PCB -- working it up in Fritzing at the moment, which seems to be working and saves me the time of learning Eagle properly. Using the prototype in another show helped a lot. I'm getting excited about this thing and think it may be a very useful little trick for the prop-maker's arsenal.
I'm going with an ATtiny84 now. Four channels of software PWM current-controlled to 350ma means you can run a cheap RGB "Cree" LED, an RGBW, or a single-channel LED of up to three watts in bridging mode. ICSP header for the experienced programmer, software serial I/O...and there's enough I/O pins left on the '84 to put in a Program Select button. So the end-user can dial up a bunch of basic effects right on the board, without needing to connect up a computer. The XBee option will be on a daughterboard, though; there's just no space for the pin footprint.
I fully intend this to be offered in kit form. And at this point I've solved enough of the electronics and programming issues I really am ready to make up the first batch of PCB's.
If that wasn't enough light, I have a second order for the LED stage lights I built. Now I just need to get the client to pay a little better piece-work for assembling them...Friday, January 9, 2015
Another Opening, Another Show
Well, feh.
The design basically failed. The show looks okay, though, and the client is happy.
What I had to work with is under thirty instruments, and about twenty channels of underpowered dimmers. The stage is narrow yet oddly shallow, with the cyclorama placed too close upstage of the scenery, and the borders and proscenium are low enough to prevent anything upstage of the Second House Electric from shooting very far anyhow.
The most important emotional idea I was trying to get across is dirt farming in the Texas Panhandle; hot, dry, big cloudless sky and unshaded sunlight. The play takes place over the 1930's drought and resulting Dust Bowl, thus I also wanted to show the darkened sky and near black-out conditions of the height of the dust storms, the increasing desperation and poverty, and as well several scenes that take place indoors, pre-electrification...plus a couple of scenes at night or in a romantic sunset.
What I chose as an overall scheme was a key light, angled slightly from House Left, in a pale gold; this represents direct sunlight, and is paired with a couple of gobos in the same direction and color; one with foliage for early in the play when there are still growing things around the farmhouse, and one with a window opening for interior scenes in a church lit by natural light. (If I had the instruments, the latter would be two systems, one in Auction House/Courthouse windows across the front of the stage, the other in a central Church window).
The second system was a flat front of fresnels in a neutral lavender; this takes over progressively in all scenes when direct sunlight is presumed blocked. A third system is a backlight in a warm amber.
This latter is the first real problem. I intended it to represent generically the heat of the day, and it does suggest that. But it is also so bright and amber it feels like direct sunlight in those scenes when I'm pretending the sun is down or occluded. It is also just a bit too romantic-looking; any scene with that back light up feels too "nice" for the grimmer portions of the play.
My flat front also has the issues alluded to earlier; I can't push coverage up into the upstage corners of the set due to not being able to make the shallow angles required. Late in the day, I've been side-arming several of the fresnels down so they can reach further under the proscenium, but this just brings them into another problem area; they hit the cyclorama, casting shadows of scenery and actors against what is supposed to be the distant sky.
Fortunately, the lack of decent hanging positions for the flat front system left me with extra instruments, so I was able to re-purpose those towards a minimal but sufficient cool back instead -- using Rosco 65, "Daylight Blue," which is not that saturated or, in this context at least, romantic looking.
Also experimental in this hang was the Cyc Lights. In theater parlance, a Cyclorama is a seamless sheet of white or pale blue that extends across and masks the back wall. The cyc was important to this show because in the reference photographs of Dorothea Lange the near-cloudless sky is a dominating presence over the "Okies" she followed into California.
In any case, the usual Cyc Strips (long multi-element instruments) are not available. So we stuck five LED Par-Cans behind the ground row, with silk to try to diffuse and spread them a little. They don't blend wonderfully, but I've seen worse streaks on a cyc. The big downside to them turns out to be that, unlike my own software, they don't have a decent "gamma" map. So instead of being able to fade them softly down to black, they hop from dark to fairly bright -- and because each color channel responds slightly differently, they do so through several colors rather more saturated than desired.
There's at least one scene where I leave the cyc off completely because the "pop" of it coming on would distract from the slow cross-fade I've got going. But they work...and because they are DMX controlled, they don't use up any of my precious dimmers.
I did my homework. I went through the script collating every reference to location, time of day, time of year, and notated each scene as to what it was supposed to suggest. And then essentially ignored that work; the look of each scene is much more dictated by getting light on faces, and setting up the required contrasts with other scenes.
Particularly because this is such a small stage, isolation gets lost in most scenes. Which is a problem because it has a Classical arrangement of General Store on one side, Farmhouse on the other. The thing is, these two buildings are not supposed to share physical space. There is a good mile between them, at least. But when a scene that is supposed to take place in a dining room or auction hall expands to use the entire width of the stage, I end up with light on the two buildings and it looks like the scene is happening in a studio backlot sort of small-scale town.
This is also inevitable when my area plot is essentially three across, and one or two deep. I can set up a scene as taking place only around the Stage Right porch, but inevitably an actor will cross just one foot too far, and I'll have to add the rest of the stage.
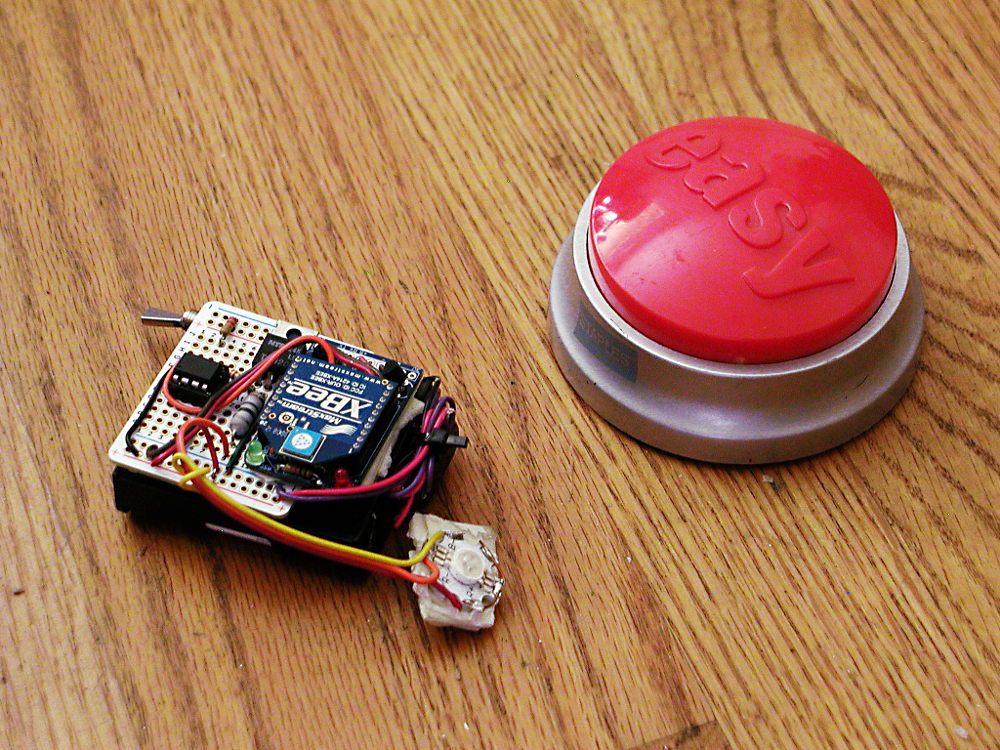
My proof-of-concept DuckLight is in another show now; stuck inside a vintage radio we're using as prop in a couple of scenes. The LED is attached behind the dial with double-stick tape, which might not be technically accurate but motivates the lines about "So what if we can't hear anything; it has a real pretty light."
And, yes -- forget the nuisance of programming a color by progressively tweaking code and uploading it, this board has no ICSP header so I had to pry the chip out every time I put new code into it. That made for a rather long development cycle just to get a color that looks sort of like vacuum tube glow and comes up slowly over about ten seconds.
I also had a cold solder joint somewhere. Eventually I gave up trying to track it down, and soldered up a new version on Adafruit perma-proto. This time with an ICSP header!
Oh, of course. Not even thirty instruments, and one has to fail on opening night. A front light. Down Stage Center.
The design basically failed. The show looks okay, though, and the client is happy.
What I had to work with is under thirty instruments, and about twenty channels of underpowered dimmers. The stage is narrow yet oddly shallow, with the cyclorama placed too close upstage of the scenery, and the borders and proscenium are low enough to prevent anything upstage of the Second House Electric from shooting very far anyhow.
The most important emotional idea I was trying to get across is dirt farming in the Texas Panhandle; hot, dry, big cloudless sky and unshaded sunlight. The play takes place over the 1930's drought and resulting Dust Bowl, thus I also wanted to show the darkened sky and near black-out conditions of the height of the dust storms, the increasing desperation and poverty, and as well several scenes that take place indoors, pre-electrification...plus a couple of scenes at night or in a romantic sunset.
What I chose as an overall scheme was a key light, angled slightly from House Left, in a pale gold; this represents direct sunlight, and is paired with a couple of gobos in the same direction and color; one with foliage for early in the play when there are still growing things around the farmhouse, and one with a window opening for interior scenes in a church lit by natural light. (If I had the instruments, the latter would be two systems, one in Auction House/Courthouse windows across the front of the stage, the other in a central Church window).
The second system was a flat front of fresnels in a neutral lavender; this takes over progressively in all scenes when direct sunlight is presumed blocked. A third system is a backlight in a warm amber.
This latter is the first real problem. I intended it to represent generically the heat of the day, and it does suggest that. But it is also so bright and amber it feels like direct sunlight in those scenes when I'm pretending the sun is down or occluded. It is also just a bit too romantic-looking; any scene with that back light up feels too "nice" for the grimmer portions of the play.
My flat front also has the issues alluded to earlier; I can't push coverage up into the upstage corners of the set due to not being able to make the shallow angles required. Late in the day, I've been side-arming several of the fresnels down so they can reach further under the proscenium, but this just brings them into another problem area; they hit the cyclorama, casting shadows of scenery and actors against what is supposed to be the distant sky.
Fortunately, the lack of decent hanging positions for the flat front system left me with extra instruments, so I was able to re-purpose those towards a minimal but sufficient cool back instead -- using Rosco 65, "Daylight Blue," which is not that saturated or, in this context at least, romantic looking.
Also experimental in this hang was the Cyc Lights. In theater parlance, a Cyclorama is a seamless sheet of white or pale blue that extends across and masks the back wall. The cyc was important to this show because in the reference photographs of Dorothea Lange the near-cloudless sky is a dominating presence over the "Okies" she followed into California.
In any case, the usual Cyc Strips (long multi-element instruments) are not available. So we stuck five LED Par-Cans behind the ground row, with silk to try to diffuse and spread them a little. They don't blend wonderfully, but I've seen worse streaks on a cyc. The big downside to them turns out to be that, unlike my own software, they don't have a decent "gamma" map. So instead of being able to fade them softly down to black, they hop from dark to fairly bright -- and because each color channel responds slightly differently, they do so through several colors rather more saturated than desired.
There's at least one scene where I leave the cyc off completely because the "pop" of it coming on would distract from the slow cross-fade I've got going. But they work...and because they are DMX controlled, they don't use up any of my precious dimmers.
I did my homework. I went through the script collating every reference to location, time of day, time of year, and notated each scene as to what it was supposed to suggest. And then essentially ignored that work; the look of each scene is much more dictated by getting light on faces, and setting up the required contrasts with other scenes.
Particularly because this is such a small stage, isolation gets lost in most scenes. Which is a problem because it has a Classical arrangement of General Store on one side, Farmhouse on the other. The thing is, these two buildings are not supposed to share physical space. There is a good mile between them, at least. But when a scene that is supposed to take place in a dining room or auction hall expands to use the entire width of the stage, I end up with light on the two buildings and it looks like the scene is happening in a studio backlot sort of small-scale town.
This is also inevitable when my area plot is essentially three across, and one or two deep. I can set up a scene as taking place only around the Stage Right porch, but inevitably an actor will cross just one foot too far, and I'll have to add the rest of the stage.
My proof-of-concept DuckLight is in another show now; stuck inside a vintage radio we're using as prop in a couple of scenes. The LED is attached behind the dial with double-stick tape, which might not be technically accurate but motivates the lines about "So what if we can't hear anything; it has a real pretty light."
And, yes -- forget the nuisance of programming a color by progressively tweaking code and uploading it, this board has no ICSP header so I had to pry the chip out every time I put new code into it. That made for a rather long development cycle just to get a color that looks sort of like vacuum tube glow and comes up slowly over about ten seconds.
I also had a cold solder joint somewhere. Eventually I gave up trying to track it down, and soldered up a new version on Adafruit perma-proto. This time with an ICSP header!
Oh, of course. Not even thirty instruments, and one has to fail on opening night. A front light. Down Stage Center.
Tuesday, January 6, 2015
Lighting Paperwork
Lighting Designers seem to like paperwork a lot. Howard Bay, in his book "Designing for the Stage," claims it is because they are frustrated engineers. He paints a vivid picture of being in tech while a harried LD leafs through sheet after sheet of channel schedules, dimmer schedules, hookup charts, strip charts, and so forth trying to figure out what one channel is controlling one mis-aimed and distracting light.
Don't get me wrong; paperwork is not itself bad. If you have to communicate with a Master Electrician and a crew of a dozen lampies, and you are juggling two-hundred plus instruments, it helps a lot to be able to generate specific charts and cut lists and strip plots. What I mean is be sensible; if you are hanging your own show, your paperwork only needs to document what you can't keep in your own memory, and if you only have six lights, you are unlikely to need much help.
My focus is the smaller theater, inventories that rarely exceed a hundred instruments, and small teams involved in the hang and focus (with the Lighting Designer usually in charge and on the deck during that labor). For that, the paperwork is less about communicating to others, and more about keeping track of things for your own needs.
And for that, I find the Magic Sheet rules.
I am all about derived data. With the exception of Specials, most lights in a plot are part of a System, or a family. And as such, their details are shared with the other lights in the system. If you are hanging a warm backlight, once you've put up one 6" fresnel with a cut of Rosco 14 in it, you hardly need to consult paperwork to know the next instrument will also be a 6" fresnel with x14 in it.
And this continues in depth. Assuming a bare stage, if you went four instruments across on the first electric, then there are probably four instruments across on the other pipes in the system as well. All you need to know is which electrics are being used. Even more; most plots are symmetrical, so if you hung all the Stage Right instruments, you know what the Stage Left part of the plot should look like.
After all, in the situation I described you are either doing paperwork for yourself, or for a small crew of equally skilled people who have you right there to answer questions. So it isn't necessary to document everything in detail.
More importantly, it isn't efficient to bury that information inside a surfeit of different kinds of paperwork. It should not be necessary for your technician to have to look through a channel schedule to figure out the focus point of the instrument that's on the strip plot, and then find a color schedule in order to gel it!
And this information logjam is not just for the hang and focus; it is even more essential to avoid when you are in Tech Rehearsal, trying to quickly adjust (or write from scratch!) cues when you have little desk space, little light, and little time. This is not a good place to have to consult three different pieces of paper in order to get a sconce warmer adjusted to the right intensity.
What a Magic Sheet is, is like a cartoon of a plot. My typical Magic Sheet has a sketch of the set for each major system, a glyph at the top corner indicating direction, color, and anything else that seems important to document about the particular instrumentation or lighting quality, and then channel numbers placed in each of the focus positions.
This makes it very quick to relate the acting area in question to the proper channels for the systems that light it. And it also provides a reminder of the boundaries of the systems; you can see quickly that all the cool backlight is from channels 25-39 and remove those from a daytime scene you are editing.
But it is also a wealth for derived data. Yes; you can go back to the plot, or to dimmer schedules and so forth. But, especially in a smaller space, most of the data is derivable from the sheet.
Say you have a dark spot in the front light. You know what the front system is supposed to be. The magic sheet tells you the Warms are channels 1-5 across the apron from left to right. It is quite obvious that channel 4 is the one that isn't coming up.
Flip into patch mode on any modern lighting board, and you discover the dimmer number. So you can look to see if the breaker is tripped, or some similar problem.
Also; you know which instrument is not coming on. In any sensible plot, that front light system is hung with identical instruments at a consistent spacing. Turn the system on, and which instrument isn't on is pretty obvious. You don't need to delve into the Light Plot to identify it. You need to put up a ladder and see what's going on with the instrument that isn't lit.
See, this is the trap that paperwork creates. People start relating to the virtual world, the solipsistic universe of the paperwork. They get all involved with trying to find "Instrument #15 on the First Electric" or "We need to trace cables to see what is plugged into Dimmer #45 because the paperwork says that is the one that Channel #4 brings up."
No, you need to fix the light that is out, and in many cases a mere glance will reveal which one it is. (And, yes...even if the plot is complicated and cramped, then just put up everything at 35 percent. The light that doesn't will then be obvious.)
The thing is, working from the reality of what is in the air, and relating to it in terms of systems, is going to catch what are really the common problems. To wit; that in the heat of hanging, someone marked down the wrong dimmer number. Or during focus, someone pulled out the plug. Or during Tech, the lamp burnt out. None of these are revealed in the solipsistic universe of the paperwork; they are all aspects of the map not resembling the territory.
At some arbitrary number of instruments I'll go to Light Plot. The biggest advantage to a Light Plot, in my mind, is that it makes it easy to figure out where you have room (and circuits!) to plug in the lights you need. It is also handy during a quick hang to be able to just go down a pipe going "fresnel, fresnel, fresnel, 6x9, another fresnel, two more 6x9's..."
I tend to schematize my Light Plots as well, though. I typically drop circuit and/or dimmer data on them while hanging, and maybe go back and add channels when everything is patched. Color, probably. Instrument type, certainly -- but often I don't even bother with the CAD, or even the nice template, but just use a sketch style I've derived from the latter.
Because again it is a reminder, not the thing and the whole of the thing, the tilt of the instrument combined with the color and position in the plot is enough to derive the aim point. The circuit is right on the plot and ends up in the light board software (or a physical patch board) so the relation to the channel is documented there -- as well as in the Magic Sheet. The instrument type is determined by similarity across a system and the known availability; if there are only four 6x12's in the building, you will know where they are going to end up, and it isn't necessary to mark every other ellipsoidal in the plot to make sure you remember it isn't one of the four.
In fact, the plot is what I figure out the physical layout, the angles, the potential interference with. It is what I use to hang the instruments. The last time it is used is to record circuits; after that, the patch is in the board and the identity of the lights is in the Magic Sheet; I focus, write cues, and diagnose problems from the Magic Sheet and the Light Plot goes back into the folder.
Yeah, these days, there are lots of lovely software packages, including some that will link up to your light board and present the data in a form that is more direct and easier to comprehend. And, yes, you really do need something like this if half your inventory is color-changers, LED pars, intelligent lights, and similar devices that can't be so easily put into a box of "moonlight wash from Stage Left."
But there are still a lot of small theaters, with primitive equipment which is itself falling apart. And for these, you need a way to organize your data that allows you to move swiftly; either to problem-solve, or to re-design your lighting design on the fly.
Friday, January 2, 2015
Lighting the Stage
So the books will often lead off with a description of the various kinds of lighting instruments. And often a short dissertation on Ohm's Law et al.
Naw; I'm going to lead off this brief overview of the subject by talking about the kinds of light. More than anything else, theatrical light is about control. As important as it is to put lights on actors, it is equally important not to put light on random walls, audience, bits of backstage. Check out a theater set some time under work lights; the effect is quite different! Theatrical lighting starts by bringing in light just to those elements we wish to reveal.
That's why almost all of our tools are directional. But even then, they fall into two rough groups; those that are just directional, and those that can be even more tightly controlled. The latter is the ellipsoidal, often called generically an "Ellipsoidal Reflector Spotlight" or "ERS", but also typically named by brand and/or size.
It is that reflector that gives the thing its peculiar quality. The reflector focuses light, you see. Brings it into a tight focus point within the housing of the machine. This allows the light to be precisely masked to keep it away from distracting spills of stray light, and even allows the light to be textured or patterned by placing steel-cut patterns into that same focal plane.
This also makes these instruments more expensive and a slight bit less efficient. This is why they are found side-by-side with the other work horse of the theater world, the fresnel. Technically, an instrument with a hemispherical reflector and a fresnel lens, but what this means is the light never falls through a focal point. It remains soft and fuzzy through the throw of the instrument.
Of course, both tools can take on some qualities of the other. The fresnel can be modified with Barn Doors or other devices that more softly mask off unwanted spill. The ellipsoidal can be thrown out of focus or (preferably) softened by placing sheets of diffusing material in front of the lens.
But these two general types really does cover the kind of tools you have to create the lighting look desired. Par cans, cyc strips, scoops, follow-spots, intelligent lights; all of these can be considered variations of one of these two themes. Powerful, diffuse light, or tightly controlled, focused light.
The qualities of light, they are many. Color, intensity, angle, texture. And even within these, the light from a Par Can is subtly different from the light from a fresnel, giving a different aesthetic quality (as well as different technical considerations).
But before we get to that, we have to recognize that theater is an artificial environment. In the real world, there are often hundreds of different light sources -- or sources with innate qualities that can't be properly simulated, such as the horizon-to-horizon glow of the daytime sky, or the sheer power and starkly parallel rays of direct sunlight.
Too, theater is, well, theatrical. Like every artificial recreation of experience, it is selective and amplified. Where in the real world the glow of the candles on a birthday cake are but one of many elements, to reproduce the aesthetic of our perceptual experience we need to reduce the picture to just that glow, and perhaps a little extra to define contours, provide a background, etc.
Human perception is filtered by our attention. The power or contrast of a birthday cake only plays correctly at living room distance. Across the void of fifty feet of audience seating, we have to exaggerate in order to properly mimic the effect.
Plus, of course, we don't have access to the full panoply of the world. In this cockpit we can not hope to hold the vasty fields of France; we can only suggest them with some earth and a tree or two. Especially when the lighting is asked to create dozens of different environments, you don't have the luxury of full simulations. You must make do with sketches.
Lighting, of course, is able to make use of an established language. You can light the actors from behind with bright blue and the audience will accept the conceit that they are supposed to be in pitch black. You can cast the shapes of light through leaves and the audience will accept that there is shrubbery around (even if they can't see it). The bright circle of a follow-spot is perfectly accepted as belonging with a sprightly song, even if it no more matches any non-theatrical human experience than the way random passer-by's suddenly break into flawless choreography.
So, aesthetically, one of your goals is to recreate the feel of a lighting environment (or produce one that is interesting to view.) Some are as obvious as the flickering neon sign outside the seedy detective's office (or the way light falls through the slats, casting a zebra-pattern of shadows on the detective's face). Many are not.
It is tempting to think in terms of diagetics here. That a night scene under a streetlamp can be lit as if that streetlamp is a primary source. Or an in-one (aka, a short scene played in front of the show curtain, with minimal or no scenery) can pretend to that same kind of environment, up to and including the yellow pool of a streetlight that is not being provided by scenery.
And other scenes, light simply exists because it needs to be there; it isn't directly representational of anything within the world of the play.
In my experience, the trick with these sorts of effects -- where the look is dominated by one strong element -- is to provide balancing elements to fill in what would otherwise be dark spots. These may or may not be equally representational.
To return to our streetlight example, pair the pool of yellow light with a cool backlight that can variously be taken as reflected light of the city, or moonlight, or just a general "the light of all dark places." But since both of these angles are high on the actor (and one is behind her) we add one more angle; something unmotivated but necessary to light up that all-important face and expressions just a little.
This works best, as I said, when you bring in just enough to make the total effect pleasing, but never so much you wipe out the strong presence of that element you've chosen to emphasize.
Technically, figuring this out looks a lot like a color wheel. You will usually want to take a ruler and bring your supporting lights in at a significant angle to that first light. And you will want to chose their color (and, often, their quality) to complement it as well. 45' is a good rule of thumb in the horizontal, angle to the audience permitting.
This significant angle works in the colors, too. Against that cool backlight, the face light should be a warm, or at least a neutral lavender. The closer your colors cluster, the more you carve out a distinct corner for this micro-look.
Of course this same scheme easily expands to cover the stage, as I explained in an earlier essay. Once you've established a balance of the various lights entering a specific snippet, you can copy those lights over and over again across the width of a stage to create your basic plot.
But here's another division I didn't touch on in the previous essay. Some scenes will make use of the whole stage width, and thus the lighting for those is derived from your area plot (plus whatever use you can make of color washes, gobo washes, and the like). Other scenes are more restricted in stage space. They do not need the entire stage. And this is extremely useful, because these smaller scenes can become micro-plots. You don't need to re-create the "man under a streetlamp" across forty feet of stage if there is only one lamp and one man.
If many of your special needs (in terms of different locations, emotions, times of day, etc.) are also small, tight scenes, you can get by with just one overall look and a handful of specials to cover the oddballs.
And a few specials go a long ways. If you can bring out something the audience hasn't seen before at least twice during the length of the play, you will make the audience feel as if the lighting had variety to offer.
And, yes, there are also some scenes that are peculiar in their own ways -- an extended chase scene through a darkened garden, for instance, or perhaps a dream ballet, or a storm -- where you do have to cover the entire width of the stage but you are relieved from having to light it well. Look out for these scenes where you can pull up a wash or a slash of light or something else peculiar -- and not have to hang twenty instruments to cover the whole width of the stage in smooth pleasing front light.
Lastly, never forget that lights are dynamic. The human eye is constantly adjusting its expectations, its acclimation, its white point. If you really need a scene to read as bright, work on the scenes around it to make them subtly dimmer. Everything is perceived in terms of contrast; to what was seen before, to what is seen around it. Given an entire act to pull the lighting down into the rose-colored shade Blanche DuBois asks for, a single naked 100watt lightbulb is blinding.
Thursday, January 1, 2015
Quest for Props
ThinkGeek had a sale on the Ion Nebulizer and Vox from "Galaxy Quest." Unlike the TOS phaser I picked up a few months ago, these are unassembled ABS plastic kits. Not sure when I would have time to assemble them, though!
Also just re-read a couple of the Telzy Amberdon/Trigger Argee stories by James Schmidtz. I'd still like to make one of the emblematic weapons from written science fiction -- weapons (or other props) that haven't been realized on screen. Various random ones leap to mind.
For Trigger, it is her "beloved Denton." No real description is given, but it can be inferred from business such as her hiding it in a spring-loaded holster built into a cosmetics purse that it isn't huge. It is, however, at least large enough to be accurately sighted; Trigger has no qualms about making a shot at fifty yards. Similar business suggests it doesn't have a lot of bits that stick out and could get caught on clothing, but it isn't described as being sleek or slim. Just as a readily recognizable boutique side-arm; expensive, but worth it to the professional. It also may have indications as to the usual owners; sportsmen, hunters, and well-to-do ranchers on remote planets with larger than usual wildlife. All in all, probably not a pocket pistol.
A rather different affect is given by Kimball Kinnison's signature twin DeLameters, in the various Lenseman stories. These are described as a standard side-arm for the Patrol; available to civilians but considered a bit over-powered for casual carry. In character as asteroid miner "Wild Bill" Kinnison carries them openly (and uses them several times to good effect). In a different scene, Worsel describes them as big, loud, and inefficient, but the latter at least is just Worsel. The general feel seems to me like a long-barrel Colt or something with a similarly no-nonsense mass of metal that has seen good use. Kinnison may be an excellent shot, but the major intimidation factor of the DeLameters is their sheer destructive power. One often gets the impression of more like a machine-pistol; too heavy for most people to tote one-handed.
For a complete change of style, the not-particularly-fond-of-weapons Andre Norton seems to make a point of describing mass manufacture, plastics and composites, standardized power packs and (although I may be reading too much here) not necessarily the best ergonomics. That, and her tendency to describe much of her tech in terms of the closest Platonic Solid makes me think the standard Beamer and Stunner have simplified shapes without much surface detail. And I can't help think that many of them are shiny plastic or otherwise have a similar feel that is closer to consumer appliance than it is to weaponry.
Just random thoughts. I'm too far behind to want to take on new projects. So better to write them down and thus put them out of my mind.
Goldilocks Problems
I'm in the middle of a lighting design for a play. My problem is I have almost enough instruments and dimmers. Or, rather, I have about 2/3 of what I would need for a proper design, but too many resources to be satisfied with a minimal approach.
Lighting for the stage, as the books say, wants to achieve several not always compatible goals. Primary among them is to be able to see the actors. But this is a more subtle goal, in that actually you want to focus on the actors and reveal their forms and expressions (as appropriate). Sticking a bright light in the middle of the room does not achieve this goal particularly well.
The books also go on to give setting the place, the season, the time of day, and the emotional location of the play as well. But here is where I differ. Not to say that these aren't laudable goals. But, particularly in a real-world lighting situation where you struggle with less than infinite resources, the real trick is to find those elements of the play that are either difficult to indicate via costumes and scenery, or that require reinforcement.
And, more often then not, your task is only partly about making a specific statement about a specific place (or mood, or time, or etc); is it as much or more about providing the contrast.
Almost every play has contrasts running through it. Scenes in Verona versus scenes in the Forest of Arden. Scenes at night versus scenes during the day. Scenes in spring versus scenes in winter. Scenes of joy versus scenes of sorrow. Scenes of spectacle versus scenes of intimacy.
So in lighting "Oaklahoma!" your task is partly to provide the wide sweeping expanse of prairie where the wind goes sweeping down the plain and the corn grows as high as an elephant's eye. It is also to clearly differentiate the dark, sordid little shack where Judd lives his furtive life. And as well make it clear that the Dream Ballet is indeed a dream.
For "Under Milk Wood" the task is even more detailed; the exact time of day is essential to every moment of the play. The changing of the hours is an essential detail and an important character, and it is one that is realized largely by lighting.
If you are doing "Peter Pan" with a full complement of theatrical tricks, then there is enough wood panelling, foliage, and naval fittings to clearly differentiate Darling's house, Island, and Hook's Ship from each other. If you are doing it on a bare unit set, or something else more schematic, then lighting may be called to fill in enough of these different environments to draw the audience into them.
So those are the two intermingled tasks (or, rather, the primary two of an entire host of entangled goals) that I tackle first in any lighting design; the overall look (if any) and the way in which that look or looks can be differentiated.
When you have practically no assets to light with, my first fall-back is an area plot and a few specials. You have to light the actors one way or another. And you often want the ability to focus in on only one part of the stage, either for dramatic focus, or because a specific scene is restricted to only part of a unit set. So an area plot buys you a lot of lighting options.
Area plot meaning, basically, divide the acting area into spots that are roughly the size of the beam cast by the typical lighting instrument in your inventory, and cover each of these spots with at least one lighting instrument. Assign dimmers so, at the very least, groups can be brought up individually (such as, all Stage Left, or just the Center...the more dimmers, the more you move towards having individual control of each and every area).
In the very smallest of settings this may just be one front light per area. If you have the inventory, a pair of lights angled to each other, but circuited together. As the number of available dimmers increase, the options you build in increase; the next stage is to split the pairs so you can change their relative levels. If the two sides are hung with different colors, you get a cheap ability to weight the scenes towards one hue or the other.
A more economical option is to add washes; these are large swaths of coverage that include several areas (or even the entire stage) at one sweep, and do so with more saturated colors. In the most budget-stricken situations, par-cans may be all you have for this. The old stalwart the 6" fresnel also works. If you are lucky to have lots of extra ellipsoidals, though, you can add to the options a gobo or pattern "wash" as one of the options. This is a very cheap way of achieving the "now we are in the woods, now we are out of the woods" effect.
The other really big bang for the buck is backlight. Especially if you can double-hang it; give yourself a warm and a cool. With an area plot in a neutral color and two colors of backlight you can get an astounding variety of feels, plus the ability to change the look mid-play for all that helpful differentiation. Add one or two very selective specials and you can light almost any play.
However. Somewhere in my list of goals -- somewhere below "affordable" and "gets finished before opening night" -- is to make lighting that is unique to that production. That isn't a generic solution shoe-horned in. For that, my usual step both in reduced lighting designs and when I have a little more budget to play with is to tackle the area problem in a manner that says more about the specifics of that play.
Instead of hanging a neutral area plot and then trying to add something on top, I work with the basic shape. I remember the set for a Neil Simon that was dominated by tall windows; I integrated window special with backlight so there was always this sense of light coming from the windows into the apartment. For both productions of "Dial M" and "Streetcar" I worked within implicit light sources; the practical desk lamps and so forth of the former, and the harsh revealing sunlight Blanche worked so hard to hide herself from in the latter. And for a "Midsummer" it was the light of a full faerie Moon. Then on top of these very defined sources was general fill in more neutral colors.
Even for something as simple as "Funny Thing Happened on the Way to the Forum" in a standing set, you can take a page from the same classical tradition and light as if the harbor were Stage Left and Rome were Stage Right. In short, a straight McCandless area plot; but one in which you make a conscious choice of the "warm" and "cool" in a way that supports the production's conceits.
In most designs, the "aha" moment for me is when I've managed to draw what I call a Rose; a diagram of the essential lighting directions with quality and color indicated. The Rose may be representational as in the above examples, or rather less so; for a "Snoopy!!!", for instance, I simply double-hung in warm and cool (that is, warm and cool came from both sides, mixing to white; but a vibrant sort of white light that makes colors pop and edges more defined).
I can pretty much hang a show based on just the rose. With the rose and an area plot, I can quickly figure out the necessary inventory. And with the rose and an area plot, I can also document everything I need to know in a couple of magic sheets.
Trouble is, the show I'm doing right now has too few lights to carry out what I need for a proper rose. I can, with some effort, just barely achieve one overall look, but there are several contrasts that I think are important.
Really, this show has everything. There's interior and exterior scenes. Nighttime and daytime (and romantic sunsets, to boot). Summer and winter. Even some subtler ones; artificial -- electric -- light versus natural light leaking into a pre-electrification farmhouse.
And I'm willing to let a lot of these go. Because this might be a unit set, and it might be a laudable goal to help the audience understand when a scene is indoors and when one is outdoors, but the show is about the coming of drought and then the Dust Bowl. And those, and the wide plains of Texas and the merciless sun, are the emotional center of the show. To take the audience through the story properly, I need more than anything else to help them to see the land drying out and the green crops withering, followed by the parched topsoil being raised by the wind into a dark cloud that blots out the sun.
And I have 2/3 of the instruments, circuits, dimmers I need to really tell this. Yet too many resources to be satisfied with not trying to do so anyways.
Subscribe to:
Posts (Atom)