Showing posts with label 3D. Show all posts

Friday, September 4, 2020

Howay, man, I'm paggered but.

 Been a week of slow progress and small disappointments.

Take today. IT was dumping some old Mac Mini's, and I snagged one. Was thinking of setting it up for recording at the shop (so I can play trumpet parts without my neighbors screaming at me.) Had some company stuff on it. No problem, says Apple. Erase the hard disk, it will boot up from the restore sector and you can download the factory original OS right off the net.

Except no. Turns out Apple was either lying, have changed it, or were incomplete about it. But that took an hour or two of pressing buttons and hoping that it would actually work this time. So now I have a brick, and a copy of Lion on order just in case I feel up for making a boot disk for it.

My laptop has been running hot. Hot enough so it automatically cranks down the CPU cycles, which causes videos to stutter and CPU-intense applications like 3D stuff to get, well, ugly. That actually took a while to figure out. The same IT dump included a broken cooling pad so that got me thinking I should just order one of those.

Amazon lost the order. While it was wandering around the boondocks I thought a little harder and finally dug into it and opening up the laptop to clean out the vents and re-do the thermal paste turns out to not be quite as scary as I thought. But needs some special tools. So I ordered those.

And got to thinking about that. If I'm opening it up, why not replace the ailing optical drive, increase the RAM to maximum, and even put in an SSD? 

I got inspired enough I opened it up anyhow and blew out some of the dust. And then the cooling pad arrived anyhow so I'm using that for now.

***

And then there's software. Carrara no longer ran after the last OS "upgrade" and I had enough problems with it already. So I'd purchased Cheetah3D and that was good enough to knock off the calyx model I needed for the last cover.

The next model should have been simple. This was the section of Underground platform I needed for the next book cover. But it was a freaking pain to do in Cheetah. The UVmapper is not wonderful, there's no polygon groups (at least, not accessible), it can't manage to keep scale constant (I brought a model back out of the render to tweak, and it got thrown into a different scale and position the moment it had been opened by Cheetah.) And the poly tools -- well they basically don't exist. The thing is barely functional as a prims modeler and is useless for polys.

Well, fine. This time I'm finally going to learn Blender.

Oh, yeah. And while I was too sick and stupid to work on the novel over last weekend (and part of the week) I was messing around with Fallout 4. I've basically stopped playing the game. I think I spent as much time in console mode as out. "Player.additem" and "tcl" and the like are right at my fingertips.

More software skills learned at some expense and like as not never to be used again. 

Yesterday was all about making the busted UVmap Cheetah crapped out actually work. And then being very annoyed by the behavior of the Paths tool in PhotoShop...why? Because part of Leslie Green's look was a distinctive serif font that is apparently quite recognizable. There is a commercial font "inspired" by it, called Beeching, but several of the characters are clearly wrong and the serifs are the wrong shape and for twenty bucks...!

So I hand-edited Baskerville and it is close enough. Gives me even more respect for the art of font, with how to mix the thins and the thicks for grace and readability and all that other stuff I didn't actually do. I pretty much made a dog's breakfast of it but I'm using it anyhow.

Now I just have to add in the drips and broken tiles and the proper oxblood and so on. Plus displacement and spec maps and you know the drill.

***

And create the other graphics. I'm willing to put it out with a mock-up cover just as long as I'm printing author's copies for the beta readers. Because I really want my dad checking on the Britishisms and especially the Geordie. Because that's exactly the sort of thing he likes doing.

As I go through pass after pass, cleaning up and tightening, each pass I take out more of the Geordie and make it more obvious what they are saying. I was editing the first pub scene, though, just before I stopped to blog, and that turned out to be very annoying since I could either have Liam speaking Geordie or contributing. Which was only part of the picture; the characters in this scene aren't coming across as distinct voices. I realized I could swap lines around, they were that generic. And that's not good.

I've also been taking a lot of notes about ways I want to go through and bring the main plot lines out and make them more obvious. One of them being the "dun dun duuun!" pass; the one where I have the story (if not Penny herself) recognize that An Adventure Has Just Begun.

***

And one other rescue from IT's pile works fine; that's a 3 TB external drive. Which again slipped through their clutches with all the data intact and I just got done erasing it.

Monday, August 10, 2020

Pitch?

 Preview of the revision-in-progress:


So that's with the Tomb of Atreus background, new render of the calyx with cleaner ground and no bullets and a godray that took ten hours of render time even at 1/4 resolution. I had the side lighting cut because Dad complained about it, but I needed them to detach the pot from the background so rendered those off as a new layer and comped that in this morning.

One thing PhotoShop does not do, apparently, is let you adjust the kerning on individual letters. I'm still delving into that, though. (You can, of course, turn them into a bitmap and manipulate that.) It's really a sort of awful font -- Diogenes, and it was free at least. But it has the "Greek without being too awkwardly Disney Hercules" look about it.

And I just realized I'm breaking another rule by using a serif font with a sans serif. Well, with a decorative. The serif font is Archaeocaps, which is a caps-only font with a slightly awkward look that does sort of put across "history, but modern."

It's a tough cover problem, trying to juggle archaeological thriller with detective cozy. The other is worse. I haven't quite figured out how to not make it look like a crime novel.

And rewrites are going very slowly.


***

During lunch at work today I took the bridge off my violin and thinned it down. The main reason was because the mute didn't fit and it was cutting into my practice opportunities.

It's funny. You look at the "how to fit a bridge" and they all explain how to use sandpaper. Then the old pros speak up, horrified that you'd use anything but a very sharp knife. Well, I'm lazy. I used sandpaper. Although I did use a knife to fit the feet a little better than they had been.

The bridge fit. The violin also sounded nicer, much nicer. I am not into the bright sound and I just splurged as well for a "non-whistling E string." And a set of nylon-core (not the really expensive silk-and-gut ones, though). Strings don't last forever anyhow, and my A string had just unravelled and I had to scrounge up the strings I had before I got the Alphayues.

One thing led to another and I swapped back the old chin rest and it is finally starting to feel like it is placed right on my shoulder. Still some tension though, mostly in the arm.

Anyhow!

I put the strings on but left them a little slack so everything could ease in a little. Came back a few hours later, and with no reference pitches in my ear over that entire period tuned in the E to as close as my tuner could register it.

So maybe I do have perfect pitch? I really need to spend some more time training it up.

Wednesday, December 11, 2019

Coverage

Just thought I'd collect in one place the process I went through in making a cover for an eBook.

The rest is below the fold because this is a long post.


Thursday, December 5, 2019

The Fox Knows Many Things

And this fox's brain is starting to hurt.

Or maybe that's the sinuses. The pot is mostly rendered. The dirty secret to 3d art is the endless round of render, tweak, render again. As the final render series is over 4K pixels, those are long renders. Built the Mauser ammo and dipped into the appropriately named Bullet physics engine to drop a pile of them on the ground. Poser11 continues to not play nicely with the spherical world map function; first IBL/HDRI light map didn't work properly, and now the reflections look like shit. Something has changed. I've been doing reflection maps since Poser9 at least.


At least I've learned; to render in lighting layers so I can fix them in the final comp, and to let small stuff go if I am confident I can fix it with a paint brush a lot faster than I can fix it in the 3D scene. (No examples will be forthcoming. I have some stuff at a...different...graphic sharing site under a different name.)


I mocked up the cover with all the words and other graphics (well, waiting on the final renders), read up on fonts, wrote the blurb, put my data into Kindle Direct Publishing, and started an author's web site.

There's a lot of work in packaging a book. On the book itself, I need to do a couple small edit passes, including one looking just at closing quotation marks to make sure my various softwares didn't monkey up the capitalization on dialogue attributions. ("I'm not angry!" she shouted, but, "I'm out of here." He left the room.) And make sure I've set all the flags correctly so scene and chapter breaks come where they belong.

The blurb needs to be edited and there are some other bits and pieces that need to get added to the full text that shows up on the Kindle page. And I have to take another pass with Rocket at categories and keywords -- especially since I am going KDP Select and I have some additional keywords I can plug in.

The final assembly of the cover, of course. And then once the eBook is completed, go through the formatting and cover art stage again to get the paperback version into the shop.

And there's the usual mess of bio, picture...advertising, publicity, links...

Oh, yeah. And I really want to have another book in the store as soon as possible. I really should have started this with something other than Athena Fox. Because I know better now what I need to plan and outline a novel, and the Athena Fox series is constrained to stay in more-or-less the real world and be as accurate as I can afford about it. I could knock out two volumes of The Tiki Stars in less time than it would take to complete the London research for Fox and Hounds. And that's not even counting taking a research trip of my own out there.

Especially attractive if I could come up with the five hundred quid to "volunteer" at an archaeological dig whilst I was there...

Saturday, November 30, 2019

Blowing the dust off

I finally started to get some figure-drawing memories back. Took it long enough.

Four passes for this one. So far. Still not sure how exactly I'm going to ink it to make black-figure (or perhaps red-figure if it ends up looking better) Attic pottery.

Broke out my old pencil set and did action lines in red, drew roughs and guides in blue. Then anatomy (you usually draw nude then add clothes). Then outfits and features. Then a fourth pass to go slightly Attic with the linework. In particular, a typical eye form.

I'm being slightly annoyed now because the basis of both Attic styles (and even the later polychrome ware) is a silhouette figure on solid background, with details picked out on top.

In black-figure, the artwork is added with slip; this is a slurry made of finer-grind clay than the larger grained and more porous clay of the body of the pot. The pot is fired in three stages; in the second phase, the entire pot is already black with oxide formation and the finer-grained slip vitrifies, sealing in the color. The last re-oxidation stage brings the base clay back to reds and oranges.

Details were incised into the slip (presumably before firing) allowing the red base to show through. The later red-figure added details in the same slip as the background. In both, and especially in the later polychrome, specially formulated glazes added white, red, and yellow to the mix.

Thing is, I did line work. Typical of line art, the figures are outlined and the outlines carry through, becoming internal details. I'm not really sure how to best prepare it for filling in the solid color areas in Gimp.

The problem I'm having in the black v. red is that the black-figure is closer to the right period (I'm not duplicating the actual pot of the story in any way...it was painted in the Orientalizing period, barely out of the Late Geometric and prior to the full development of black-figure ware). Black-figure is harder to read, though. Also, traditionally (but not always) women would be picked out with that white overglaze I mentioned but whereas people of the period would understand this as short hand for the women having a slightly paler, less-sunlight skin tone, for us it looks like a white girl facing off against a black guy. Not what I want on the cover.

Red-figure also usually has that same symbolism but I feel better about omitting it there. Red-figure is also a lot more identifiable to the general public as "Greek Pot." The only real drawback is I'm intending a black backdrop so I need to be able to separate pot from background. Well, that and I really do like the look of the red background -- it has a lot of nice texture -- and less of that shows through if it is used for the artwork and not the ground.

And I might change the pot. The Calyx Krater has that wide mouth that casts a big shadow. The Column Krater looks to my eye a little late period. There's also the Volute Krater, with the really fancy handles. But at that point, why not use an Amphorae?

Wednesday, November 20, 2019

UV nodes on a Grecian Urn

The calyx model is done. I think. Now I just have to paint up the textures. Artwork, bump map, spec map. And render, of course.


Cheetah3D is growing on me. The best thing, right now, is that no operation caused it to crash or cause the object to become un-editable. And that's way ahead of Carrara on it's best day. The lathe operation puts out a clean UVmap and the built-in tools did a decent job of mapping the handles, too.

I agree with the manual. The bezier spline controls are not good. Better to make a spline in an illustration program and import it. My first take at handles was with a spline sweep, but I didn't like the resulting profile.

So I did a box model, dropped it on a symmetry tool, and then dropped that on a subdiv smoothing tool. All worked just as I'd hoped, with just a little learning curve involved. I think the software could end up being fast, once I put some custom hotkeys into it (apparently you can).

>>>

Meanwhile an instrument I had in my wishlist went on open-box sale:


Yes; transverse flute, otherwise known as Western Concert Flute in C. Closed-hole, C foot, not the longer B foot. And, yes, it is pink. 

I fired up my camera because this is the last chance I am likely to have to attempt to play an unfamiliar family of instrument without any prior study. Yeah; that question has been floating around. My opinion is you can get a sound out of most plucked strings and hammered instruments, including percussion and keyboards. Single reed, a little harder. Double reed and brass, harder yet. Bowed strings, extremely difficult; yes, you can get noises, but not anything resembling the characteristic sound of the instrument.

That's the thing about the piano. Sure, a random child or small animal can't play a Chopin Etude, but when the press down a key, it sounds like, well, a piano. 

Turns out the transverse flute was tough for me. Apparently some people get the embouchure right away. Some don't. Apparently the book method is you detach the head joint and just play that for a week. Then you play the first octave until you are good with it. Then you move on to the second octave.

Five days and I'm playing scales but the second octave is not secure. A very breathy tone I'm not happy with. But as far as adding flute sounds to a composition -- yeah, I've got enough. I may work on it for a few more days but then it is back to the trumpet. Which, for all I may have said about it in the past, is oddly pleasing to play.

Tuesday, November 19, 2019

What is it about 3D?

Maybe it is because working on a 3-dimensional form is largely incompatible with the interface of flat display, keyboard, and mouse? Like doing orchestral synthesis; even with keyboard, breath controller, and CC knobs you just can't put the same nuances in you can with an orchestral instrument in your own hands?

It seems that every 3d application I have worked with re-invents the wheel. Usually badly.

They are largely unintuitive and often have clunky workflow -- the kind of design where something you do once an hour has a hotkey sequence but something you have to do several times a minute requires selecting from a drop-down menu.

And they lack useful manuals.

It took three days of searching to find anything resembling a manual for Cheetah3D. It is a third-party, fan-written, but fortunately free manual. Still, every resource I've seen seems to jump over those early basic steps that become so rote everyone forgets they have to be explained to the beginner.

"Adjust UV's by applying the Scale tool to your Selection..." Okay, great, but how do I select UVs in the first place? The regular selection tools don't seem to do anything. That's the sort of thing that gets skipped over.

Two things annoy me very much from both a workflow and a "why are we doing this" angle; first is that selection and manipulation are separate. So if you want to operate on more than one polygon, you click the Select tool from the menu bar, possibly go into Area or another Select Mode (which does NOT toggle, but only acts for the duration of one selection), then go back and click the Manipulate tool also in the menu bar, go back and pick up your selection (don't accidentally click outside!) and then you can move it.

Oh, except you didn't "Make editable" so nothing happens. That's the other thing. Like Fusion's weird way of splitting editable objects into different types, I don't understand the underlying philosophy behind "make editable" and what it functionally does.

There is one fix which should be easy to make and I hope will happen soon; grey out menu items that don't apply to the kind of object you are working with. As it is now, all the menus open up; even contextual menu pops up with every operation that could be done on any object. Carrara, for all that I have and would say (It is dead ware -- Don't buy it), gathered the applicable tools to the contextual menus.

Actually, I lied a little above. Although it too has unintuitive aspects to it, and lacks any and all useful documentation, Fusion360 is hyper-fast and efficient at navigation and basic operations. The hotkey camera and selection controls and the multi-purpose contextual handles meant I could model pretty much as fast as I could think.

I had a lifetime subscription at a locked-in rate that was quite affordable. So of course they broke the contract, jacked the price, offered me another "lifetime" subscription at about ten times as much, and from what I can tell from their official pages, broke that contract for the people who were foolish enough to sign for it and is now at something approaching what I pay for rent.

Carrara, meanwhile, no longer works under the last four or five upgrades to the MacOS and there is no support and no plans to ever make it work properly. Although they will still sell you an "upgrade" to 8.5 (yes -- throughout its history, Carrara almost never released patches. Instead they'd sell you the point upgrade for full price, promising that it would include the bug fixes for the last version. Which it never did.)

So, yeah, I'm pretty much waiting for Cheetah to get over the early teething problems, to get popular and powerful, at which point they will stab the user base in the back, sell out to Autocad, and jack the price out of range of the ordinary user. But for now, I think I can get it to do what I want.

At least it is easier to navigate than Blender.

Saturday, November 2, 2019

Hex and Cat

Found my Carrara 6 installer. It wouldn't install. OS is too new. But it turns out I had only hidden the Carrara 7 install, not actually deleted it. And it has broken fonts. Yes, they have a version 8.5 for a relatively low upgrade price but according to forums it doesn't change the font problem or fix any of the other bugs that have been with the thing since, oh, version 4.

By broken I mean the menus have no words and when text boxes pop up everything, even the buttons, are empty. So I tried anyway. I remember the program fairly well; that's the only reason I put up with it this long. And immediately hit the poor UI design, where everything is hard to see and the control handles are too tiny to grab and every time you miss a text box pops up to remind you that you missed -- a text box warning that needs to be clicked through but can not be disabled.

So that's not happening. Life is too short to suffer utter crap like that program.

Fusion360 would be lovely, but the "lasts forever" annual $50 was cancelled. Thanks, Autodesk. Now it is over $500 a year. And the thing is now so top-heavy and overloaded even the web site comes close to crashing.

So I guess I am going to buy Cheetah3d. It's been coming along. It has gotten more expensive, and it has a little of that too-eager proselytizing among the users and the same weird habit of not actually having a manual. But I've given it a trial spin....and it still beats Carrara.

Monday, June 26, 2017

copy morphs from actor to another

There were a couple hits recently with the above as a search term.

It is relatively easy -- if you read the question on way (and much harder if you read the question the other).

Morphs in the Poser universe are a set of deltas. Poser meshes are .obj files (or .obj format imbedded in a Poser native format like .pp2) that define a 3d surface via a set of vertices connected by edges and filled in with faces. Each vertice has 3 Cartesian coordinates; x, y, z.

A morph file must have an entry for every single vertice of the mesh it will be applied to, in the same order (called "winding order") that they are listed in the .obj file. Each of these entries is a move in the x, y, and z directions.

This is what give morphs their flexibility. A single morph can be applied at a fraction of the full move, a multiple of it, or even as a negative of that move. They can also be combined; the final position of the target vertice will be the result of the addition of all the vectors.


With that out of the way; to move a morph from one file to another merely involves copying the big chunk of text that lists all the deltas. Plus a control. So, basically, copy the entire channel; everything within the brackets following "targetGeom nameOfMorph".

I should note that as of...I think Poser 5...it was possible to store the actual morph data in an external file. I never worked with those in my prop creation so I can't advise there.

There were also and probably still are third-party helper applications, some of them running within Poser itself using Poser Python, to copy and paste (and also delete and rename) morphs for you.


However. The morph has to be for the same mesh. The exact same mesh. Even one missing vertice will cause it to barf. I have to make particular note of this because in the Poserverse, "Actor" is the name for an individual part. A leg or arm or individual gear in a gearbox or whatever. Poser uses the term "Figure" (or prop) to refer to a fully rigged instance within the workspace. And, no; a morph designed for a leg will not work on an arm, any more than a morph designed for V2 will work on V3.

Ah, but there is more. It may not be possible to copy a morph, but there are ways to duplicate it. Manually, by using magnets and other deformers in the Poser workspace or mesh modeling tools outside (again, be very, very careful not to change the number of vertices or their winding order). There are also automated tools. PhilC makes some amazing ones that run within Poser itself (using Poser Python, natch).

Sunday, March 12, 2017

It's a Poser, all right.

My site stats say several people have accessed the old posts on rigging for Poser (the 3d figure-centric animation and rendering software). So here's the long-delayed third post in the series.

Since I haven't used Poser in a while this is going to have less in the way of concrete examples. Also, the last version I used was 9 and it is up to 11 now. Poser tends to maintain backwards compatibility with previous tricks, though, even as it adds new ones (each generation of figures adds some new tricky way to deal with the perennial core problems like poke-through -- and let's not even get into DAZStudio which, while maintaining a large degree of compatibility with Poser-generated content, changes many of the paradigms).

So I will try to give examples, but, really, the best way to do this is to find a Poser file and reverse-engineer it. See how the stuff is actually formatted. Or go look online for one of the various useful guides. Once you know what is possible and what people tend to call it, it is a lot easier to find help on getting it right.

So  to it. The three Poser power tools I find the most useful for the Poser content I've created over the years are, in no particular order, altGeom, ERC, and MAT poses.


altGeom: 


Overview:


Way back in the early days of Poser, either the riggers, the software, or the projected customer base couldn't handle the idea of rigging every finger. So they created a way to swap out one pre-posed hand with another. The code was still in there when the first Millenial Figures arrived (the original Victoria 1 and Michael 1), and stayed in the code as the vestigial gen/noGen switch (aka, a way to change out the lower-torso mesh to one with or without the naughty bits).

altGeom is a handy way to change the shape of an item past what morphs allow you to do. Let me review for a moment; a morph is a list of deltas -- differences in position -- for the vertices already in the mesh. Applying a morph causes each vertice in the original mesh to move to a new position. Which is why you can dial in a morph as a percentage, including applying it extra strength or negatively -- in the latter, the vertices simply move in the opposite direction.


It is hard to see in that tiny video but the spring on the kick pedal here is using a morph to elongate. There are also morphs on the head of the drum so it "dimples" when hit.

 For the stage microphone set I made, every stand was equipped with an altGeom dial that provisioned it with either a standard mic clip, a large shock mount, or a null object (no clip at all).

Construction:


An altGeom consists of two things; a geometry reference to the different geometry, and the code to create the dial (which is subtly different from that used in a translate or morph dial).

Again to review; in all Poser figures and most props, you will find two pointers; the figure reference file, and the actor pointer. They look like this:

figureResFile :Runtime:Geometries:Princess:Stage_Mics:shortStand.obj


and

actor clipBase:8
{
storageOffset 0 0 0
geomHandlerGeom 13 clipBase 

The name you see there, "clipBase," needs to appear as a geometry group within the geometry file "shortStand.obj" The actual actor name, however, does not need to match; the geomHandlerGeom reference is the only place in Poser where it needs to see the actual name in the geometry file.

So...unlike everywhere else in the Poser universe, in a part with an altGeom there is an additional figure reference occurring inside the body of the actor;

alternateGeom    clipBase_2
{
name clipBase2
objFile 2101 :Runtime:Geometries:Princess:Stage_Mics:clipBaseALT.obj
}
defaultGeomName  clipBase_1

This is, of course, the actor in which occurs the actual dial for the altGeom. Take note of the "2101" there; this is a unique identifier that must be different from any other geometry used in the Poser scene. Starting above 1000 is strongly recommended.

And here is what the actual dial looks like:

geomChan handGeom
{
uniqueInterp
name change clip
initValue 0
hidden 1
forceLimits 1
min 0
max 2
trackingScale 0.045
keys
{
static  0
k  0  0
}
interpStyleLocked 1
valueOpDeltaAdd
Figure 8
clip:8
changeClip
deltaAddDelta 1.000000
valueOpDeltaAdd
Figure 8
BODY:8
changeClip
deltaAddDelta 1.000000
}

Something to note here; the limits are set to the number of actual geometries being referenced (including the original). "handGeom" must be used as the internal name for Poser to understand the unique nature of this dial, but the external, user-facing name can of course be of your choice.

Wrap-Up:

So -- a few other useful things here. The source file can contain other groups, and multiple figures can access the same alternate geometry. You can access the same group multiple times, too; I coded up but never got around to releasing a Climbing Wall where each potential hold was an actor containing the translate instructions to move the geometry into the right location on the wall. Thus, there was only one of each hold ever constructed; the cr2 did all the work of populating the wall. And, of course, the end user could set a new route merely by rotating a few dials.

Unlike morphs, the altGeom does not need to share the number or winding order of vertices. However, if the edges are nearly identical, Poser will still manage to weld the meshes together when it makes a figure. Also, of course, the morphs for one geometry won't work on the other. But, strangely, Poser will sometimes recognize this and will hide the dials belonging to one geometry and show dials you've created for the alternate geometry. This can not, however, be always trusted.

Alternatives: Instead of using an altGeom, some props are simpler to build by hiding the optional bits using the ability to hide (and not render) a specific actor. As far as I know you can't build a "show/hide" dial, but you can construct a one-click pose to do it. Similarly, translate and/or scaling could be used in an ERC dial to hide one optional bit and show a different one instead.


ERC:

Overview:


When Poser finally got around to adding fingers, they realized folding all of them individually to make a first was a pita. So they added a bit of code which is still in there; name your fingers with the same internal names as those on a standard Poser figure, and create a dial called "grasp," and they will all respond to it.


It actually worked on this cute guy, here, even though he only has two fingers on each hand! Well, this same trick was later leveraged in by the Poser designers to allow all the body shape morphs to be collected together in a single spot instead of having to go to every limb and digit turning dials individually.

In any case, it didn't take long for the community of Poser tinkerers to realize that this lowly bit of code had untapped powers. In essentials. and with some important exceptions, every dial in Poser can be slaved to another dial.

This is...absurd. Some users attempted to make sense of this cornucopia by coining the terms "JCM" for morphs that automatically dialed themselves in when a joint was moved (aka, bend the elbow on a Poser figure and the biceps muscle swells in a natural way), "JCT," "FBM" (Full Body Morphs, meaning a single dial will tweak in separate "muscular" morphs across multiple body parts), Super-Conforming, etc. But in general the blanket term "ERC" (for Extended Remote Control) is accepted.


Superconforming:


One of the uses to which ERC has been put is to allow clothing to magically take on the same morphs being applied to the figure below. The trouble with this happy picture being crosstalk. A simple search will turn up thousands of systems for fixing the crosstalk problem. They are all wrong. Simply put, Poser creates instancing on the fly as figures are added to the workspace, or as a scene file is read in. It is entirely impossible to force Poser to observe unique identifiers (outside of, perhaps, manipulating the Poser workspace in a more direct way using Poser Python tools).

So you can get superconforming or crosstalk to work for you once, say when creating a scene, but save it and restore, add something new, or even work on it too long and the references will be lost.

Poser is dumb. It looks in the first place it thinks of to find anything, from the matching master dial for an ERC slave code to the correct texture file. And it doesn't always start where you would expect or want it to start. Which means that even internal ERC channels can get "lost" and wander off when you have more than one figure in the scene.

That said, operating ERC between figures is an alarmingly powerful too with all sorts of wonderful potential.

Construction:


An ERC chain consists of three things; a slave dial, a target dial, and the code within the slave dial setting how it is to respond.

The master dial can be any kind of dial; a morph dial, a translate dial...or an empty dial. The code for creating a dial that doesn't do anything itself is as follows:

valueParm turnClip
{
name turn clip
initValue 0
hidden 0
forceLimits 1
min -360
max 360
trackingScale 0.2
keys
{
static  0
k  0  0
}
interpStyleLocked 0
}

The usual dial functions are here; internal name versus displayed name, the ability to hide the dial, and, yes, dials can be stacked (just don't point them at each other. Quickest way to crash Poser that has yet been discovered).

The code that makes the magic happen is all in the slave dial:

rotateZ zrot
{
name tilt clip
initValue 0
hidden 0
forceLimits 0
min -90
max 100
trackingScale 1
keys
{
static  0
k  0  0
}
interpStyleLocked 0
valueOpDeltaAdd
Figure 8
BODY:8
tiltClip
deltaAddDelta 1.000000
}

The key is in those last four lines. The source figure is, as I said, bollixed in by Poser when you load the figure. But you can at least try to push it in the right direction by making it match the actor numbers of the figure file. The next is the actor that contains the master dial, and the penultimate is the internal name of that dial. The last is the tracking scale.

Setting the tracking right is often key to getting ERC working right. For a full body morph, the tracking is usually 1=1; each body part morph dials up to the same amount. For trying a morph to a joint rotation, though, you need to know that Poser uses 1.0 as meaning a morph is full-on, but a rotation around a full circle appears in the Poser code as "360."

So, yes; one of the most useful functions of this is to take dials that might be spread all over the figure and mirror them in a place where they are easy to find. Incidentally, another Poser peccadillo it is doesn't always save channels in the BODY when the file is saved and retrieved. It is safer to consolidate your master dials in the top selected body part instead.

But since you can merge and stack dials, there's some fun tricks you can do:


Again, sorry for the poor render here. These are actually copies from stuff I uploaded to YouTube years ago. So there's some simple things here; the turning sense head on the ghost detector is linked to a morph that extends the loop of wire connected to it. The jaws of the steam powered monkey wrench automatically spin the nut as they are opened.
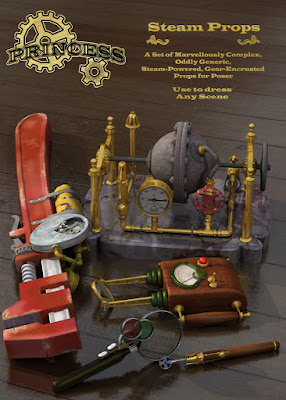
A little more tricky, the gear box is set to a single dial (and all the individual gears are hidden in the cr2, meaning they display in the workspace and render but don't show up as selectable body parts), and each uses a deltaAddDelta tuned to its diameter so the teeth mesh.

The trickiest is the steampunk sonic screwdriver (which is unfortunately impossible to see clearly in the render). The trick here is joint limits are set on the joints, dial limits on the dials, and in some cases a dial is set to a negative number below the joint limit. So what happens is that dial waits until the master dial has rolled it over into positive numbers again.

Under a single master dial, the spinner makes a half-turn as it starts to retract. The spring collapses with it. When it has fully retracted it stops; the leafs, which have been waiting quietly the whole time, close over it.

People have used this sort of trick...multiple stacks of dials pointing at each other, phantom dials that are hidden from the user and exist only to delay a following action... to rig tank treads.

As one extended example of ERC in action, the Easy-Pose cables or tentacles use ERC to make a long flexible object possible. The figure has an otherwise uncontrollable number of body segments, but the dials are all collected into master dials at the head so they all turn together. And you can get trickier; if each segment, for instance, takes orders from the previous segment instead of the master, and each is set to a deltaAddDelta of slightly more than 1.0, then the cable will coil into a decreasing diameter nautiloid spiral.


MAT Poses:

General:


By itself, the MAT Pose is simply a pose file that applies texture instead of joint rotations. But this is just a glimpse into what is actually possible.

The big thing to know is that there is only one syntax for Poser files. The suffix to a file; pz3, cr2, hr2, etc. tells Poser what to expect from it, but the markup language inside is the same stuff. Now, there are restrictions. Among other things, pose files expect to find a figure and will apply themselves to the last selected figure in the workspace. Bad things happen if there isn't one (this is one of the reasons why figures are a superior way to format complex props.)

In a similar way, a prop (pp2) can be told to attach itself to a figure (smart prop style) but other file types don't usually get this as an option.

The other key thing to remember about this all is that unspecified channels preserve the original data. So a pose file meant to only change expression should have all joint rotation and body morph channels edited out of it. If the channel isn't in the pose file, it won't be touched by the pose file.


Construction:

The basic MAT pose file looks like this inside:

version
{
number 4.01
}
figure 
{
material plastic
{
KdColor 1 1 1 1 
KaColor 0 0 0 1 
KsColor .2 .2 .2 1
TextureColor 1 1 1 1 
NsExponent 40.4078 
tMin 0 
tMax 0 
tExpo 0.6 
bumpStrength 1 
ksIgnoreTexture 0 
reflectThruLights 1 
reflectThruKd 0 
textureMap ":Runtime:textures:Princess:PTbeltFpatrol.jpg" -1 10105 
bumpMap NO_MAP
reflectionMap NO_MAP
transparencyMap NO_MAP
ReflectionColor 1 1 1 1 
reflectionStrength 1 
}

There are no channels specified, no actors. All it has is a material; whatever is included there will replace the material that was loaded from the cr2.

Of course it doesn't stop there. A simple pose file can also include a function that hides a body part (useful for tight-fitting shoes that would otherwise poke through):

{

version
{
number 4.01
}

actor rFoot:2
{
name    rFoot
off
}

actor rToe:2
{
name    GetStringRes(1024,53)
off
}

A pose file can also add new control channels, and even add morphs -- the latter, however, requires that empty hidden dials be already in the cr2 waiting for morph deltas to be attached to them. I monkeyed around a little with a slaving code that made the figure the pose was attached to mimic the motion of an existing figure in the scene. Tricky to actually work with, though -- as explained in crosstalk above!

Another odd function of MAT poses is that you can replace materials on an actor-by-actor basis;

actor rButtock:2
{
customMaterial 1
material SkinBody
{
KdColor 1 1 1 1 
KaColor 0 0 0 1 
KsColor 0.0554971 0.149996 0.061799 1 
TextureColor 1 1 1 1 
NsExponent 9.65048 
tMin 0
tMax 0
tExpo 0
bumpStrength 1
ksIgnoreTexture 0
reflectThruLights  1 
reflectThruKd 0
textureMap ":Runtime:textures:Princess:PThoseHarper.jpg" 0 0
bumpMap ":Runtime:textures:Princess:PThoseSherwoodBUM.bum"  0 0
reflectionMap NO_MAP
transparencyMap NO_MAP
ReflectionColor 1 1 1 1
reflectionStrength 1
}
}


This is a tricky pose here. Incidentally, the tradition was to name poses MAT if they changed materials, INJ if they injected morphs, and DIV if they used custom materials. Anyhow, for some reason Poser requires you define the material at the top of the pose file in addition to doing so within the individual actors.

So yes; this specific example put hose on the legs of the figure in question while leaving alone the skin (and eye and teeth and so forth) textures already applied. The one disadvantage is that it splits along the actor seams, although some Poser figures were specifically sliced to make those divisions fall in more useful places.


Wait There's More:


Point At:


This function can be called in the cr2:

pointAtParm Point At
{
name Point At
initValue 1
hidden 0
forceLimits 1
min 0
max 1
trackingScale 0.005
keys
{
static  0
k  0  1
}
interpStyleLocked 0
pointAtTarget bRivit:9
}

Notice that this looks just like a dial definition. In fact it is a dial. But it has to have the exact internal name Point At in order to work. The way this trick worked in the final prop; this was a stand with legs that folded up. Each leg had a brace with the center of rotation set at one end and the primary axis running the long way. When a master dial was turned that rotated each leg into the stowed position, each brace would pivot freely to keep their other end as close to the connector as they could. The result was it looked like the braces were mechanically part of the assembly.

A trick B.L. Render worked with was to Point At a "gravity ball" moved to a location far below the picture frame. That would make fringes hang down, towards "gravity." I've used a similar variation; set both eyes to Point At a hovering non-rendered ball, and you can direct the figure's gaze in a natural way.


Deleting RHA's


As B.L. says, children effect their parents. This can be a particular problem for mechanical props. Twist a knob on a control panel, and part of the panel twists up to follow. You can turn off deformation by setting "bend" to 0, but this means you can't apply morphs to that actor anymore. You can tweak the joint params to try to exclude the body part but even with zones this isn't always possible.

Or you can go into the cr2 and delete the channels that make this happen. Once deleted, Poser won't put them back (at least, not as of the last version I've used).

These channels are easy to recognize; their names have a similar format and they always include the child part:

twistY lBunear_twisty
{
name lBunear_twisty
initValue 0
hidden 1
forceLimits 0
min -100000
max 100000
trackingScale 1
keys
{
static  0
k  0  0
}
interpStyleLocked 0
otherActor lBunear:4
matrixActor NULL
center 0.0162426 0.67091 0.00326313
startPt 0.657258
endPt 0.754053
flipped
calcWeights
}

But here's another interesting thing; you can ADD these channels in order to make a control object. This is a technique called Body Handles. Adding a body handle is surprisingly easy. Add an actor in the definitions and the body of the cr2, referencing a custom geometry file for it. Add it to the hierarchy definitions neat the bottom of the cr2. Load the figure, then save again. Poser will fill in the rest of the Actor section.

Now you have a handle you can pick up and drag around that will drag part of the figure with it (depending on how you set the zone of effect). It's like a magnet that stays attached.


Translation:


Anyone who has gotten this far probably knows this one. Translation along the xyz axis of a body part is already in Poser, it is just that the dials are hidden by default. All that is necessary is to set Hidden to false for that dial. Set limits, and you have a sliding drawer or piston or whatever.


Inlychain:


I really don't remember how to work IK magic now. I do know you can get some fantastic results from it. The normal figure hierarchy works down from the BODY. If you rotate the shoulder, the forearm and hand are moved to a new position. If you rotate the forearm, the hand is moved to another new position.

Inverse Kinematics, well, inverts this. Most Poser figures have IK available for both feet; turn it on, and moving the foot drags the body parts upstream of it. So you can actually create a cable that is attached at both ends, and with the proper balancing of IK weights, it will be tugged at from both ends and attempt to shape itself to follow both.

My hi-hat stand has IK in it. Somehow I used that to allow a chain-drive going over a cam to follow everything else when you pressed the pedal down.


Conclusion:


I hope some of this helps someone.  I've largely stopped creating Poser content, and all those skills that took so long to learn are going to waste now. Unless I can use them to help someone else.

Friday, October 7, 2016

I saw a pocket watch

That pretty much sums up the current direction of Fusion360.

Fusion is a great ap, and the new pricing schedule is actually affordable. But it does have it's peccadilloes. Chief among them being that it is being revised and revamped so frequently there are no current manuals or online help sources or other instructions that actually apply to the real program (they all reference buttons, functions, or entire modes of employ that got taken out several program versions ago).

This updating is, also, forced. On at least three occasions I've had a deadline -- I had to finish a model and I only had a few hours to do so -- but Fusion360 (unlike every other, intelligent, application) makes updates mandatory. Stop work and wait for their extremely slow server (two hours wait to download the latest update, not infrequently). No, you can't work in the background. No, you can't put it off. No, you can't even "fool" it by turning off wifi -- because Fusion360 is so damned cloud-minded all of your data files become inaccessible when you go offline. No matter where you try to force their storage.

So the latest update pushed through (along with the ominous warning that the next update will require an OS update, forcing me to use an OS with known and serious flaws), and it took even longer to start working. The side panel where all of my files are accessed stayed blank for a frighteningly long time, and when I hovered the mouse over it.......

....I got a watch face.

Anyone who knows anything about the Mac OS flees in terror at this point. You should NEVER be that deep into legacy cruft where you see the watch face. It basically means some programmer screwed up bad.

Thursday, April 7, 2016

To see the King, to sell the cow, to make the potion to lift the curse...

I've had to push the Wraith Stone back a little.

Did a little more reading up. There is a piece of development art that shows, together, "Excalibur" in a form much like it appears in the game, something that is almost certainly an early version of the Galali Key, and a thing that simply has to be the Wraith Stone, although the in-game version is quite different. And there are a lot of interesting fan theories about all these resemblances! (Me, I see a certain Atlantean influence in the Galali Key, and that fits in oh-so-well with some of the revelations in Tomb Raider: Underworld).

Well, I'm not building the in-game version. It is boring and ugly (although the really ugly one I've seen references on turns out to be the one worn by an otherwise excellent Tonner doll of Amanda.)

I've more-or-less decided to sculpt the thing then either mold it, or 3d scan it (using the NextEngine scanner at TechShop), print that, then probably make a mold off the print after cleaning it up. I still have no idea how to control translucency to get the weird look of glowing inclusions within a matrix of darker stone. But all that takes a back seat to the real problem; the electronics layer has simply become too complex.

Found a cute little chip, the WS2803, which can drive 18 channels at 30ma constant-current PWM from a mere two channels of serial input. (There's also the TLC5940, which takes several more pins to control but hits a whopping 120ma per channel). As another option, SeeedStudio now does PCB assembly at a very, very reasonable rate -- making an ATmega (with the speed to software-PWM those 16 GPIO pins) an even more attractive alternative.

Aka, I could do the whole thing in surface mount. But that, plus the need to build in LiPO charge management, means the engineering on this thing might be too big for a single step. Better to work out some of the kinks on the Holocron fork of the DuckLight circuit.

So I'm back to the Holocron.

I'm to the point where I need to stop designing and start bending metal (which I'm told is aerospace jargon, but I'm unable to find a cite). There are all sorts of wonderful creative ways I could realize a Holocron, but I need to put that exploration aside and complete what I have; a perfectly functional way to realize one that takes the form of an inexpensive kit.

My intended price point is under $50 for a full kit, electronics included. Said electronics being an animated lighting effect, internal power with USB re-charge, and a slot for including a user-provided USB thumb drive inside.

I still haven't traced down why my first circuit (otherwise quite functional) would reset the chip when I went for a full zero-to-full on two channels (aka a Police Car flasher lighting animation). The next PCB is mostly to correct that and some other errors I found (such as one of the programming pins being wrong, and some traces run too close to the edge of the board), and to add on a LiPO charge circuit and the connectors to support the USB and LiPo components.

Otherwise, here's the current gordian knot cutting:

Shell design on the "Stolen Holocron" model as much as possible, with only one USB slot instead of that being incorporated into the design. Giving up on ideas like mirrored acrylic sheet or thin metal or some really clever geometry and go back to using the fact that you need to paint the shell as the way that the seams all get hidden.

Diffusor design sticking with pale transparent color and drafting up a abstract geometrical design of vaguely astronomical/clockwork shapes.

Circuitry layer maintained, using a darker transparent color as before, but designed at the full size of a cube side so that the pieces can be layered together and snapped together as a unit, thus placing any glue (and the seams) at the edges where it gets hidden by the shell anyhow. The only cleverness I'll have here is integrating the "spider" so it fits into tabs on these other layers and requires no glue or other support.

And also (after looking at purchasing Illustrator) going to stick with Inkscape, but draft everything on graph paper first to work out the design elements there instead of wrestling with them within Inkscape.