Closed the school tour Sunday and put all the gear away. Then took Monday off.
Put up another chapter in my ongoing Tomb Raider/Stargate fanfic. I'm not real happy with it. Doing a little research on the next one today. So far I've figured out what airport they fly into and from where (Airbus A320 out of Heathrow for the last leg, on British Airways, into Prague Ruzyně International Airport. Which got renamed about six years after the dates I've set the story in. They also took the pink tank away. Well -- it was only pink for a short time in the early 90's).
And figured out what they are wearing on the plane. Looking at a lot of outfits on Polyvore and Pinterest. Most which weren't elegant enough for my Jolie-style Lara Croft. Trouble is, what eyes can I use to show them? I'm writing in third-person limited and for various reasons Lara can't be that person for this chapter. And neither Daniel Jackson nor Jack O'Neill are the type to notice clothes. So I stopped to look at some resources on flight attendant lingo and seniority ranking and scheduling and so forth to see if I could do a walk-on character to be my camera for just that one scene...
Seems like a lot of work for a fanfic. But I've more or less given up on ever selling the novel (or writing the next one) and this is what I have to feed the writing bug.
Monday, March 30, 2015
Saturday, March 28, 2015
Light and Form
I had a quick lighting design this week. Quick not because it wasn't an important design, or because it was simple, but quick because we almost lost the venue and only got it confirmed a little over a week before we opened. We had to load in the set and light it in two days, skip tech and go directly into final dress, then previews that same week.
I'm not happy with the lights. But I'm not sure, if I had leisure to plan it all over again, what I would try differently. The director appeared to be asking for a bedroom in an upscale southern home at mid-day, and believed it didn't make sense for anyone to turn on the electric lights. So all the light was motivated as coming through a window -- a window that, alas, is on the fourth wall and not particularly obvious as part of the picture. And many scenes were blocked in the far corners of the room, far away from this putative light source. So I opened up the fronts, increased the levels, reduced the contrast -- so now you can barely tell the light is supposed to be coming from a window, and the scenes elsewhere in the bedroom are still dimly lit (because there is only so far you can push without having to re-hang the plot from scratch).
 When I got home, there was a message from Shapeways. My V150 model was apparently breaking (probably off the sprues) often enough that Shapeways finally downgraded it to non-printable. Would have been nice if they told me before selling it to someone. So I spent 10-14 hours -- many frustrating ones wrestling with file conversions and problems in the Shapeways website -- patching and altering the model once again. I've probably put in close to 200 hours on that damned model now. And model sales have netted me maybe forty bucks.
Among the changes I was forced to make this time was to attach the suspension permanently, and as well fix the gun in the turret (no more posing of that part). Apparently sprues are bad, now; Shapeways not only advises against them, they throw up all sorts of clever little road blocks against their users. Their alternative is to print a mesh bag around the model....increasing the price of the print 150% in the process.
Meanwhile the school tour I've been mixing closes this Sunday. Today I'll be finishing up repairs on some of their wireless microphone elements. Then switch over to work on my wireless microphones, because those get rented out next week. And then perhaps work on repairs for the company that hired me for the season then "forgot" to tell me they'd found someone cheaper. Or maybe not. I don't feel I exactly owe them any extra work!
Now that I'm paying monthly for TechShop, I hate the feeling when there's nothing to go into the shop for. But it is all in the brainwork phase now. Mostly software -- finish the Inkscape files for the new holocrons, finish the CAD for the raygun -- but also raw design work.
And if I'm slow at wrestling with 3d models, you should see how long it takes me to problem-solve mechanical arrangements. Or dream up better ways to light a play.
After posting the above, paused in soldering up microphones to try out the Lithium Polymer battery that just arrived on my Cree driver board. The LED lights up nice and bright -- the 3.7 to 4.2 volts of the Lipo is plenty -- but the chip is still resetting. I need to put it on a breadboard and try out a regulated power supply. But it is enough to tell me that battery will work for the raygun.
I'm not happy with the lights. But I'm not sure, if I had leisure to plan it all over again, what I would try differently. The director appeared to be asking for a bedroom in an upscale southern home at mid-day, and believed it didn't make sense for anyone to turn on the electric lights. So all the light was motivated as coming through a window -- a window that, alas, is on the fourth wall and not particularly obvious as part of the picture. And many scenes were blocked in the far corners of the room, far away from this putative light source. So I opened up the fronts, increased the levels, reduced the contrast -- so now you can barely tell the light is supposed to be coming from a window, and the scenes elsewhere in the bedroom are still dimly lit (because there is only so far you can push without having to re-hang the plot from scratch).
When I got home, there was a message from Shapeways. My V150 model was apparently breaking (probably off the sprues) often enough that Shapeways finally downgraded it to non-printable. Would have been nice if they told me before selling it to someone. So I spent 10-14 hours -- many frustrating ones wrestling with file conversions and problems in the Shapeways website -- patching and altering the model once again. I've probably put in close to 200 hours on that damned model now. And model sales have netted me maybe forty bucks.Among the changes I was forced to make this time was to attach the suspension permanently, and as well fix the gun in the turret (no more posing of that part). Apparently sprues are bad, now; Shapeways not only advises against them, they throw up all sorts of clever little road blocks against their users. Their alternative is to print a mesh bag around the model....increasing the price of the print 150% in the process.
Meanwhile the school tour I've been mixing closes this Sunday. Today I'll be finishing up repairs on some of their wireless microphone elements. Then switch over to work on my wireless microphones, because those get rented out next week. And then perhaps work on repairs for the company that hired me for the season then "forgot" to tell me they'd found someone cheaper. Or maybe not. I don't feel I exactly owe them any extra work!
Now that I'm paying monthly for TechShop, I hate the feeling when there's nothing to go into the shop for. But it is all in the brainwork phase now. Mostly software -- finish the Inkscape files for the new holocrons, finish the CAD for the raygun -- but also raw design work.
And if I'm slow at wrestling with 3d models, you should see how long it takes me to problem-solve mechanical arrangements. Or dream up better ways to light a play.
After posting the above, paused in soldering up microphones to try out the Lithium Polymer battery that just arrived on my Cree driver board. The LED lights up nice and bright -- the 3.7 to 4.2 volts of the Lipo is plenty -- but the chip is still resetting. I need to put it on a breadboard and try out a regulated power supply. But it is enough to tell me that battery will work for the raygun.
Wednesday, March 25, 2015
Laralex, Polygons, and Post-Post-Processualism
I was quite under the weather for a few days there. Each time I'd sort of recover, I'd do another early-morning show and between the missed hours of sleep and the tension of the show I'd slip back again.
The CAD is coming along slowly. This is the hard part now. This week is also load-in of my next lighting design. And Maker Faire is not all that far down the road.
But I was sick and my concentration shot so I basically slumped on the couch with lots of hot tea watching Cynthia Rothrock movies and reading Tomb Raider fan fiction.
Oh, yeah. Discovered another odd relic from the late 90's. Apparently when the King Tut exhibit was on tour, the Times (yes, the Times of London) wanted to remind everyone that they had helped bankroll Howard Carter. So they contacted Eidos/Core Design and had them re-use the engine and assets from TR4 (Tomb Raider IV: The Last Revelation) to make a short game homaging the Times' involvement in the opening of the Boy King's tomb.
In the game, Lara is hired by the Times (as if!) to explore a newly discovered annex to KV62. Complete with rampaging mummies and all the usual Tomb Raider action, of course. The game is a full stand-alone and a free download and as a Win98 game runs near flawlessly on Wine. It is also the original "tank controls" Lara, who really does handle (as The Escapist puts it), like a cow in a trolly. But it was worth it just to experience 200-polygon Lara first-hand.
It's been a long strange journey. I was never attracted by the character or the games until one bored evening I stumbled on Tomb Raider: Underworld on a $1.99 sale at Steam. And that game was a lot more fun than I expected. My only real interest in the older games, though -- even the Crystal Dynamics remakes of them -- was from that same sort of completisim that drives one to read all the books in a series even when the first one wasn't that great.
Actually, this is more of a problem when you started with one of the later editions. I didn't want to play "Legends" so much as I wanted to find out what was the deal with Amanda and Natla and all the hints about Lara's previous history with them.
Anyhow, the fanfic.
Fanfic in bulk follows trends. The stories people were writing after AOD (Tomb Raider: Angel of Darkness) were largely about continuing adventures of Lara and Kurtis and more appearances by the Monstrum (or whatever...I never played that game, although perhaps I should, given the Prague setting of part of the action).
Following the 2013 game, the main meat for most fanfic is what might have been called in the old days of Star Trek fanfic "slash" stories -- Kirk/Spock then, Lara/Sam now. Like several recent writers in popular markets, Rhianna Pratchett included a subtext (in this case, in the relationship between Lara and her best friend Samantha "Sam" Nishimura) that is so barely under the radar it practically counts as canonical.
But another major trend to fanfic based on the 2013 reboot is, basically, fix fics. Specifically, versions in which Alex doesn't die. Which is kind of odd. The shape and flavor of the game is pretty much a grimdark in which Lara loses most of her friends and is pushed slightly beyond the bounds of sanity, coming back someone who will willingly put a flaming arrow through a stranger's neck in order to survive.
Alex is one of the disposable NPCs. More specifically, he is a nerdy guy over his head, led by Lara's example to an unwise attempt at heroism himself. His entire reason to exist in the narrative is as a combination object lesson and one additional sorrow for Lara. Maybe it is the way that he is so utterly eclipsed by Lara that draws so many fanfic writers to him, and towards his attempts to win (and grow enough to earn) an actual relationship with her. And it isn't nerdy young boys who are vicariously living this dream, either, but young women.
There's some fun stuff out in the fanfiction world. I've been reading one story that sends her to the Plain of Jars. I wish I'd thought of that one -- mysterious neolithic cultures and thousands of tons of unexploded wartime munitions makes a perfect playground for the Tomb Raider. Another I'm subscribed to is a hurt/comfort fic (Lara/Sam, of course) that beats the poor kid up worse than the 2013 game. But does some cool stuff both with Greek mythology and with pulling in some of the characters and situations from the previous games.
My own fanfic is basically Crystal Dynamics canon, but taken before the events of Underworld (mostly because Underworld concerns Thor's Hammer and the Stargate SG-1 side of my plot involves, among other things, the Asgard).
I did scribble one quick Tomb Raider 2013 sketch, though. Which was entirely a take-that at one of many bits of ludonarrative dissonance in the game. Might be a little hard to explain. You see, the game makes it possible to go back through all the previous levels after defeating Mathias and freeing Himiko (aka, after winning the game). And this makes no sense within the presented narrative (any more than the reluctant hero of the narrative meshes with game mechanics that encourage you to do especially brutal kills in order to earn more points).
Come to think, my previous one-shot was also a take-that -- this time at the railroad nature of the plot. Which is why I had Lara set fire to Himiko's body the first time she saw it. Not like she doesn't spend half the game setting fire to everything in sight (mummified bodies included) anyway!
What attracts me most in fanfics is alternate histories. Especially stories in which one thing is changed, and the changes propagate until the entire original narrative unravels. And, yeah, in my opinion Tomb Raider 2013 could really do with some of these. Pity that none of the Laralex fics I've seen so far do much but re-tell the exact same game only with Alex following along like a strangely-shaped shadow.
But all these Heroic Alex fics made me tempted to send Jonah down to the beach to look for survivors instead. Which would mean Lara would never go through the opening sequence with the mummy bag. And might even end up with Stephanie being rescued. And between Jonah's sturdy, unflappable nature ("I'm not going to die with an empty stomach") and Stephanie's irrepressible good spirits, the story would evolve in very much not the grimdark way it does in the game.
Instead of course I'm doing an SG1 cross-over. Which started as a one-note joke; a desire to observe the clash between Daniel Jackson and Lara Croft, despite both practicing essentially the same Indiana Jones school of archaeology. But what has become the alternate universe aspect, really, is my attempts to rationalize both the Forbidden Archaeology of the Tomb Raider world, and the Ancient Astronauts of the SG1 world, with something resembling the real world we live in -- one in which archaeologists carry soft-bristle brushes, not whips.
One of these conflicts is going to become important in my next few chapters and I'm still trying to figure out how to approach it. Tomb Raider, like much fictionalized depictions of archaeology, is artifact-centric. Which is not incorrect for an earlier era, the time of cabinets of curiosities, of Carter, of Schliemann (who, it is quoted, did to Troy what the Greek army could not). But really, this depiction comes straight out of much older story-telling traditions; fables and fairy-tales, stories of magic swords and geese that lay golden eggs.
Far from being artifact-centered, one could argue that a modern dig is site-centered. A site is explored horizon by horizon (essentially, layers of time) instead of the bulk being hurriedly tossed away (as it was by Schliemann) in the search for museum-ready pieces. And all the detritus of the site goes under the microscope, analyzed by every method from botanical to statistical to build up a picture of the culture under consideration.
And even this conceit -- the idea of archaeology as a neutral observer which could use tools of economic analysis and time-motion studies to reconstruct a society's needs and goals, started to be questioned as far back as the first cultural anthropologist to openly admit that they were incapable of painting a picture of life in a remote village -- they were instead painting a picture of life in a remote village that had an anthropologist visiting it.
Almost every lovely economic theory eventually founders on the harsh reality that people do not make rational purchasing decisions. So, too, did processualism falter on the conceit that a stone age tribe put their physical and emotional needs in the same boxes as a college graduate in the western world of the 20th century. But then, too, did post-processualism fail in throwing these tools (of using our own constructs to analyze the workings of a very different peoples) completely away.
And, of course, amid all these heady and competing theories, and in a world where site access is fought over and observing the legalities is everything to an archaeologist's career, the reality of a Daniel Jackson or Lara Croft is still going to be going after those rare magic swords that, in their version of the world, are still out there.
Look-Ahead Sound Mixing
I was mixing microphones for a school tour yesterday, and I realized I was, once again, not just mixing for that moment of that song, but mixing in context; of the whole song, of the total performance.
I'm reminded of a couple of classics of science fiction when I think about this. In Robert Heinlein's "Blowups Happen" the staff at a power reactor are going insane from the tension of the job. This was written before the operations of the first pile became publicly known, and Heinlein had extrapolated a fission reaction in positive feedback; balanced on the cusp between dying out or going into runaway (what the industry now calls a "power excursion."
His people, experienced nuclear physicists all, were forced to monitor the processes inside the massive power reactor second by second, using calculus to project the widely varying curves to decide when to moderate -- knowing if they slipped a decimal, a massive explosion would take out half a continent.
The stakes are similar in SF Pioneer E.E. "Doc" Smith's The Vortex Blasters. In this case, the (seemingly) natural phenomenon of a loose atomic vortex behaves chaotically. At any given moment, you can take the past few minutes of activity and attempt a best-fit curve. And if you could do this well enough, you could time a large explosive charge to arrive at the core of the vortex at the exact moment that the yield matched the energetic output of the vortex, thus snuffing it out like an oil rig fire.
Enter "Storm" Cloud, physicist and lightning calculator, who did this personally using his ability to perform complex calculations in his head (eventually he is replaced by a specialized computer...but the real solution to the loose atomic vortices and the source of the problem is more interesting than that. The story stands up well -- still worth a read today).
Fortunately mixing a show is much smaller stakes. But that doesn't change the problem. Given an ideal audio space, ideal sources, perfect equipment, and no psychoacoustic or physiological auditory limits, you could set up a perfect mix for every moment.
In the real world, you have issues you have to map around. One big one is hearing fatigue. If you want to have the ability to push a powerful musical moment into the peak power you are legally and ethically allowed to deliver to the audience, you need to hold back until that moment. Otherwise the audience will already by fatigued and will be unable to appreciate it. Every show, every act, every song has an internal dynamic arc, and you don't start every song with screaming levels; because that leaves you nowhere to go.
I also look ahead knowing a flute is going to enter and I need to carve sonic space for it now, instead of having its entrance masked by competing material. I mix knowing I have one singer who isn't on microphone and the mix that will work during her solo is not the same as the optimum mix a few bars before that.
And I also have to mix into history. Say I guessed wrong on the EQ for a trumpet and gave them a specific and distinctive flavor. That means I have to make a lightning-fast decision about where to go into total artistic mix. If I change it now, the audience's attention will be attracted to the change instead of to the solo, leading to a poorer experience. On the other hand, when the trumpet entered it was new, and the audience is not burdened by the same preconceptions I (or the musicians) might have about how it is "supposed" to sound. Within that first few seconds, they may accept this as musically valid, and the song will work.
The window to make this choice is only a second or two. And it is a multi-variant problem; the sound might be "slightly" off, but it might be so in a way that will stand out later in the song, but the song itself may permit adjusting before that other moment occurs...
And in the middle of this same window a vocalist may have decided to shift her position on a mic and need to be fixed now. Which means even less time, and even less brain power to spare on figuring out where the potential fixes may fall within the total context of the moment, the song, the act, the night. And, yes, I do slip. I have someone suddenly sound utterly wrong, and as I'm fixing that, I blow an entrance.
Monday, March 23, 2015
Raygun XII
Basic shape is in CAD now:

I used a picture of the rough model as reference, adjusted a few details in the direction of a sketch I showed the client...then after building most of it, went back and tweaked again.
I'd made the body a little fatter than the mock-up (as well as leaning the "bulge" forward towards the barrel more) but after I'd placed everything else it was just too much. So I re-scaled. Rather; deleted one half, scaled the remainder, re-aligned it along the drawing planes, and mirrored it. If you are careful, there's a lot of elements in the "stack" of operations in Fusion 360 that remain parametric quite late into the modeling process.
I'd like to try making the rings a little bigger, also the "sight" a little smaller. On the latter, though, it is just barely large enough to contain a 5mm LED.
In any case, the current task is figuring out how it will all assemble. I'm half-tempted to smooth the fins and grip into the body with nice gussets, but that would mean one massive machining pass for each side, and a larger billet. So it seems most sensible to break it into body, fin, handle, trigger guard, reflector dish, nozzle rings, front nozzle escutcheon.
In fact, I am thinking the escutcheon may be lathed out manually. And also possibly do the same for the "sight"; that would make a cleaner shape, and more importantly, save a lot of time in CNC machining. Plus, then, the fin might be made in a single piece instead of fitting two pieces together.
So this takes me deep into what they call "Design for Manufacture" (which includes as a subset "Design for Assembly.") Fortunately, again, I have a couple decades of theatrical scenery and props behind me in figuring out what order things have to happen in order to be able to reach the bolts for one part that will be later hidden by another part.
It doesn't make it easy, though. Especially in a basically new material and process. I have to keep in mind as I go the likely tolerances of the various processes -- high on the list, how well I'll be able to align the billet for top and bottom machining steps.
Plan that looks best is that most of the parts bolt into the main body; the fin, handle, and trigger guard can all have tabs that slot into the main body then are bolted into holes tapped in the main body. If I was more sure of my fit-up I would just use tabs and close fit, but I'm not and I don't want parts to wobble. The main body then slips together with a locking tab at the back (which will have to be manually milled) then a couple of bolts in front; these get hidden by the donut assembly, and that in turn gets held on by tightening the nozzle escutcheon down on a set of threads.
Already I have two problems with this scheme; getting a tight enough join at the rear, and the fact that the escutcheon doesn't have wrench flats...plus is hard to access due to being inset in the reflector dish.
The scheme I'm toying with for the "sight" is to lathe that separately, and have a tab from the fin go into a milled slot, where it will be retained by a threaded pin driven from one end of the sight. But this gets a lot more complicated with the LED and the turned acrylic "nose" (the part that gets illuminated) having to somehow be attached. At least for those, glue should be sufficient (and well allow access later if necessary -- an important part of any assembly plan).
Wednesday, March 18, 2015
Raygun XI
In an effort to make this blog a little less long and rambling (too late!) I'm editing instead of adding a new post.
The parts I want for the Raygun are out of stock right now. And I haven't tested them. But I need to move forward. Fortunately, I was able to find a few models at Thingiverse and GrabCAD that I could import into Fusion 360 (Digikey also links to CAD files on many of the products they carry):

Instead of going through a proper drawing stage, I photographed the rough model (with maximum zoom to flatten it out as much as possible) and used it as a reference to start building up the CAD in Fusion 360.
It took a lot of tries to find out what would create the main body shape. In any other application it might be a quick lathe then boolean, but in Fusion 360 it turned into many, many greyed-out menu items and "you can't do that" pop-ups until I finally stumbled upon a sequence that it liked. Now I face the same problem with the grips; I haven't figured out yet how to cut the wrap-around grooves into them.
Since the housing is closed, I'm experimenting with a surface transducer instead of a speaker. The idea is that the body of the gun itself becomes the sounding board. Maybe. But I have to try it, because there's not enough time left before delivery to delay working up the CAD. The fall-back position is standard speaker and add some sounding holes. Somewhere.
Similarly, although it is attractive to put AAA batteries in the grip, with a clever door to go in and change them out, making firm commits is more important at this stage then more experiments and test measurements. So Lithium Polymer is the plan. At least that, I have one on order I can test out with my LED driver before things get too critical.
The plan is to start with the basic shape and let the needs of construction dictate additional panel lines, bolt holes, and so forth. But I am kind of hoping there won't be a lot of those; the mockup has infected me with a strong preference for its clean, uncluttered lines.
Really, this is an ambitious project. I'm working up an entire mechanical design, in less-than-familiar software, and generating tool paths from that to cut it out of metal. But I am fairly confident; I've done all these steps before, in different projects.
The parts I want for the Raygun are out of stock right now. And I haven't tested them. But I need to move forward. Fortunately, I was able to find a few models at Thingiverse and GrabCAD that I could import into Fusion 360 (Digikey also links to CAD files on many of the products they carry):
Instead of going through a proper drawing stage, I photographed the rough model (with maximum zoom to flatten it out as much as possible) and used it as a reference to start building up the CAD in Fusion 360.
It took a lot of tries to find out what would create the main body shape. In any other application it might be a quick lathe then boolean, but in Fusion 360 it turned into many, many greyed-out menu items and "you can't do that" pop-ups until I finally stumbled upon a sequence that it liked. Now I face the same problem with the grips; I haven't figured out yet how to cut the wrap-around grooves into them.
Since the housing is closed, I'm experimenting with a surface transducer instead of a speaker. The idea is that the body of the gun itself becomes the sounding board. Maybe. But I have to try it, because there's not enough time left before delivery to delay working up the CAD. The fall-back position is standard speaker and add some sounding holes. Somewhere.
Similarly, although it is attractive to put AAA batteries in the grip, with a clever door to go in and change them out, making firm commits is more important at this stage then more experiments and test measurements. So Lithium Polymer is the plan. At least that, I have one on order I can test out with my LED driver before things get too critical.
The plan is to start with the basic shape and let the needs of construction dictate additional panel lines, bolt holes, and so forth. But I am kind of hoping there won't be a lot of those; the mockup has infected me with a strong preference for its clean, uncluttered lines.
Really, this is an ambitious project. I'm working up an entire mechanical design, in less-than-familiar software, and generating tool paths from that to cut it out of metal. But I am fairly confident; I've done all these steps before, in different projects.
Monday, March 16, 2015
Machining Paradox
There's a couple of these.
One is that the equipment for working metal needs to be remarkably sturdy and stiff. This is why a lot of those "build your own metal lathe with some angle iron and a drill motor" aren't really going to hack it. And why there is such a difference in cost between a desktop CNC with a laser or (printing) hot end, and one that can carve metal. The machines are heavy, built of steel. The tool holders and other parts have massive bolts and multiple set-screws, and when you lock a setting in, it takes brute muscle power to tighten all the bolts and clamps.
And yet; so much about why we approach a project in a certain way, why cuts are made in one direction over another, why the trade-off between speed and tolerance, have to do with the fact that everything flexes anyhow.
Perhaps related to this, the core calculations for machining -- and engineering -- are at the heart pretty basic physics and geometry. And it is an essential skill to be able to work like this, practically from first principles, to figure out the cross-section of a load-bearing member or the weight of a finished casting.
And yet, against just like in engineering, the devil is in the details. All those places where the abstract form just doesn't carry sufficient information, where the first-order effects are edged on to by second and third-order effects. You really do need to model the thing you mean to do...but you also need to know that the model lies.
Probably the least paradoxical, is that machining is done to tolerances of tens -- ten-thousandths of an inch (I'm barely up to accuracy of 0.0005 myself). But we don't work within arbitrary decimal numbers out to those five places...instead the vast majority of work is done to the nearest appropriate "round" number, or one of the stock fractions that come up over and over again. So I could lathe something to 0.25000", and I might even set the dials to that value, but basically I'm lathing to 1/4" in diameter.
This comes from three different directions. One is that hardware, tools, and stocks are available only in certain sizes -- many of them simple reduced fractions. Another is that as tight as the tolerances might be in one place, there is expected slop all over; necessary gaps to allow parts to move, the known tolerance of manufactured hardware or raw stock, etc. So when you hit a gap or other fit-up, you take the chance to jump up to the nearest simple fraction...instead of blindly adding the exact calculated clearance at each step and working outwards in numbers that are increasingly random-sounding. The last is because it is a heck of a lot easier to remember, and to calculate, and to do the in-your-head approximations for measurements you've dealt with many times in the past.
Sunday, March 15, 2015
Raygun X
So I spent St. Paddy's day the way any self-respecting Irish-American would; by dr....by doing my first solo cuts on the CNC Milling Machine.
And I accomplished all my primary goals, and almost all of my goals for the session:

That's the 2-inch "radar dish" reflector on the front of the raygun. This was only the top passes; I didn't have time to flip the stock and finish the underside.
It was good learning. I leaned quite a lot on other people in the shop, including a few friends I've made there, who helped me with some stuck buttons and where the spindle lockout key was stored and so on. And I asked for advise from staff before purchasing my first ball-nose end mill (for this piece, the roughing pass was made with 1/4" flat end mill, and the finish pass with 1/8" ball nose).
I built a quick 3d model in Carrara, generated g-code in Cut3d, zeroed the Tormach, and did air passes to check my code (and a good thing I did, too!) I edited g-code both off-line and by hand, did a tool-change mid-work, used the feed rate override, and basically got a pretty good workout in setting up and problem-solving on that mill.
What really surprises me is the feed rates and speeds I set up, the tabs I designed in and the rest of the work holding, and basically all the gross physical measurements turned out to be in the ballpark. I guess all that conventional milling/machining time paid off.

 It's all about the curves on this prop. Large, parabolic arcs that need to be smooth. I didn't need three days of bondo spot putty and sanding to underline that getting these kinds of curves to look right is very, very time consuming.
Well. Sanding the grip would be more onerous (there's all those grooves in it). But it does seem do-able.
On the gripping hand, I came up with a hybrid idea for one of the alternates. So I had thought of vacuum forming in terms of a lightweight shell, which would be filled with amorphous material (just as I did the Lewis Gun magazines a little while back; glued together then filled with expanding foam).
I also knew quite clearly that if I chose to go molding of a master to make (cheaper) replicas, the molding cost would be added to the existing fabrication costs. And molds aren't cheap. Well, there is one "out" here; the wall thicknesses and other modeling details for the CNC are entirely compatible with 3d printing. So could run off copies using that method.
In any case, here's the idea; pull the shell out of thick ABS, or even acrylic. And laser-cut an acrylic skeleton that supports the structure and provides attachment points for internal and external assemblies (including such important things as a working trigger).
Worth thinking more on.
And I accomplished all my primary goals, and almost all of my goals for the session:
That's the 2-inch "radar dish" reflector on the front of the raygun. This was only the top passes; I didn't have time to flip the stock and finish the underside.
It was good learning. I leaned quite a lot on other people in the shop, including a few friends I've made there, who helped me with some stuck buttons and where the spindle lockout key was stored and so on. And I asked for advise from staff before purchasing my first ball-nose end mill (for this piece, the roughing pass was made with 1/4" flat end mill, and the finish pass with 1/8" ball nose).
I built a quick 3d model in Carrara, generated g-code in Cut3d, zeroed the Tormach, and did air passes to check my code (and a good thing I did, too!) I edited g-code both off-line and by hand, did a tool-change mid-work, used the feed rate override, and basically got a pretty good workout in setting up and problem-solving on that mill.
What really surprises me is the feed rates and speeds I set up, the tabs I designed in and the rest of the work holding, and basically all the gross physical measurements turned out to be in the ballpark. I guess all that conventional milling/machining time paid off.
(Image from Tormach)
And...right. I've now got a much better grasp of how the process goes; enough to take a second longer look and see if it is still an optimal method for the raygun.
And...at first approximation, this will work fine for a Jubal Early; the price point on those is going to be $200-300 and there's less surface to machine away (and more flats that can be conventionally machined, if for no other reason than clean-up). But it is less optimal for this project. One raygun, probably. But the gut estimate now says three or more machine sessions to cut an entire gun, so making multiples -- especially for a price point under $100 -- is less attractive.
And, yes, clean-up will be an issue. The above was just a single pass with a 1/8" ball nose. I can easily add a second clean-up pass, but that one pass was almost an hour of machine time. Cut3d estimates 95 minutes for a dual pass (with some efficiency revisions I already put into the cuts) and I was unable to run at any higher than 90% of the coded feed rate without chatter.
////
And after writing that last paragraph, I tried a little sanding and hand-polishing on the piece above. Which brought it up to a entirely acceptable shine without too much labor. I had already planned to chuck the reflector, and possibly the main body, in the lathe for polishing. I also had existing concerns that aggressive smoothing might change the curves I'm working so hard to get right.
Lesse. Finishing pass was with 1/8th ball nose end mill with a step-over of about 1/3 diameter. I think I set it to .025 -- 20%. And...my math is not into figuring out the height of an arc drawn from zero to 20% of the diameter, so let me just call it about half of the step-over; the grooves should be one or two hundredths of an inch deep.
Lesse. Finishing pass was with 1/8th ball nose end mill with a step-over of about 1/3 diameter. I think I set it to .025 -- 20%. And...my math is not into figuring out the height of an arc drawn from zero to 20% of the diameter, so let me just call it about half of the step-over; the grooves should be one or two hundredths of an inch deep.
Well. Sanding the grip would be more onerous (there's all those grooves in it). But it does seem do-able.
On the gripping hand, I came up with a hybrid idea for one of the alternates. So I had thought of vacuum forming in terms of a lightweight shell, which would be filled with amorphous material (just as I did the Lewis Gun magazines a little while back; glued together then filled with expanding foam).
I also knew quite clearly that if I chose to go molding of a master to make (cheaper) replicas, the molding cost would be added to the existing fabrication costs. And molds aren't cheap. Well, there is one "out" here; the wall thicknesses and other modeling details for the CNC are entirely compatible with 3d printing. So could run off copies using that method.
In any case, here's the idea; pull the shell out of thick ABS, or even acrylic. And laser-cut an acrylic skeleton that supports the structure and provides attachment points for internal and external assemblies (including such important things as a working trigger).
Worth thinking more on.
Saturday, March 14, 2015
Fusion Cooking
I've started the CAD for the raygun. No matter how I end up constructing it, having a scaled 3d model is going to be a help.
Fusion360 is still annoying. There is no instruction manual, the online tutorial videos are entirely people demonstrating how nice the software is without actually bothering to explain which commands they are using or where they found them (to partially excuse them, the software has changed radically over the course of the existing training videos, to the point where none of the menus, key commands, or even function names can be expected to match any more). And the forum is unhelpful -- pretty much the old Lightwave forum again ("Look at the stupid noob, asking for help!")
 So I figured out myself how to remap the necessary middle mouse button via a piece of Mac shareware, and I'm able to navigate the viewspace. Finally. Still basically trying menu items at random; select two profiles, hit "loft," watch as an error message flashes too briefly for anyone but an Evelyn Woods graduate to read (no...there's no way to get it to persist, come back, or get logged), then flip over to a different menu and hit an identically-labeled command over there...and maybe this time it actually works.
I also got the CNC part of the application to work, but I'm not happy with the results just yet.
 Instead, I'm turning to Cut3d, which is the starter CNC toolpath generating software recommended by and running on the computers at TechShop. Again it took a little tinkering. According to the error logs Wine was generating, Cut3d was crashing when it tried to use the GLX graphics code to display an imported model. So some jiggling with the display preferences in the Wine shell (to force use of native or X11 rendering instead) and the Cut3d demo is working pretty well on my Mac.
So, yes, those are Windows window controls you see there. (Win XP is the flavor Wine is set to mimic for this software) Oddly enough, I could change that to Mac standard, too, but I chose to leave them in that flavor as a reminder of where I am. Just like I (and a lot of other uses) leave Terminal in a green-text-in-black-background just to remind them that they are deeper in the OS than one normally is, and text commands here are phrased in the Deep Magic.
It looks even more baby software than it is. It is actually surprisingly deep, with a lot of control over your options.
And so, yeah, my first ever solo run on the Tormach CNC mill is going to be a fully 3d part, curved, with double-sided cutting AND a tool change. I'm heading out to the shop now, and hopefully my g-code will be ready to go by the time my machine reservation rolls around...
Fusion360 is still annoying. There is no instruction manual, the online tutorial videos are entirely people demonstrating how nice the software is without actually bothering to explain which commands they are using or where they found them (to partially excuse them, the software has changed radically over the course of the existing training videos, to the point where none of the menus, key commands, or even function names can be expected to match any more). And the forum is unhelpful -- pretty much the old Lightwave forum again ("Look at the stupid noob, asking for help!")
I also got the CNC part of the application to work, but I'm not happy with the results just yet.
So, yes, those are Windows window controls you see there. (Win XP is the flavor Wine is set to mimic for this software) Oddly enough, I could change that to Mac standard, too, but I chose to leave them in that flavor as a reminder of where I am. Just like I (and a lot of other uses) leave Terminal in a green-text-in-black-background just to remind them that they are deeper in the OS than one normally is, and text commands here are phrased in the Deep Magic.
It looks even more baby software than it is. It is actually surprisingly deep, with a lot of control over your options.
And so, yeah, my first ever solo run on the Tormach CNC mill is going to be a fully 3d part, curved, with double-sided cutting AND a tool change. I'm heading out to the shop now, and hopefully my g-code will be ready to go by the time my machine reservation rolls around...
Friday, March 13, 2015
Navigation
The stumbling block in 3d software is display of 3d information in a 2D medium. To be able to create and edit an object in 3d space, you need to be able to move either the object or your viewpoint.
Frequently. Fluidly. Having to stop in the middle of a scaling operation to grab a navigation widget (as Poser still insists on thinking is state-of-the-art) is rather like expecting you could play a First Person Shooter in which you had to put down your gun every time you wanted to look over your shoulder.
What you need, basically, is hot-key combinations; ways you can fly around the model or space without losing the selections or operations you are in the middle of. The way I work -- the way a lot of people work, I suspect -- is to move a LOT, constantly bobbing around to check alignment from different directions.
The best 3d software allows customization of the navigation controls. There are several good reasons for that. One is personal preference. Another is that forcing the user to always have a dual-scrolling mouse with haptic feedback is not a wise choice.
The last is because every piece of software seems to chose differently. Even the spacebar-drag is co-opted into some other function in some applications (or ignored entirely, as it is with Fusion360.)
So I'm flipping back and forth between multiple pieces of software just to continue any one project (like the Raygun, for which I'm currently working up the CAD and will be generating g-code for to send to the CNC milling machine). And since fast and fluid camera motion (as well as other basic operations like selection, copying, etc.) is required to model efficiently, every way in which different packages insist on their own hotkeys is a huge loss of production efficiency.
Heck -- playing Tomb Raider then switching to Half Life (or worse, playing Lugaru then switching to Overgrowth) will get your avatar killed as you try to remember that crouch and change weapon and throw are all mapped in different ways.
And these are similar changes. I build a mesh in Carrara -- where control/command/option left click let you smoothly navigate around -- to import into Poser; where clicking in the workspace does nothing but enable an unconstrained pan (as in, your camera flies off into a nasty Dutch Angle and has to be manually restored to default position from a drop-down menu).
At least Inkscape matches up with the Illustrator I'm porting laser files to; both map the Apple command-key functions to control-key functions.
And now Fusion, which is entirely different in navigation from Carrara (or Blender...but Blender is one of those rare aps that is almost completely customizable), and even from Cut3d (not that I need to do as much navigation in Cut3d)...
Thursday, March 12, 2015
Buggrit, milennium hand and shrimp
And that's all I can say. Good night, Sir Terry. You will be missed.
Wednesday, March 11, 2015
New Holocron
 So I built a holocron a while back, starting from a kit (of which I ended up using very few parts). I also wrote the build up as an Instructable, and included -- free of all restriction -- all the SVG files I had created.
That Instructable caught the eye of a fellow RPF member, and thus I'm back in the holocron business, but this time with a completely custom design.
The original Golden Armor holocron was twelve pieces of laser-cut acrylic. Apparently this was how the three holocrons built for Lucas (for some sort of game promo) were done as well. Golden Armor's scheme wasn't bad; sand the internal panels lightly to diffuse the internal lighting better, and glue the outer panels corner-edge to corner-edge, filling the resulting void with Bondo.
 But even on my first I thought I could improve that a little. So I threw out the internal pieces and laser-engraved new ones, then laminated those up with yet a third layer, this the "circuitry" layer inspired by the panel lines on the Millenium Falcon consoles. That gave a very nice depth to the holocron, even when the internal lighting was off.
To finish the Golden Armor shell, I used small pieces of acrylic square rod, gluing them along the edges before assembling the whole thing.

Thus my new shell design. And, yes, it was a lot easier to line up the pieces. But it could be better yet (also, the location of some of the splices would make them hard to clean up).

So first they have corner passes. These are because the laser has a slight radius, and tends to melt the plastic a little on inside corners; left without correction, the corner will be slightly rounded and thus the intersecting finger won't quite fit.


And of course the new interior pieces interlock as well. My first run (for which I purchased the wrong material, which is why it lights nicely but doesn't contain any of the engraved or interior detail) they are simple staggered edges. Assuming the new snap-fit interlock works, however, they will get those fingers.
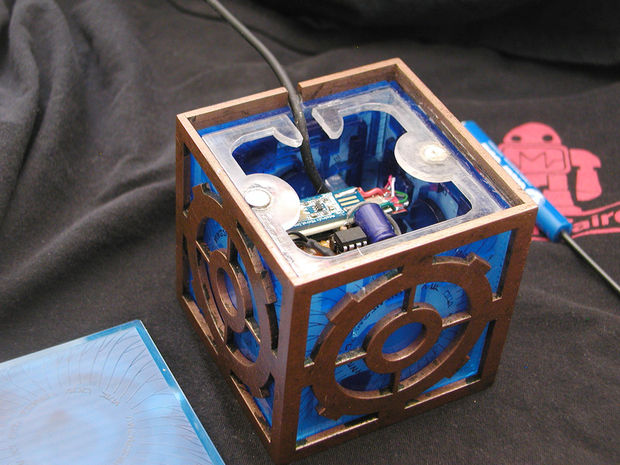
What I haven't quite worked out are the last pieces that hold the internal circuitry, and provide a place for magnets to hold down the lid. I'm also wondering if there is a way to deal with the "circuitry" layer so it doesn't have to be carefully glued to the back of the diffusor panels.
And this is where the design rests, until I can get out to Tap Plastics for the right acrylic, then manage to find a slot on the calendar when one of the laser cutters is free.

(The first run, with the wrong kind of diffusor panels), lit for test purposes with one of my Cree).
Raygun IX
Many of the designs I'd been tinkering with implicitly incorporated construction strategies. The one that got approved, however, does not.
This means the next task is working out how best to build it. This is another one of those multi-variable problems where every choice is a trade-off. Construction time, cost, infrastructure cost (aka additional tooling and training for new techniques), risk management, etc.
Here's several pointers to keep in mind whilst working through the construction design phase;
1) Everything goes over estimate.
2) You can only know the known unknowns. Leave yourself space to solve what are currently unknown unknowns. (Make this space bigger when ever dealing with unfamiliar materials or methods!)
3) Watch out for hidden assumptions. Write out everything in plain English so you can look at it and realize you don't actually need forty watts of power or a high silver content or whatever. Or realize you do; and need to weight that aspect higher in the trade-offs.
My big accomplishment for today was estimating costs and time for several different fabrication strategies.
Here are a couple of the big things I'm worried about:
1) The round form. I have some experience in hand-carving compound curves, and I did that in scale for the mockup. But I know that it is quite time consuming, and difficult to be truly accurate; enough to want to look into any way of mechanically achieving those curves. That would be lathing, or various options in computer fabrication.
Lathing has a couple of issues; I haven't any wood lathe experience, and these curves are difficult to achieve on a metal lathe.
Computerized fabrication falls into roughly three methods; slicing (turning the desired shape into a stack of pieces which are glued together and smoothed), printing, and CNC machining. Out of all of them, the CNC requires the least clean-up.
2) Access to the inside for electronics. This has an assumption wrapped in it that I need to expose properly; that the internal spaces are actually planned around the electronics package. It may be incorrect; it may be that a slush-cast, and potting the electronics before final assembly is just fine.
3) Duplication. Almost certainly there wants to be more than one. Fortunately, the majority of the construction methods I have considered so far aren't feasible for the finished model; meaning a molding stage is necessary in any case.
4) Metal. This is a very much questioned assumption. I want the look of metal. I'd like the weight and solidity. I'm pretty much ruling out vacuum forming as viable, but a metallic look is still achievable with paint or cold casting. So, again, 3d printing and resin casting are still on the table.
More data is needed. Using simple volume calculations taken from the mockup, here's how a couple of competing technologies break down;
 Molding: Doing a box mold of the whole thing would consume about 100 in^3 of silicone. Smooth-On's Oomoo-30 is available in trial packs of approximately 75 in^3. Given that I'd really want to mold several parts separately for ease in mold design, clean-up, and final assembly, it works out to a minimum of $50 of silicone. So molding is within reason.
 Printing: the cheapest Shapeways print is priced by bounding box for models under a certain density. In any case, it works out to around $50 for just the main body...with careful nesting of the parts for most efficiency, could probably come under $100 for the total print.
(As a reference, my V150 model -- thin walls, under 5" long -- costs $45 to print.)
 CNC machining: I have much less experience with this technique, but working off listed feeds and speeds from both Tormach and various end-users at CNC and machining forums, it seems capable of doing a roughing pass over the body of the raygun in about five minutes. Finishing pass should be at least 4x that, and there are of course more parts involved, but it seems plausible that even with work holding and tool changes to get the whole thing fabricated in one machine-time reservation.
Cost of the metal; raw stock big enough to form the body with space for clamping works out to about $20 worth. Given all the various parts, wastage, and errors, can assume $80 of metal, and less for repeated fabrication.
So. CNC machining in metal is very competitive. It achieves the desired shape in one step (instead of fabricating a master then molding and casting that), so savings in materials and time. It seems the next step in the planning process is to work up a projected CNC approach and see if that is as feasible as it appears at first glance.
Fortunately, there's a perfect experiment that needs to be made. The raygun, as I currently envision it, breaks down into several elements:
1) Body shell (probably two-piece body, handle may be integral to the shell and likely also two-piece -- the alternatives here are all about being able to chuck the body in a lathe for final polishing).
2) Emitter. Probably turned acrylic, which is also largely unexplored technology for me.
3) Trigger. Another CNC'd part -- metal in any case -- with pin and spring and some way to engage the electrical switch.
4) Internal electronics; have purchased a bag of 3W Cree in pink -- which my new control board will PWM just fine even without the revised version. LED in the fin as well (which leads to questions about how to lead the wires up). And of course it has to "pew pew pew!"
5) Selector knob. Not sourced. Current thinking is to CNC the basic knob and design the way it integrates to the body and is held in place as part of the fabrication. Behind it would be either an encoder or, more likely, a potentiometer. Have not thought about indicator dial, however....and I have some leanings to work out a lighted inset to the side plate, too.
6) Reflector. I tried to source a dish shape in a chrome finish but the closest I came to were some Lego parts. I've also contacted a chrome plating company but I suspect the run is too small for them to do and/or me to afford (minimal order for chroming tends to run in the low hundreds of dollars).
 The current best thought for the reflector is to CNC it, smooth it further on the lathe, and then polish it up to the best finish 6061 aluminium alloy can achieve with a buffing wheel. I did this long ago with some Cyberpunk claws and I know it is achievable. The major downside is aluminium oxidizes, and essentially all protective coatings dull the finish.
So my next step is going to be to work up a new model for the reflector I can then try to run off on the Tormach mill.
This means the next task is working out how best to build it. This is another one of those multi-variable problems where every choice is a trade-off. Construction time, cost, infrastructure cost (aka additional tooling and training for new techniques), risk management, etc.
1) Everything goes over estimate.
2) You can only know the known unknowns. Leave yourself space to solve what are currently unknown unknowns. (Make this space bigger when ever dealing with unfamiliar materials or methods!)
3) Watch out for hidden assumptions. Write out everything in plain English so you can look at it and realize you don't actually need forty watts of power or a high silver content or whatever. Or realize you do; and need to weight that aspect higher in the trade-offs.
My big accomplishment for today was estimating costs and time for several different fabrication strategies.
Here are a couple of the big things I'm worried about:
1) The round form. I have some experience in hand-carving compound curves, and I did that in scale for the mockup. But I know that it is quite time consuming, and difficult to be truly accurate; enough to want to look into any way of mechanically achieving those curves. That would be lathing, or various options in computer fabrication.
Lathing has a couple of issues; I haven't any wood lathe experience, and these curves are difficult to achieve on a metal lathe.
Computerized fabrication falls into roughly three methods; slicing (turning the desired shape into a stack of pieces which are glued together and smoothed), printing, and CNC machining. Out of all of them, the CNC requires the least clean-up.
2) Access to the inside for electronics. This has an assumption wrapped in it that I need to expose properly; that the internal spaces are actually planned around the electronics package. It may be incorrect; it may be that a slush-cast, and potting the electronics before final assembly is just fine.
3) Duplication. Almost certainly there wants to be more than one. Fortunately, the majority of the construction methods I have considered so far aren't feasible for the finished model; meaning a molding stage is necessary in any case.
4) Metal. This is a very much questioned assumption. I want the look of metal. I'd like the weight and solidity. I'm pretty much ruling out vacuum forming as viable, but a metallic look is still achievable with paint or cold casting. So, again, 3d printing and resin casting are still on the table.
More data is needed. Using simple volume calculations taken from the mockup, here's how a couple of competing technologies break down;
(As a reference, my V150 model -- thin walls, under 5" long -- costs $45 to print.)
Cost of the metal; raw stock big enough to form the body with space for clamping works out to about $20 worth. Given all the various parts, wastage, and errors, can assume $80 of metal, and less for repeated fabrication.
So. CNC machining in metal is very competitive. It achieves the desired shape in one step (instead of fabricating a master then molding and casting that), so savings in materials and time. It seems the next step in the planning process is to work up a projected CNC approach and see if that is as feasible as it appears at first glance.
Fortunately, there's a perfect experiment that needs to be made. The raygun, as I currently envision it, breaks down into several elements:
1) Body shell (probably two-piece body, handle may be integral to the shell and likely also two-piece -- the alternatives here are all about being able to chuck the body in a lathe for final polishing).
2) Emitter. Probably turned acrylic, which is also largely unexplored technology for me.
3) Trigger. Another CNC'd part -- metal in any case -- with pin and spring and some way to engage the electrical switch.
4) Internal electronics; have purchased a bag of 3W Cree in pink -- which my new control board will PWM just fine even without the revised version. LED in the fin as well (which leads to questions about how to lead the wires up). And of course it has to "pew pew pew!"
5) Selector knob. Not sourced. Current thinking is to CNC the basic knob and design the way it integrates to the body and is held in place as part of the fabrication. Behind it would be either an encoder or, more likely, a potentiometer. Have not thought about indicator dial, however....and I have some leanings to work out a lighted inset to the side plate, too.
6) Reflector. I tried to source a dish shape in a chrome finish but the closest I came to were some Lego parts. I've also contacted a chrome plating company but I suspect the run is too small for them to do and/or me to afford (minimal order for chroming tends to run in the low hundreds of dollars).
The current best thought for the reflector is to CNC it, smooth it further on the lathe, and then polish it up to the best finish 6061 aluminium alloy can achieve with a buffing wheel. I did this long ago with some Cyberpunk claws and I know it is achievable. The major downside is aluminium oxidizes, and essentially all protective coatings dull the finish.So my next step is going to be to work up a new model for the reflector I can then try to run off on the Tormach mill.
Tuesday, March 10, 2015
Room Full of Bicycles
I laser-cut most of the next Holocron today. But I don't like it. The parts all fit, but it is still fussy to line everything up while the glue dries, and with just a little more work it should be possible to snap-fit the parts together.
I finished revisions on the shell before I left TechShop, but there were no more empty slots on the lasers (not at least until much later than I meant to stay).
Oh, yeah. It also took me a few minutes to remember how to use the controls on the laser, lower the bed, do an air pass...(and more time puzzling out Illustrator, and getting the files correctly imported from InkScape).
Yeah, it's like riding a bicycle. You never quite forget...but you can get pretty rusty. TechShop. It's like a big room just full of a really wide variety of bicycles.
Monday, March 9, 2015
Raygun VIII

This is not the prop. This is not the beginning of the prop. This is, however, the prop of the beginning. (With apologies to Winston Churchill).
Which is to say; this is a full-scale mock-up constructed in order to work out both aesthetic balance, try out some detail ideas, and get a sense for what construction methods may be appropriate.
After several weeks of chasing down various pathways, we finally stumbled on a direction that we both liked. This was the sketch that got approved:
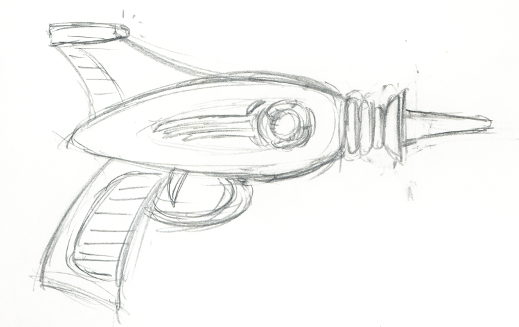

This is not, mind you, a construction drawing. It is merely the first attempt to translate the sketch into a scaled concept that can then be checked for overall balance and practicality.
And, indeed, it flunked the first test:

Based on the look and feel of the first cutout, I adjusted dimensions and transferred to foam-core. The re-sized foam-core cutout felt a lot better, but I needed a little more to really get a sense of it. So; added cheap expanded foam (recycled from the last time someone in the neighborhood had furniture shipped to them:

And carved the foam by hand into an approximation of the right shape:

Well, I was still learning from this mock-up, so it was worth taking it just a little further. Note, however, it is in no way suitable for a final prop, or even for a master to take a mold off. If I had meant to do this, I would have used a spine of MDF, omitted all the turned parts (like the front nozzle, which is meant to be acrylic, or the front dish -- which I am still trying to source), used dense foam and skinned it with Bondo for strength.
Instead this is spackle and filler primer, white glue as a foam sealer and Bondo spot putty in the later stages. It can only take gentle handling.

So several coats of primer and spot putty...built up the dish and insulator rings with Apoxie Sculpt...spray-painted gloss black, then hit it with silver coat. When that is properly dried I'll come back with a few bits of detail paint.
Incidentally, I took that top picture in my kitchen at 10 PM, and somehow my old Oly C3020 auto-balanced on to a fantabulous effect. It was originally a rich sepia that looked like a picture from the turn of the (last) century, but I tweaked the hue in GIMP using a color layer to achieve the very Republic Serial tonality of the above. I'd love to be able to reproduce that effect on demand!
Sunday, March 8, 2015
Are We Multitasking Yet?
(With apologies to Bill Griffith.)
I'm still working serially, but the job slotting in the task manager has been on shorter intervals the past few days. I've been plugging away at three rather different projects, and the moment I get stalled on one, I switch to one of the others.
(Or browse random web comics...I'm not that task-focused!)
I finally got a concept sketch approved for the Ray Gun (more on that next post) and have moved on to mock-up:

In the meantime, the next Holocron is approved for trial cut, but there is a lot of work involved in making the pieces fit together better than the last one:


I'm still working serially, but the job slotting in the task manager has been on shorter intervals the past few days. I've been plugging away at three rather different projects, and the moment I get stalled on one, I switch to one of the others.
(Or browse random web comics...I'm not that task-focused!)
I finally got a concept sketch approved for the Ray Gun (more on that next post) and have moved on to mock-up:
In the meantime, the next Holocron is approved for trial cut, but there is a lot of work involved in making the pieces fit together better than the last one:
And I haven't managed to quite let go of the Poser content creation I started back when I was sick. Getting closer to having a few new clothing meshes ready for something...possibly my online store, which could really use more stuff, but rigging clothing is such a pain:
Thursday, March 5, 2015
Multi-threaded, single core
Everything is possible, but everything takes longer than you'd like.
A side effect of the obsessive focus I bring on projects is my inability to sustain that intensity. I'm not really a multi-tasker. Instead I concentrate on one thing for a few days, then move my focus to something else.
It's like doing shows in rep (aka in repertory; two or more plays are done over the same block of time at the same building). And like working in rep, a lot of extra effort goes into loading in and loading out.
In terms of projects, I have the physical clutter of half-done projects, supplies on order or just arrived or being saved for when I'm ready for them, tools and jigs and workspaces that need to be set up for a certain project and I'm leery of breaking them down...and similar clutter of the mental spaces.
I discovered when writing a novel that it took a minimum of an hour to upload enough of even a single scene in order to be able to work on it. To work on the novel in depth it took three or four days before I could really remember where everything was and be able to pick up where I left off.
Add to this, more and more sets of intellectual tools that get rusty. Like trying to remember the hotkey commands in the dozens of pieces of software I need for many of my projects.
Right now I'm shuffling quickly, trying to move along on the latest Holocron orders, move into the drafting stage on the Ray Gun commission...and doing a little mesh work and file reorganizing for Poser content creation.
And, yeah. It's been a while since I looked at those folders. I found some meshes in progress I'd completely forgotten I'd built. That's hours of work, even days of work, that would have gone completely to waste if I hadn't almost accidentally stumbled on them again.
And may, still. I'm pushing hard on everything that even slightly resembles paying work, but this stuff is chump change...what I really need is another gig or two, and the moment that happens, everything else will have to go on the back burner.
Wednesday, March 4, 2015
Zombies of the Heliopause
There's a scene in Sharon McCrumb's comic mystery story Bimbos of the Death Sun (which takes place at a science fiction convention) where one of the characters looks at all the creative effort being put into fanart and cosplay and so forth and wishes that all those people would turn their obvious talents towards "real world" fashion design, commercial art, etc., and earn a better living.
It isn't an uncommon thought. There are two flaws in it. One is that fandom is a small pond; being able to write well enough to get a fanfic following is not the same as being publishable in the wider world. And ditto for all the other skills of fabrication and industrial design on display.
The other is that fans are not blind to the advantages of money. There are many ways fans attempt to make a little cash from their work, ranging from getting paid by other fans to help them with their sewing, to monetizing click-throughs at the host sites where they put their creations.
Anyhow.
I woke up realizing I am an active member at three sites dependent on user-generated traffic; Instructables, Fanfiction dot net, and DeviantArt. Out of these, only Instructables has returned "real world" value for the effort -- in the form of a t-shirt and an electronics kit (which I gave to a niece).
Contrast to this, I don't supply that much "content" directly to the Replica Props Forum (I post a few pictures, but I don't do any work specifically for the needs of that site), but I have made significant cash through my activity there. What little I have in the bank right now is basically my payment from the last set of machined Aliens grenade props.
It is sobering. But then, there is more to life than making money. Much of what we spent effort and money on is gaining social status, contacts, learning new things, seeing new places, learning new skills; everything beyond the lower steps of Maslow's pyramid of human needs (aka food and shelter).
And the online world is no more unreal than the outside world. There have been through the ages many friendships which took place at long distance, through letters, for instance. Social needs and gains are still important even if they are being transacted digitally instead of in meatspace.
But...and here's the morning's big caveat: yesterday I came back from a job along the coastal highway, and I was reminded again of how incredibly scenic a place I live in. And reminded of how little time I've spent lately walking, exploring, sight-seeing, etc. around my own home town.
And I just spent the last few days cooped up inside mostly creating images for an online fan art site. Well, okay...I was too sick to go out on two of those days, and I'm still cash-strapped...but it is a good thing that I've already started to transition towards creating content that can be monetized instead.
(The title of this entry is taken from a short story I was working on, which involved uploaded brains in temporary bodies to work a physics experiment in the remote reaches of our solar system. My main output at Fanfiction dot net of late has been a Tomb Raider/Stargate SG1 cross-over, for which I've done a lot of amusing research. My Instructables have often been linked from this blog, but there will be no link or other outward connection to my Deviant Art work; some of it is a little kinky and that's not something I mean to share through this blog.)
Sunday, March 1, 2015
Gah Software
In Star Wars (the first film, the original film, which is to be known as "Star Wars," period) a small farming homestead purchases a droid that can speak Bocce -- purchases a functional AI because that's easier than learning the computer language some of their old evaporators use.
Meanwhile on Next Generation and later, everyone can use everything that has microcircuits, and there's never even a moment of realizing the docs are all in Klingon or whatever. I think Star Wars gets it a lot closer.
Anyhow.
I've been really sick for a couple of days. And spent it delving into some software I haven't used in far too long. Still learning my way around GIMP, getting better with Inkscape -- and flipping back and forth between those two with great rapidity as I develop the most recent iteration of the Holocron:
 This image is watermarked because the art for this one I want to keep exclusive to the client that ordered it.
And I'm pretty much volunteering the design time, but aside from the vector on the center image, it is all re-purposable for the holocron kits I'll be offering soon at the RPF.
I'm going to be able to offer a fair number of customization options right off the rack, plus option to do new design work as I find time.
Perhaps I'll even some time solve the assembly issue. I've seen some Holocron designs that use a staggered outer edge to hide the way the shell has to be assembled: and those would not need to be sanded and painted.

Anyhow. Figured out an option for the DuckLight battery issue and rigged up a quick test with the prototype; hooked the main circuit to regulated 5v, and plugged the Cree into a separate 4-cell battery pack. It seems to deliver almost the output I achieved with an overall regulated 500ma power supply.
So the scheme now is to add a 3.3v LDO to the PCB. It won't be that wasteful of space; I already need to add the filter capacitors to stabilize the ATtiny.
Pity there's no easy way to cram that in to the current PCB so I could do some proper in-place prototyping. But the boards were only ten bucks.
 For completely random reasons, I spent most of my sick time messing around with a software I'd started to forget. Poser. Poser 9, to be precise, which saves all the parts of the interface that worked badly in Poser 6, and adds flash-driven menus that work poorly, non-scalable interface fonts, and other nice little details that make it excruciatingly inefficient and frustrating.
It's worse than that. I also flip into Poser 6 when I'm rigging a prop, because it is simpler to work in and makes cleaner files.
And for some stuff, DAZstudio is a little easier. At least the camera is superior. But of course the interface is entirely different, in almost every way it can be.
I'm really not looking forward to having to go back into Carrara, but I have some modeling projects in the pipeline that need it. Well, that or Blender...and I'm still having terrible trouble coming to grips with Blender.
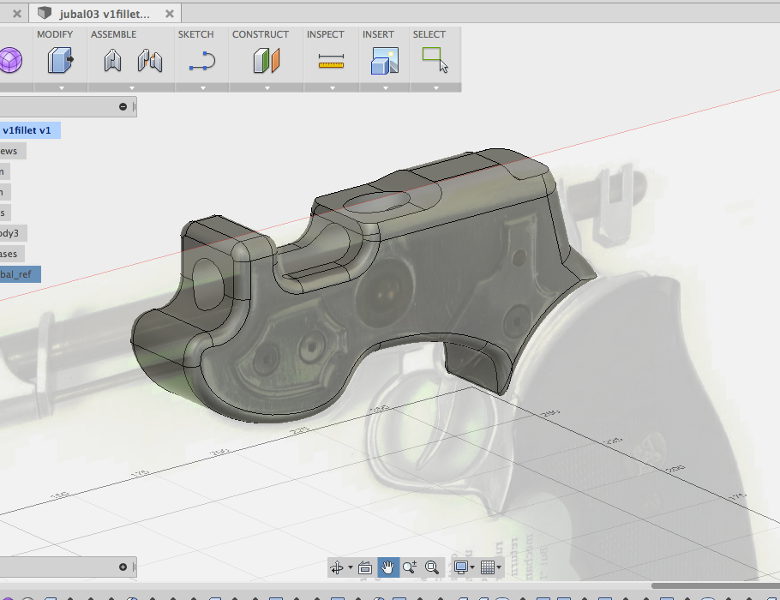 Even Fusion 360. Some of the specific curves and edges I need out of it are far too difficult to
achieve inside the interface. So like pretty much everything else I do, I need to flip the meshes into another application to do some work, then re-import them.
And I just realized it has been several months since I last used that software. They've probably changed the entire thing by now!
At least EagleCAD was a relatively small learning curve, and shouldn't take too long to pick up again...
Meanwhile on Next Generation and later, everyone can use everything that has microcircuits, and there's never even a moment of realizing the docs are all in Klingon or whatever. I think Star Wars gets it a lot closer.
Anyhow.
I've been really sick for a couple of days. And spent it delving into some software I haven't used in far too long. Still learning my way around GIMP, getting better with Inkscape -- and flipping back and forth between those two with great rapidity as I develop the most recent iteration of the Holocron:
And I'm pretty much volunteering the design time, but aside from the vector on the center image, it is all re-purposable for the holocron kits I'll be offering soon at the RPF.
I'm going to be able to offer a fair number of customization options right off the rack, plus option to do new design work as I find time.
Perhaps I'll even some time solve the assembly issue. I've seen some Holocron designs that use a staggered outer edge to hide the way the shell has to be assembled: and those would not need to be sanded and painted.
Anyhow. Figured out an option for the DuckLight battery issue and rigged up a quick test with the prototype; hooked the main circuit to regulated 5v, and plugged the Cree into a separate 4-cell battery pack. It seems to deliver almost the output I achieved with an overall regulated 500ma power supply.
So the scheme now is to add a 3.3v LDO to the PCB. It won't be that wasteful of space; I already need to add the filter capacitors to stabilize the ATtiny.
Pity there's no easy way to cram that in to the current PCB so I could do some proper in-place prototyping. But the boards were only ten bucks.
It's worse than that. I also flip into Poser 6 when I'm rigging a prop, because it is simpler to work in and makes cleaner files.
And for some stuff, DAZstudio is a little easier. At least the camera is superior. But of course the interface is entirely different, in almost every way it can be.
I'm really not looking forward to having to go back into Carrara, but I have some modeling projects in the pipeline that need it. Well, that or Blender...and I'm still having terrible trouble coming to grips with Blender.
Even Fusion 360. Some of the specific curves and edges I need out of it are far too difficult to achieve inside the interface. So like pretty much everything else I do, I need to flip the meshes into another application to do some work, then re-import them.
And I just realized it has been several months since I last used that software. They've probably changed the entire thing by now!
At least EagleCAD was a relatively small learning curve, and shouldn't take too long to pick up again...
Subscribe to:
Posts (Atom)