My old rule was that a musical has a busy enough soundscape with music and singing and dialog (and footsteps and audience sounds and so forth).
But I just did a second show in which I had background effects running through many of the songs. And this was a kids show, too (that is, a young cast, not, a show aimed for kids.)
In "The Little Princess" I ended up with a wind loop that ran under at least one song. Also a rain loop and some added thunder for another.
For "Tarzan" I actually had jungle noises (mostly birdsong and insects) playing through many if not most of the numbers.
Now, this was a young cast. But for some reason I had a ton of headroom in the mix, and clarity to spare. An ultra-small pit of keyboard and drums (the drummer also played Djembe, and the keyboard player was often in a split patch with bass under his left hand). They played soft and controlled, and I've been tinkering with the system, and I had no trouble getting clear mic signal above it.
And, well, it is mostly Phil Collins. Which means open ballad-like songs with a lot of space in them. Space for more orchestration. Or space for effects.
The key, as always, is ears in the house (aka a front-of-house mixing position), and a fader so the background effects can be trimmed moment by moment just like backing vocals or the drum mics.
Hollywood does this kind of dense design these days. They can, of course, because they are cutting to the final print. In theater, you are up against the spontaneous nature of the thing. You can't so closely predict where the spaces are going to fall in dialog, and where you need to hold back on the underscore.
Also, Hollywood is made of close-mic. The ability to isolate, compress, and stack up dry sounds very close to each other. Theater is an acoustic environment. The voices of the singers, the backline monitor amps of the band, the sounds made by the audience all go into that live reverberant space. Even when you have microphones, you are often constrained to place them further away -- meaning again a more distant, muffled, less precise sound.
But when you come up against a musical like "Tarzan" (or to an only slightly lesser extent, "A Little Princess") you are dealing with a sonically artificial setting. Pop songs, studio sound, not the invisible reinforcement expected of a classic Rogers and Hammerstein. And that kind of sound -- with the strong amplification implied -- gives you room to also treat sound effects in a more immersive way; more movie, more gamescape, than would be traditional for theater.
Wednesday, January 29, 2014
I Sense a Fan
Ventilation fan blew on one of our ETC "Sensor" packs during the ballet. Stood a box fan up next to the dimmer pack to keep it going.
The fan is inset too deeply to be able to read the data plate, and I didn't want to go through the process of cracking the case unless I knew a replacement was available. I mean, it looked like a standard 4" muffin fan, but engineers sometimes get creative and it might be some one-of-a-kind 33.3 volt multispeed fan with an ambifacent lunar waneshaft and twin spurving bearings.
So we contacted ETC for the correct part number, found it at an online dealer, and when the part arrived I opened the case. And then and only then noticed we'd managed to order a 10" fan.
Well, fortunately, now that the case was open I could read the nameplate, and it did turn out to be a common design and an essentially similar recommended replacement was available at the nearest Grainger.
"Nearest" being down the freeway, since they consolidated (and closed the local store). Spent the morning driving down to get the part, wriggled it in, wrestled the pack back up to the racks, and it works fine. But during the drive, the engine fan on my car blew, so now I have to deal with that!
Tuesday, January 28, 2014
Alyx Doesn't Live Here Anymore
Okay, bad joke.
My long run of feeling in good health suffered a stumble of cold or flu. Right on top of two back-to-back kid's shows. Which is perhaps not a co-incidence, as I personally taped microphones onto over forty different kids; whatever they had, I probably caught.
Still, at the worst of it (sniffling constantly, having trouble sleeping), I worked a fifty-hour week, attended rehearsal on another show, started a Jedi Holocron, attended several classes in the City, and at some point along there even wrote a short Half-Life2 pastiche that I stuck up at fanfiction dot net.
Meanwhile Valve has changed the Steam client once again, and my PC/Wine version of the rebuilt Surface Tension levels for the Black Mesa mod isn't running any more. And I've gotten a little bored replaying Route Canal or similar; for every fun fight, there's some jumping puzzle with steam vents and barnacles to get through. Hey, Valve, here's an idea; instead of giving the players a "rest from combat" with some nasty little puzzle in which if you misjudge the size of your character's invisible bounding box by a centimeter you die, how about some bit where you walk through an area with enough to look at and explore to be interesting, and no-one is currently shooting at you?
Anyhow.
Today I felt a little of the old "mysteriously short of breath, pain in the joints" feeling. But...I'm feeling just well enough still that I'm going to stand up now and zip down to the gym for a late-night climb. We'll see how that goes!
Wednesday, January 22, 2014
The (Abbreviated) Design Process
I've written here before about the design process of theatrical sound. But I've also gone through a whole string of shows lately in which that clean and methodical process has been truncated and adapted.
You usually start with a Script; with the complete script, matching page numbers, the cuts that were made in rehearsals properly annotated. Except reality for me has been, of late, multiple versions of the script floating around with different page numbers, different cuts -- in fact, large cuts and alterations never documented by Stage Management in any written form.
On at least one show, I put the "Script" aside and mixed the show cold, based on what actually happened on stage. That was how poor the script was as a guide to what would actually happen.
You also would like to start with a Character Chart; with a single document that lists which actor goes with the various multiple roles they might play, so when the MERMAIDS come out to sing you know that two of them were SAILORS in a different scene and one is YOUNG CAPTAIN HOOK, and thus you know the correct microphone channels to turn up.
Well, directors don't get the need for this. More often than not any list I get from a director will be too late to do me any good, and often as not it is wrong, too. The costumer is often a better source for that information, but on one show I went as far as circulating a poll to the individual actors to ask them which numbers they sing in!
Because even when the data is theoretically right, it simply isn't on the Director's radar that three of the MERMAIDS don't sing on the first song, and on the second song two of them are in costume change and enter late. And both of those are absolute death for a mic mix; bring up the theoretical chorus from the paperwork and the audience is treated to dressing room chatter, backstage gossip, and someone swearing as they struggle to get into a costume.
The upshot is that the smart way to program your scenes is to wait until the cast is doing full runs in costume. And when each song begins, put on headphones and start working through the mics. Save the ones that are singing, cut the ones that aren't useful in that number, or that talked, or that made a noise, or that sung badly.
The theory for sound effects is you spot the script yourself, present a draft cue list to the Director, this gets discussed, you try out critical cues in rehearsal, then you sit down with either your good monitors or -- preferably -- the actual speakers you will be using and construct your cues. Then the tech rehearsals are just a matter of tweaking the levels and the placement in time.
Reality is that many Directors have too much on their plates to talk sound with you, and they've made so many (undocumented) changes to the script, you really have no idea what is going to be required until you see the cast doing it. So the script says there was supposed to be a WOLF. Turns out that didn't work for them so they changed it to a SNAKE, and since they had a lot of ensemble that needed more to do, they made it THREE SNAKES. And four hours before rehearsal you finally get an email from the Director in which (after apologizing for not having had time to read your draft cue list) they give their own demands, including the sound of THREE SNAKES menacing the heroes.
Okay, sure. You pull and purchase and mix up something that will go with a trio of ensemble members wriggling menacingly across the stage. And then you get into the actual tech, and you see three people in purple pants jumping up and down like pogo sticks in an upstage corner. That's your "Snakes." Throw away another four hours of work!
So it almost makes sense to construct the majority of cues as you see them and as the Director calls back across the seats "I need a helicopter sound here" (and you can see that what they need is something to go with the actor who is flapping his arms around and spinning in a circle.)
Two things that make this much faster; I've been using DropBox and networking my machines and essentially all my sound effects files are visible from wherever I am. So a lot of the time I don't bother to pull and sort any more; I just audition in the space as I'm building.
And when there is a simple cut, volume change, or layer, I do it in QLab instead of creating a single sound file. It is pretty much as fast to take a thunder sound and add an auto-follow cue that fades the thunder after two seconds, as it is to import it into Audacity and delete half of it and add a fade-out and re-save. And when you do it in QLab, you can alter the result on the fly; make the thunder shorter or longer with a couple of keystrokes.
Lastly, of course, I assign sound effects to hotkeys on the laptop, or to keys on a MIDI keyboard, so I am not restricted to linear playback. I can play a cue, omit that cue if it doesn't work, use it in several places if it works well.
Oh, I should have also mentioned; I always throw a master volume fader on to the top layer of my mixing board, so during the show I can adjust the volume of the sound cues I am playing back. Because even when you do have time to tweak levels and get it all perfect, performance levels change, dynamics change, audience noise changes, and you need to adjust.
So the pretty theory is still there, but the practice -- especially in the short-tech, creatively-charged, younger-cast shows I've done lately -- is likely to be a lot more casual.
Monday, January 20, 2014
Death march
Charlie Stross recently blogged* about the industry practice known dysphemistically as a "death march." It is an institutional habit, endemic in the gaming industry...and in theater. I'm in the middle of a rather crunchy double show (four casts, two directors, two weeks to tech and perform) myself.
*(Or to be precise, his guest blogger, Machinima wizard Hugh Hancock, did.)
Theater -- particularly small theater -- regularly schedules 80-hour tech weeks. There are some good reasons for it; for one, theater spaces don't come cheap, so there is strong inclination to get tech done with in the shortest possible time. I also suspect in the very small theaters your volunteer staff and other people with day jobs can't spare two weeks off from work, and have to try to get things done in a long weekend and change.
But it is also there for less intelligent reasons. It is there because they've always done it that way. And it is there because the people who set the schedule are those who suffer least for it. Even when you have a producer/director who is right there in tech along with the cast and crew, there is a difference between sitting in a chair having coffee brought to you, and balancing on a rafter holding a heavy lighting instrument with your stomach growling because you can't afford to buy fast food (and the schedule doesn't permit you anything else).
(And then staying four hours after that director has gone home in order to fix things you couldn't get to during the rehearsal).
And of course a difference between being the one who is setting the schedule and the one who is having it set for them.
Crunch time is a bad idea. It is a worse idea to schedule it as a regular process; because when you've scheduled the things that must happen to take up 14 of the available hours in the day, there is no place to go when you need time for surprises; for the things that didn't work or took longer than planned or were just plain late.
And the crunch descends mostly on the grunts. On the tech staff, and yes, also on the designers (which in a small enough theater are the same person anyhow). The game industry may sometimes ship late, but only the rare Broadway show refunds opening weekend. As a freelance tech, you may be from day to day in a space that only crunches twice a year for their big show, but this is your "day job." You go from one crunch to the next, the only time to rest being the time searching for the next gig.
Quality suffers during crunch. People don't think clearly, don't take time to do things right. They also put off decisions, according to some studies. In theater, this often frames out as directors or producers not actually making a smart decision (that will save time and labor) but instead making a weenie call like, "Why don't we try it anyhow" or "Show me what you were thinking and I'll tell you if I like it," or "Could we have the singers louder but without all that the feedback?"
Which is to say, no decision at all -- just an illusion of having managed the problem. And the reality of the poor designers having to pull yet another all-nighter trying to find a technical solution for what in the end is an artistic problem, or a production problem (aka, the problem is trying to make a broke body pack keep working anyhow, because the proper solution -- to purchase a new one -- is stymied by the non-decision maker at the top.)
What I've blogged about before is how the artistic quality also suffers. Because tech is the time when all the different design elements come together. It is a time when ideas should strike sparks off each other. Where a choreographer can realize something different and exciting the actual set as built offers him. When a lighting designer sees a way to push the pallet offered by the actual costumes and scenery in a more exciting direction than the color choice she made from swatches. When a sound designer has a chance to explore the sonic spaces and find the actual holes to weave effects into.
Instead there is no time, no time to fix, barely time to finish, certainly no time to adjust. At my current theater, we don't even have tech meetings. Sure, we sit down after each tech rehearsal, but the format is restricted to the director presenting a laundry list of demands. The artistic give and take, and the ability to coordinate between different departments, isn't there because there just isn't time.
Every design, every production you proceed on guesswork. Sometimes the data is relatively good. Other times the staging changes utterly between the first blocking rehearsals and the final designer run (when it is too late to alter the plot), the mixed paint in the buckets doesn't even resemble the chips and swatches, etc. etc.
For me, as often as not I find I've misread the production concept. Probably because the concept doesn't exist as such. There isn't a firm draft that lays out the key ideas. Instead there are a bunch of loosy-goosy verbs that don't even really fit together. And when a gestalt arises from the work of the other designers (even a false gestalt, seeming connections that weren't actually designed into it) it doesn't come close enough to what I imagined to allow me to save most of my pre-production work.
More often than not, I have to throw out my working files and create a fresh design right in the middle of tech. Because this is the first time I get the actual sound of the band, instead of verbs about what they were intending to sound like, and the actual choreography (instead of what they hoped to be able to do before crunch stole all their dance rehearsal time).
And I'm getting pretty tired of having to slap up a half-assed design. Especially when I'm doing it in the wee hours between fourteen-hour shifts at the theater.
(The show I'm on right now has the disease, but the symptoms are not as marked. I'm almost getting enough rest to recover from the nasty bug I came down with.)
Wednesday, January 15, 2014
Blow-Up
I'm in tech on a crazy show (forty kids, four casts, two directors, Disney script, etc.) Hit bad by the flu (or one of the bugs going around). And a tree fell on my car. The car is fine, actually, aside from a new dent.
Spared a little time over late-night white rice dinners to add a few more models. I don't care for the design of this remote detonator, or the quality of the mesh:

The intent was to start with a walkie-talkie, add one of those "fire the missile" switches on it, and then tweak the shape a little to be more interesting. But the result has neither an appearance of realism (I say "appearance," because the real families of remote detonators look nothing like the Hollywood versions), or a game-prop like density and quirkiness of detail.
Whatever. It's one more model for the kit. Plus a more-or-less authentic model (there's a lot of variation in the real thing) of the most common American military plastic explosive; the M112 Demolitions Block. (They are mostly, these days, an off-white putty-like appearance, shrink-wrapped in green plastic and screen printed. They also tend to have a strip of double-stick tape on the back, which I haven't added yet).
These are still stand-in textures, of course.
Spared a little time over late-night white rice dinners to add a few more models. I don't care for the design of this remote detonator, or the quality of the mesh:
The intent was to start with a walkie-talkie, add one of those "fire the missile" switches on it, and then tweak the shape a little to be more interesting. But the result has neither an appearance of realism (I say "appearance," because the real families of remote detonators look nothing like the Hollywood versions), or a game-prop like density and quirkiness of detail.
Whatever. It's one more model for the kit. Plus a more-or-less authentic model (there's a lot of variation in the real thing) of the most common American military plastic explosive; the M112 Demolitions Block. (They are mostly, these days, an off-white putty-like appearance, shrink-wrapped in green plastic and screen printed. They also tend to have a strip of double-stick tape on the back, which I haven't added yet).
These are still stand-in textures, of course.
Sunday, January 12, 2014
More Boom
And after all that brave talk, I build yet another mesh with mostly extrusions. Which is slower to build and slower to map. And after all that careful work making a single manifold mesh, to get the nice crisp edges I split vertices anyhow.

Oh, yeah. Designed as the thing that goes on the blocks of plastic explosive for either a timer or a radio signal. Except I've been playing way too much Half-Life of late and I ended up with a way too elaborate game-inspired look for it.
So I've still got at least another two meshes to construct, as well as all the final texturing to do, before I can add this new set to my Poser store. But the next show is in the window already and I just accepted an offer to do about three weeks worth of upgrade work on another theater.
Thursday, January 9, 2014
How to Poser (Content): Box Modeling
If you are starting out making objects for 3d printing, for games, or for Poser, you will have run into the term "Box Modeling." To paraphrase Kipling, there are nine and twenty ways to construct a mesh. Some of the methods are additive, some subtractive, some procedural. The Box Modeling method is just one of these methods, and like the others is rarely done in exclusion, but rather becomes one of your suite of tools.

First step for this model was importing a reference photograph. Here it is in PhotoShop being aligned to the grid and pulled around a little to be less distorted.
 The model starts with a square primitive. I add vertices to frame out the shape I'm after.
 Edge tools help here; I select an edge and extract it to form the sides of the internal box there, then use the Add Vertex tool in Constrained mode to divide it up, then I drag the edges around until they are in roughly the right places.
I've also added two copies of a primitive circle, again from the Add Object menu, and stuck them close to where I need some holes cut.
 Adding holes to a mesh is challenging in Carrara. Booleans are of course out. The simplest method turns out to be to move the "hole" out of plane; then Carrara will let you loft or bridge between the shapes. When you are done, flatten the mesh and delete the center polygon.
 Extrude or Add Thickness and now we really have a box. I've selected an edge loop here and extracted it to subdivide the box. I could have achieved the same effect by extruding more than once.
Now that I have one loop cutting the box in two, I can use Quick Bevel or other edge tools to duplicate it, and move the resulting loops around as needed for the next step.
 Sub-face extrusions here; taking the new edge loops, dividing them further, and extruding selected faces to create some of the details of the shape. Be careful in these stages of the integrity of the mesh; it is a little too easy to construct edges that appear to weld but do not (due to a different number of vertices).
 Beveling the edges. I had intended to use Subdivision to smooth the object once the basic were in place, but on this mesh it didn't work so well: partly, because there are a number of odd transitions in the real object between rounded edges and squared-off edges.
So instead I'm using the Easy Bevel tool over and over, turning the rough corners into smoother corners.

Carrara's auto-triangulate tools are a mess, so I've manually triangulated most of the mesh -- or, rather, added edges in order to eliminate most of the n-gons. This requires a certain amount of creativity in making transitions from higher detail (such as the now more circular holes), to less detail.
There are as I said a variety of subtle intercuts and plane changes in the original object!
 The handle starts with a cylinder primitive instead (it is hard to get a smooth cylinder by eye by adding vertices to a box. So you start with one instead).
 A group of faces is extruded from the cylinder.
 Back to the reference plane, and the extruded polygons are shaped. As I extruded, I made sure to add edges where the other elements are going to be extruded.
(In Carrara, you can have a reference picture in any orthogonal view. Go to the "Global" tab to import the reference image).
 And as before, subdivide the surface, extrude selected polys, subdivide those, drag the edges around to form the desired shapes.
 The final mesh. To the two meshes detailed above, I've added screw heads, text, the switch boot, terminal and cap (all vertex objects) and the safety bail -- which is a tube created in Carrara's Spline Modeler.
To fit these together, I opened up the preview pane as far as it would go while inside each instance of the Vertex Modeler, and adjusted the mesh being worked on until it fit properly into the complete model.
 UV check.
This is a lecture all on its own. Maybe several! This pic shows a checker texture applied to the entire model to confirm that the UVmaps are clean and proportional to each other (aka, you don't want one part of the model to be scaled much larger in UV space than another).
 Imported into Poser and rigged; altGeom to open or close the terminal cover, JCM on the switch boot driven by the handle, and ERC-driven safety bail as well.
I'll go into detail on that if someone comments requesting it.
Not textured yet; these are stand-in block colors instead.
In the example below, an M57 "Clacker," Box Modeling seemed the simplest way to approach the desired shape.
First step for this model was importing a reference photograph. Here it is in PhotoShop being aligned to the grid and pulled around a little to be less distorted.
I've also added two copies of a primitive circle, again from the Add Object menu, and stuck them close to where I need some holes cut.
Now that I have one loop cutting the box in two, I can use Quick Bevel or other edge tools to duplicate it, and move the resulting loops around as needed for the next step.
So instead I'm using the Easy Bevel tool over and over, turning the rough corners into smoother corners.
Carrara's auto-triangulate tools are a mess, so I've manually triangulated most of the mesh -- or, rather, added edges in order to eliminate most of the n-gons. This requires a certain amount of creativity in making transitions from higher detail (such as the now more circular holes), to less detail.
There are as I said a variety of subtle intercuts and plane changes in the original object!
(In Carrara, you can have a reference picture in any orthogonal view. Go to the "Global" tab to import the reference image).
To fit these together, I opened up the preview pane as far as it would go while inside each instance of the Vertex Modeler, and adjusted the mesh being worked on until it fit properly into the complete model.
This is a lecture all on its own. Maybe several! This pic shows a checker texture applied to the entire model to confirm that the UVmaps are clean and proportional to each other (aka, you don't want one part of the model to be scaled much larger in UV space than another).
I'll go into detail on that if someone comments requesting it.
Not textured yet; these are stand-in block colors instead.
Friday, January 3, 2014
Ka-tak!
Of course I had to build a clacker for the mine model:

It isn't mapped or rigged yet. For that matter, I'm holding off on textures for the moment (will do a bunch at the same time). And, yes, I built altGeom for the plug so you can put the protective boot over the terminals if you want!
Also screen-shot several stages of the build. Perhaps I will make a blog entry some time about box modeling, and working with reference materials and scale information.
I'm also more than half-tempted to go through to water-tight and manifold the mesh, and make the mine printable from my Shapeways store: in 1/4 scale or smaller of course.
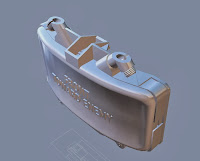
Small Morrow Update
The second Commando V150 arrived in the mail from Shapeways. We printed this time in "Frosted Detail" material, which was slightly more costly but both captured the detail of the mesh better and provided a smoother surface with less finishing work necessary before painting.
However, a few small parts did break off somewhere between printing and when it arrived here. So I've placed a hold on new orders in my Shapeways store until I've had time to thicken it a little in those spots (specifically, the protective "cage" over the gunner's periscope, and the "grab bar" like shapes that provide a door rest when the lower part of the side doors are opened. The latter was an easy fix with a bit of wire and some zap-gap CA.)

(Printing price is $50 -- I know, it sounds steep, but think of it like one of those Japanese "Garage Kits.")
Thursday, January 2, 2014
This One's Mine
Been working hard on the 3d modeling this week:
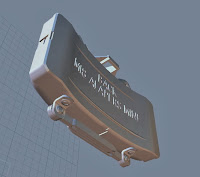
This was supposed to be a simple one to pad out the new set a little. Until I found out two things; a lot of people have modeled these so you can't cheat the details like you could with something less familiar to the audience, and; they have a lot more weird little curves and divots than I remembered.
(Yes, the legs are there. But I built them in stowed position to get the dimensions right, and I'll unfold them after I've rigged the thing. The model is done, but I still have to clean up the UV maps.)
I also realized why I'm not using automated mesh tools that much -- why I'm manually struggling vertex by vertex more often than not. That's because the automated tools in Carrara suck. The decimate tool, for instance, has never done anything useful. The edge tools have all sorts of peccadilloes (not limited to removing all mesh groups and welding all the proximate vertices in the entire mesh -- but that in itself is plenty!)
I wrapped the letters around the curved front with one of Carrara's Object Modifiers. Which rotated the mesh whilst bending it, making a nice round of flipping between different tools just to put the bend in. Then of course had to commit the bend via "convert deformed object to mesh" -- which basically shat all over the mesh. Took me almost an hour of manual clean-up.
It didn't even add all the garbage vertices and edges in a sensible way. Many of them were orthogonal to the bend, meaning they had no need to be there and in fact interfered with the smooth bend!
This is what really gets me about Carrara these days. Using it is like getting lectured by someone who hasn't been in the field himself for decades. Many times when you click on a tool (or even open a mesh), some "nag" notice pops up with some snide statement about how what you tried to do is bad modeling technique and even if Carrara permits it you won't be happy with the results.
Except. Except Carrara disobeys these frequent sneering adjuncts constantly with its own tools. Apply the text tool. It creates a mesh that Carrara will later claim is impossible and wrong.
You know, back in version 2 and 3 you could build with scaffolding, copying a set of edges and lofting off them. It made it really fast to create complex shapes. Now something as simple as the letter "A" is a huge fricking pain. Because Carrara can't understand the concept of a hole in a mesh, and tries to fill in the center of the "A," and when you try to delete the extra poly, extra-extra helpful Carrara helpfully delete all the edges as well! Because of course the edges would be naked otherwise, and exposed edges are bad modeling. So the software makes sure not to let you fix what it just screwed up.
Yes, it is long time that I stopped whining and moved on. I am moving on. I'm deep in the Blender manual and I almost understand the basic work method there now.
But I want to let this be known. I purchased Carrara when it first came out. Carrara Studio 1. I purchased it because I'd used two or three versions of Ray Dream before that and Carrara was the inheritor of that software. And it wasn't all bad; Carrara added basic mesh tools, eventually even edge tools and subdivision surfaces. And it also added what was when it came out a very nice render engine; fast as all heck, and the first realistic out-of-the-box lighting model I'd ever worked with.
But each new upgrade broke a new part of the modeling workflow, and failed to substitute a working alternative (as in, the methods they wanted you to use, were broken and they hadn't gotten them to work right yet.) And each upgrade was full of promises that it would get better. And I dumped hundreds of dollars in that rat hole.
Subscribe to:
Comments (Atom)