It totally makes sense. The moment I figured out how to create and use a full-functioned class (in Java), I switched to a completely different language with different syntax and different paradigms. Objective-C, which uses messaging instead of methods, meaning late binding and dynamic typing and all that.
Plus, you know, Processing is a stripped-down version of Java and constructs code that runs on the Java Virtual Machine. I'm learning Objective-C within the framework of Cocoa and the Apple environment. Which means I'm exposed to a lot more of the code behind the window than I am writing a Processing PApplet.
And I have yet to get to "Hello World." Oh, sure; I can create a program that compiles, that has a window and buttons, and the buttons and other elements interact with each other. But I haven't quite grasped the methods to pass messages to a custom class -- even as much as I've managed to both create a class and instance it in ways that didn't throw up a compiler error.
I'm working through a tutorial right now. One of my habits is when I'm using example code, whether it is a sample or a full tutorial, is that I will re-name every variable. This makes it a lot easier to learn which are actual variable (or otherwise user-assigned) names, and which are inviolate software functions. I also change around other things, for the same reason.
I have to say, though, XCode is a big step up in programming environment. The Processing and Arduino "sketchbooks" will color code core functions, and highlight matching brackets. XCode goes quite a bit further with throwing up contextual menu suggestions and auto-fill boxes. And there is a lot of drag-and-drop functionality, especially around interface design; you literally control-drag an interface item in order to insert the proper messaging code into your text.
I'm still going to be very happy when I finally make a button that can do something. Happy enough that I may take a break from programming!
Thursday, February 21, 2013
Wednesday, February 20, 2013
LCARS to Z-CARS
I'm not really going to do an LCARS - type GUI for my new XBee software. Well, probably not! In fact, especially since I learned you can put a Cocoa wrapper around a Java program, in a way that makes it possible to even do with Processing (or you could just grow up a little and learn to use standard Java)....
Oh, yes. I downloaded the latest XCode/developer environment from Apple. I think the last time I messed with I got to "Hello World" but gave up on actually linking to useful libraries. Maybe this time I'll get further.
 In any case, I spent time today learning how to make LCARS shapes in Processing. Which wasn't as frivolous an exercise as it seems. First off was finding out about the LINE and BEZIER classes. And, unfortunately, although lines and lines with rounded ends are a natural for Processing, the LCARS "Sweep" -- a curve that goes through 90 degrees and from thick to thin -- can't be done with those simple tools.
I graphed out an LCARS sweep and plotted it in vertex by vertex; that worked, but besides being non-scalable annoyed me as a long-way-round way of doing it. More careful investigation showed the LCARS sweep is basically two filled circles; one positive, one negative.
Ah, but the trick is to write this stack of shapes once, and reference it as needed within the program. This also makes it easier to dynamically change the display! So the next thing to learn was PShapes; a class that wraps various sorts of geometry to allow it to be manipulated more easily within the Processing window.
Except PShapes didn't seem to give me the instancing I wanted to selectively modify the shapes I called up from the template. Either that or I wasn't understanding how to properly use it. The answer was obvious -- it just took me most of the evening, a full mug of coffee and a lot of Bach to get through it.
Object-oriented programming. I had to actually sit down and make my first full-fledged class. Not a function I referenced from elsewhere, but a class that could be instanced to objects with methods that could be called on a per-object basis.
And that's done and I feel a little more like a proper beginning porgammer///progerammer//pregoram/////guy who writes code. Now I just have to refine my understanding of inheritance................
 Oh; this has nothing to do with the British television series Z-Cars. Which happened to include in the original cast a young BRIAN BLESSED.
Pity they never had a uniformed PC on that show named Gordon. Who would be, you know, ALIIIVE!
Oh, yes. I downloaded the latest XCode/developer environment from Apple. I think the last time I messed with I got to "Hello World" but gave up on actually linking to useful libraries. Maybe this time I'll get further.
In any case, I spent time today learning how to make LCARS shapes in Processing. Which wasn't as frivolous an exercise as it seems. First off was finding out about the LINE and BEZIER classes. And, unfortunately, although lines and lines with rounded ends are a natural for Processing, the LCARS "Sweep" -- a curve that goes through 90 degrees and from thick to thin -- can't be done with those simple tools.I graphed out an LCARS sweep and plotted it in vertex by vertex; that worked, but besides being non-scalable annoyed me as a long-way-round way of doing it. More careful investigation showed the LCARS sweep is basically two filled circles; one positive, one negative.
Ah, but the trick is to write this stack of shapes once, and reference it as needed within the program. This also makes it easier to dynamically change the display! So the next thing to learn was PShapes; a class that wraps various sorts of geometry to allow it to be manipulated more easily within the Processing window.
Except PShapes didn't seem to give me the instancing I wanted to selectively modify the shapes I called up from the template. Either that or I wasn't understanding how to properly use it. The answer was obvious -- it just took me most of the evening, a full mug of coffee and a lot of Bach to get through it.
Object-oriented programming. I had to actually sit down and make my first full-fledged class. Not a function I referenced from elsewhere, but a class that could be instanced to objects with methods that could be called on a per-object basis.
And that's done and I feel a little more like a proper beginning porgammer///progerammer//pregoram/////guy who writes code. Now I just have to refine my understanding of inheritance................

Pity they never had a uniformed PC on that show named Gordon. Who would be, you know, ALIIIVE!
Tuesday, February 19, 2013
Back to Processing
I'm moving away from hardware MIDI.
9/10 of the time, the MIDI signals generated by my various gadgets are going into a laptop anyhow. And as I gain confidence in programming, I think it is easier to write client-side software than to try to do everything on the embedded processor of a black box.
This seems like it is going to be the form of my DuckNodes. On the Node end, LiPo battery and charge circuit, monitor/feedback LEDs, XBee. On the master end, Xbee node with FTDI adaptor plugged into a USB port -- and the rest is software.
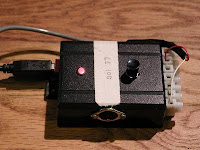
 Sure, I could dress up the receiver with some indicator blinkenlights. I'm also tempted to make it in the form of a Diesel-Punk USB stick. The first show I did using software at the receiver end, I stuck the receiver XBee inside a rubber ducky -- a yellow plastic bathtub duck -- to protect it.
(That's the actual hardware in the picture there; one Xbee inside the television remote, one inside the duck, with the latter connected by USB cable to the Processing sketch visible on the desktop.)

This is a bad time for me to be buying parts. So this will have to do to construct the prototype DuckNode; a Modern Devices accelerometer, XBee (not XBee Pro), and AAA batteries. I need to read up on the chip, though, to find out the voltage tolerance and so forth. But for the nonce I'm working on the software layer, and for that my XBee-equipped Easy Button is sufficient.
9/10 of the time, the MIDI signals generated by my various gadgets are going into a laptop anyhow. And as I gain confidence in programming, I think it is easier to write client-side software than to try to do everything on the embedded processor of a black box.
This seems like it is going to be the form of my DuckNodes. On the Node end, LiPo battery and charge circuit, monitor/feedback LEDs, XBee. On the master end, Xbee node with FTDI adaptor plugged into a USB port -- and the rest is software.

(That's the actual hardware in the picture there; one Xbee inside the television remote, one inside the duck, with the latter connected by USB cable to the Processing sketch visible on the desktop.)

This is a bad time for me to be buying parts. So this will have to do to construct the prototype DuckNode; a Modern Devices accelerometer, XBee (not XBee Pro), and AAA batteries. I need to read up on the chip, though, to find out the voltage tolerance and so forth. But for the nonce I'm working on the software layer, and for that my XBee-equipped Easy Button is sufficient.
Sunday, February 17, 2013
Tools
I'm between shows. No design deadlines, and no props with deadlines either, now that the Maverick is shipped. So this might be a good time to build some tools.
 I've been having great fun with my wireless EasyButton. Used it to run the lights on one (simple) show. Used it a couple of times to check sound cues as I walked the house. Has only been in one show so far -- or, rather, the guts were, transplanted into a television remote and used by the actor/narrator to "control" the action of the play. (For that show, the XBee triggered a sound effect in a small Processing ap running on a laptop, which plugged into the sound board).
I've had even more fun with my simple MIDI button (this spits out MIDI over the standard 5-pin DIN connector when a switch contact is closed). It has been in an orchestra pit twice to allow the percussionist to trigger a sound effect. Another time it was wired into an intercom box to play a buzzer sound. The flexibility of this is that the trigger is just a button or sensor; the resulting command is interpreted, usually by QLab, meaning we have total control over what kind of sound, where it is placed, etc.
I've been trying to dream up a new device along these same lines, that is a plug-and-play solution for any number of sound/lighting/effects coordination problems. Something I could have in my bag, that would hook up quickly with minimum wiring to a variety of inputs/sensors; something we can use to explore the kind of dynamic cue'ing new technologies have made possible.
Friday, February 15, 2013
Yippee-Kai-Aye
Sure, I could have done more with this. The original idea included opening up the cylinder and replacing the barrels with individual tubes, Gatling Gun style. Plus I wanted to put on a proper spur-type Western hammer, and cut off the not-particularly period T-rail.
Next one. This one is only good enough now to slap a coat of paint on. Besides -- there's plenty of mistakes to make in paint, plenty of experiment there.

Painting steps below the fold:
Next one. This one is only good enough now to slap a coat of paint on. Besides -- there's plenty of mistakes to make in paint, plenty of experiment there.

Painting steps below the fold:
Thursday, February 14, 2013
Keep Those Doggies Rolling
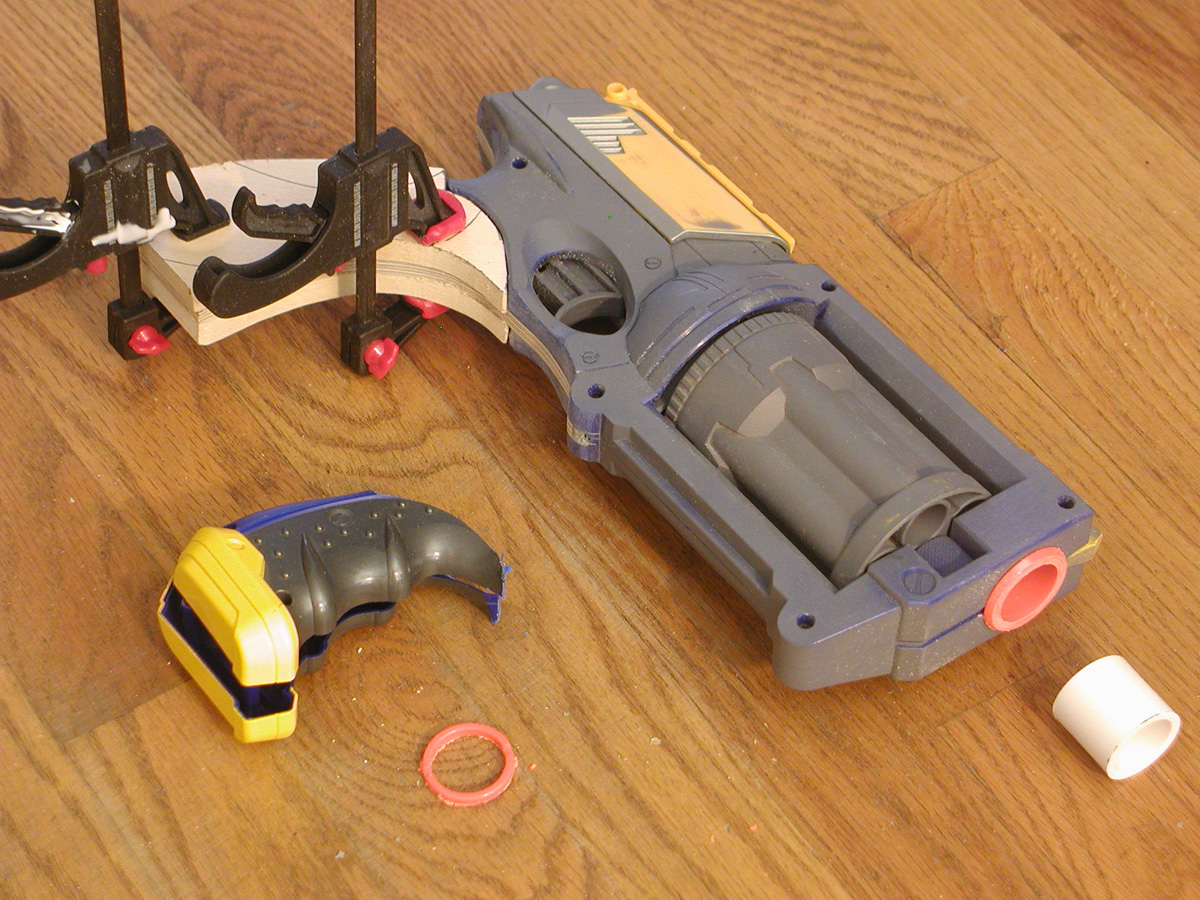
So to review: the project is a Steampunk re-dress of a NERF "Maverick" (Rev-5). First step was taking it completely apart.

Then the rather silly-looking grip is cut off, and the frame for a new grip fabricated from 1/4" birch plywood.

The adventure for the next day is shaping the grips around the new frame. I roughed out the shapes in 3/8" basswood with my "new" Dremel Scrollsaw, and attached them with zap-gap. I also sanded off all the NERF logos and branding, and cut off the muzzle.

Then comes shaping -- mostly with the small (but very sharp) carving knife I picked up at Hida Tools (a local Japanese Woodworking and gardening tools store.) Then sanded down, and patched; first with Bondo auto putty to fill the larger gapes, then Bondo Spot Putty for the small remaining gaps.
Oh, yes. The new muzzle is an ABS plumbing coupler, cut down and attached with ABS solvent cement.

By this point my errors are compounding; I had trimmed unequal amounts off the two halves of the original gun to fit the new grip frame, meaning the build-up is about 1/8" off center. Added to that, the cuts where the old grip was removed were not in the same place. Originally I had intended to smooth the join, then create an arbitrary line between wood grips and "metal." But late in the day I decided I liked the basic placement of the cuts -- but this meant spot putty and panel line tool to make them appear to match on both sides of the gun.
In addition, I'd left one spring out when I re-assembled. It's the one that retracts the front end of the cylinder retaining pin. So to open the gun you have to press the button, then hold it muzzle sky-ward and tap it so the pin falls back.

And on to painting.
I didn't think out the process well enough. Started with filler-primer on the new wood -- the basswood furs up something bad so a couple of coats of primer, sanding between. Then black paint over the whole thing. Touched up with a second can of faster-drying paint which reacted to the first; sanded and steel-wooled out the bubbles, then spent a while trying to brush the steel wool fragments off.
Then an intentionally spotty coat of Krylon "Hammered" finish to bring in some texture, and hide the flaws of a quick build and a clumsy sanding job removing the original logos and name and other marks.
My intention is to wash it with black and rust to build up some life, then cut those back with metallic spray paint, then dodge that just a little with more black. And there's a new wood technique I want to try once the metal is dry. We'll see how it goes...

Then the rather silly-looking grip is cut off, and the frame for a new grip fabricated from 1/4" birch plywood.

The adventure for the next day is shaping the grips around the new frame. I roughed out the shapes in 3/8" basswood with my "new" Dremel Scrollsaw, and attached them with zap-gap. I also sanded off all the NERF logos and branding, and cut off the muzzle.
Then comes shaping -- mostly with the small (but very sharp) carving knife I picked up at Hida Tools (a local Japanese Woodworking and gardening tools store.) Then sanded down, and patched; first with Bondo auto putty to fill the larger gapes, then Bondo Spot Putty for the small remaining gaps.
Oh, yes. The new muzzle is an ABS plumbing coupler, cut down and attached with ABS solvent cement.

By this point my errors are compounding; I had trimmed unequal amounts off the two halves of the original gun to fit the new grip frame, meaning the build-up is about 1/8" off center. Added to that, the cuts where the old grip was removed were not in the same place. Originally I had intended to smooth the join, then create an arbitrary line between wood grips and "metal." But late in the day I decided I liked the basic placement of the cuts -- but this meant spot putty and panel line tool to make them appear to match on both sides of the gun.
In addition, I'd left one spring out when I re-assembled. It's the one that retracts the front end of the cylinder retaining pin. So to open the gun you have to press the button, then hold it muzzle sky-ward and tap it so the pin falls back.

And on to painting.
I didn't think out the process well enough. Started with filler-primer on the new wood -- the basswood furs up something bad so a couple of coats of primer, sanding between. Then black paint over the whole thing. Touched up with a second can of faster-drying paint which reacted to the first; sanded and steel-wooled out the bubbles, then spent a while trying to brush the steel wool fragments off.
Then an intentionally spotty coat of Krylon "Hammered" finish to bring in some texture, and hide the flaws of a quick build and a clumsy sanding job removing the original logos and name and other marks.
My intention is to wash it with black and rust to build up some life, then cut those back with metallic spray paint, then dodge that just a little with more black. And there's a new wood technique I want to try once the metal is dry. We'll see how it goes...
Little Wonder
Since so many people have asked, here is the basic idea of the "Little Wonder" prop as I made mine for a long-ago production of "Oaklahoma!"
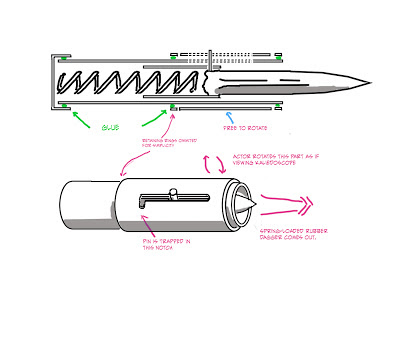 I can not vouch for the practicality or safety of this design. I am drawing this from memory. The one I built was of whatever random bits of pipe and tube were lying around the scene shop. My memory is that the inner tube was metal, but the outer tub and a further decorative ring were from ABS. I'm pretty sure you could do this all with ABS, though, using ABS solvent cement and a NERF dagger, and just find the right lightweight spring from Orchard or Ace's copious selection (or if that fails, order the exact dimensions you need from Grainger.
This also doesn't quite match the description given in the dialog. But it is fun to look at and when it works, dramatic. Since mine had the inner pipe of metal and of course the rod has to be 1/4" metal as well, it made a nice dramatic metal-on-metal "kaclank!" when activated. Although I forget if it is Ali Hakim or Judd Fry who demonstrates the thing.
If I did it today, I'd make TWO -- one firing, that Judd would purchase in the first scene, and a second non-firing that Curly could play with in the second scene.
Paint it up like a Victorian kaleidoscope. Or, considering the risque nature of the supposed thing, in red or burgundy flocked paper and gold filigree to make it look properly tawdry.
Thursday, February 7, 2013
Maverick!

No, not this guy.
I'm starting a new prop. Tight budget, tight deadline. The best kind.
For a friend, I'm joining the legions who have re-painted a NERF gun. And the smaller legion (but still enough to rate at least a Centurion), who re-painted, specifically, a NERF "Maverick" to look Steampunk.
Here's the main requirements:
It should still fit in the same holster (the friend is ordering one of those custom-made ones).
It should be study enough to wave around.
It would be nice if it still worked.
Now, I'd seen a few NERF re-paints around. And a few Mavericks, of course. And a couple things always bugged me about the Maverick, especially when it is in a Steampunk guise. The worst of these is that grip. It just looks too...well....NERF.

So I grabbed an image (of a gorgeous re-paint by "boon119" over at DeviantArt), a couple pictures of Colt revolvers, and opened PhotoShop to brainstorm ideas.
This was the concept: a Hogleg Maverick. Or, rather, a NERF with a Colt-type grip.
Taking Down:
Boy, there are a lot of parts in this thing! The cups are of course holding the many smaller screws and springs. What all of them do isn't entirely clear but the basic mechanism is understandable. The problem is going to be working around it. Cutting Up:
I have no pics (I took one, but it didn't come out well enough to use). An hour or two with scale rule, razor saw, and X-acto knives and I had trimmed a quarter-inch space between the halves, where the frame of the new stock would fit.
Fit-Up:
 As careful as I was in tracing, the alignment wasn't quite there. Making holes for the various posts was even harder...I smeared them with paint but the test alignment was far enough off that I had to re-drill and expand them anyhow.
 However, this did give me a chance to try out my new tool. Someone right in my own neighborhood just tossed out a Dremel Moto-Shop. No, not the rotary tool. This is an ultra-cute scroll saw with a 15" throat. After cleaning up a little rust, and buying a new set of 3" pin blades on eBay, I put it into action. It cut right through that birch ply.
So I'll probably glue this in, as rough as it is. But I'll save a trace in case I want to make another one of these one day. And that way the next one can be a little more accurate.
(Interesting, but there is a suspicious gap behind the trigger that suggests NERF planned to put a switch in there at some point. Suggesting the possibility of electronics. Not for this particular mod, though, I think.)
Proof of Concept:
 The shape looks right, it feels comfortable enough (though not that comfortable, alas). And even without the epoxy, quite solid enough to wave around. I have no problem believing this will support the weight of the final prop, even firing it.
Now the question remains how to finish the shaping. The original idea was to actually carve grips out of soft wood. But there is a bit of a gap, there are several funny places in the fit, and I think I might be smarter to just build it up with Bondo/Apoxie Sculpt, then paint it to look like wood.
Whatever I do is going to have to be fast. I only have twelve more days.
Monday, February 4, 2013
Old School
We've had a bunch of different music directors. It keeps things interesting, as each has their own idea about some of the ancillary tasks. Several in the past brought in a group of friends to form the band and as a result delighted in jamming together for preshow, and even at intermission. Lots of rock covers, jazz standards, and eclectic things like, for instance the Muppet Show theme.
Others either didn't realize it was allowed, didn't think it was appropriate, or didn't have a group of musicians with enough confidence in each other to assay that. In fact, the last several shows in a row have been rather quiet for pre-show.
Many of our music directors have been keyboardists, and as such, usually brought their own. When there was a second keyboard, they supplied that too -- or brought along another gigging keyboardist who owned several keyboards they liked and used.
For those that weren't, they usually made do with our upright piano. The upright sounds good and we tune it before every show, but the main drawback is the height; it is hard for a music director to see over it. For Sound of Music we rigged a video monitor -- the band was behind the set anyhow. For the juniors shows (8-13 years) we usually have a minimal pit so we make do with upright piano, drums, usually bass (but for Peter Pan we had a wind player instead).
Carnival was a mixed bag; a teen show, meaning more ambitious than the juniors, but not quite the level of technical support of the main stage shows. Our music director settled on two keyboards, drums and bass -- the latter two had played for us several times in the past. We had an exceptionally brief tech -- three days to block, tech, and final dress two casts, and this was respecting school hours, too. That meant there was really no time for experimentation, and barely time for discussion.
I know our music director could have come up with a couple of keyboards if need be. But what got thrown into the hat was that they'd use the Privia from the rehearsal hall (a Casio digital keyboard) as the piano, and I'd supply the second keyboard. What with schedule and so forth I ended up setting up the pit myself, selecting the base patches for keyboard II, and basically hoping they'd be able to use what I'd set up.
And, with surprisingly little adjustment, we did.
The Privia of course sounds ghastly. And it doesn't even have output jacks. You can connect to the mini-jack headphone out but it is fragile and it turns off the internal speakers meaning you have to add a monitor so the keyboard player can hear themselves. I've mic'd the speakers on a past show or two. It delivers a kind of C-80 piano sound, very noisy -- actually, it has a very cool burry tone to it when used with the electric piano patch, and I used that trick (a condenser mic an inch above the tiny built-in speaker) to advantage during Oliver!.
Fortunately, it is just expensive enough a keyboard to have MIDI jacks.
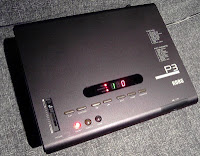
So I used double-stick tape to fasten my old Korg P3 Piano Module to the keyboard stand, ran a MIDI cable to that, and ran the output to the sound system. The keyboard player used the internal sounds of the Casio and had complete control over her speaker volume.
Second Keyboard took us more fully into the retro past. First off, the only controller keyboard I had to offer was my old Roland W30 workstation. This is a keyboard/sampler/sequencer so old the operating system boots off a 3 1/2" floppy disk. It also has a sticky A3; right in the middle of the keyboard.
For sounds, the better-sounding option would have been to loan my aluminium Powerbook running Garritan Personal Orchestra via the supplied Aria Player.
But in keeping with the theme, I instead hung my Roland M-OC1 Orchestral Module on to the MIDI output of the W30. (Of course, I could have set up a custom patch disk on the W30, but that would have taken time and probably not sounded as good. Probably!)
The Ochestral Module is a rack-mount (meaning, a metal box 19" wide, plus flanges) dating from the 90's. It is a break-out of one of the expansion cards (aka, a ROM card) for Roland's flagship keyboard, the JV80.
It dates from the heyday of what Roland called LAS (linear arithmetic synthesis). What is basically means, is that you start with real samples from orchestral instruments, process the central part of the tone and combine it with pure electronically-generated waveforms until you have an unchanging tone that can be looped continuously for as long as you need. Then you combine it back with a snippet of the attack (the noise transients at the start of most musical notes.)
(In late LAS synths there were four slots for what they called "partials," meaning you would actually play several samples simultaneously, and/or cross fade from one to the other either over time or as you changed registers. It was all in all a rather flexible approach that led to fairly rich sounds.)
After that it is standard synth-era tricks; velocity and key-dependent filters and volume envelopes so the sound changes in nature as you go up and down the scale, and as you play softer and louder, and oscillator-driven similar filters and VCOs to apply a sort of artificial vibrato. Modern philosophy is much more sample-oriented, and tends towards fixed-length samples with minimal looping, the actual transients, even the actual tails (as in, the sounds after stopping a note).
The rest of the band was a little more "modern." The bass player brought in his own pre-amp/DI for his piezo pick-up, which sounded lovely (not all DI's are equal, and piezo pick-ups make this even more obvious.) I had prepped only eight snake channels to the pit, and I was maxed out at the console with just six inputs -- any more and I'd have had to add a submixer. So drums started with my generic overhead; a CAD GXL3000 set to omni. In this case, moved as close to the xylophone as I could get it and still be out of the drummer's way.
I originally had a snare mic taped to the hat stand with spike tape. It sounded good enough for this particular show I kept the angle after bringing in my stands. Aiming at the side, low, from about four inches away and about a 35' angle. I now understand why people mic both top and bottom of the snare drum! (I still don't understand top and bottom of the hat). For this show, the snare side gave the most of the circus feel, I thought.
But. There was no time to tech, the house sound of course changes utterly when you put bodies in it, and I got a really nasty cold right as we went into performance. I had the shakes, could hardly hear, and was struggling through the show to hold back a hacking cough. Needless to say I blew a few entrances. Also needless to say, that kiboshed any chance of really developing the sound of the show and bringing it to where it could have been. And for that I am disappointed.
Subscribe to:
Posts (Atom)