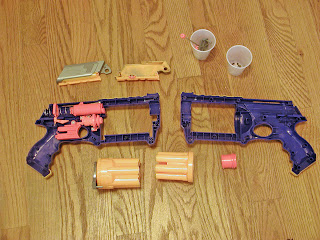
So to review: the project is a Steampunk re-dress of a NERF "Maverick" (Rev-5). First step was taking it completely apart.
Then the rather silly-looking grip is cut off, and the frame for a new grip fabricated from 1/4" birch plywood.
The adventure for the next day is shaping the grips around the new frame. I roughed out the shapes in 3/8" basswood with my "new" Dremel Scrollsaw, and attached them with zap-gap. I also sanded off all the NERF logos and branding, and cut off the muzzle.
Then comes shaping -- mostly with the small (but very sharp) carving knife I picked up at Hida Tools (a local Japanese Woodworking and gardening tools store.) Then sanded down, and patched; first with Bondo auto putty to fill the larger gapes, then Bondo Spot Putty for the small remaining gaps.
Oh, yes. The new muzzle is an ABS plumbing coupler, cut down and attached with ABS solvent cement.
By this point my errors are compounding; I had trimmed unequal amounts off the two halves of the original gun to fit the new grip frame, meaning the build-up is about 1/8" off center. Added to that, the cuts where the old grip was removed were not in the same place. Originally I had intended to smooth the join, then create an arbitrary line between wood grips and "metal." But late in the day I decided I liked the basic placement of the cuts -- but this meant spot putty and panel line tool to make them appear to match on both sides of the gun.
In addition, I'd left one spring out when I re-assembled. It's the one that retracts the front end of the cylinder retaining pin. So to open the gun you have to press the button, then hold it muzzle sky-ward and tap it so the pin falls back.
And on to painting.
I didn't think out the process well enough. Started with filler-primer on the new wood -- the basswood furs up something bad so a couple of coats of primer, sanding between. Then black paint over the whole thing. Touched up with a second can of faster-drying paint which reacted to the first; sanded and steel-wooled out the bubbles, then spent a while trying to brush the steel wool fragments off.
Then an intentionally spotty coat of Krylon "Hammered" finish to bring in some texture, and hide the flaws of a quick build and a clumsy sanding job removing the original logos and name and other marks.
My intention is to wash it with black and rust to build up some life, then cut those back with metallic spray paint, then dodge that just a little with more black. And there's a new wood technique I want to try once the metal is dry. We'll see how it goes...


No comments:
Post a Comment