So now I'm really crunched for time. And I'm sort of between Poser props right now (the modeling is going slowly), so I'm a bit rusty on the details. I tend to remember how something works about half-way through trying to rig a new one, anyhow. Basically, then, this is going to be scattered, and at least partly wrong. Sorry.
Tuesday, April 30, 2013
Monday, April 29, 2013
Robot-Robot
TENTH DOCTOR: "Does it have to do that?"
So we're closing in on the first robot. I had the guts of my old "Square Candies That Look 'Round" -- Arduino, micro servo, and a Sharp IR distance sensor -- and my intention was to work around the shape and look of the components and dress them up in some cool way.
The niece had different ideas. She really wanted the robot to have a big, box-shaped head. So after looking over the materials we had, and keeping in mind how lightweight that servo was, I had her put together a box from three-eights pieces of white expanded foam. My usual method with this material is smooth it with wallboard compound and/or gesso, paint it up with thinned white glue, and spray paint.
But we've been doing robot in short sessions, and we just couldn't wait long enough for multiple coats to dry. We gambled, did one light coat of glue, and I hit it with the spray. Which bubbled up quite a bit but the thing survived and, actually, the effect is kind of cool.
Unfortunately even though it is light, it is large enough so torque is an issue. So I needed to swap out the cardboard box with something heavier. And that servo is running rough, so I'm also swapping out for a standard-size. Which, I'm just this second thinking, might mean I need to go to a board with a separate power supply.
(If I had any money I'd pick up a metal-gear micro from Adafruit instead. But I have a couple standards lying around, so that's what I'll use. A bigger issue is the lack of resolution and the rather noisy output of the Sharp. We're really asking it to do more than it can do here.)
Anyhow. While I was tinkering with finding a nice box to put everything in, and trying to decide if I was going to leave a full Arduino or port the code to a cheaper stand-alone, I realized there was a simple way of setting it up so the niece could get her feet wet on programming.
Write the basic code on to an Arduino. But add a serial read command that will put new values into key variables (like dwell time, seek speed, sensitivity, etc.) And then write a Processing ap on the front end that spits changed values down the USB cable.
My programming skill isn't quite up to having the Processing sketch re-write the flash, so the idea would be to toy with the values, then go back into the Arduino IDE and hard-code them into the working software from there. Keeping the software on the micro means the robot remains stand-alone, which I think is good.
Unfortunately, as seems always the way, I didn't think of this until after my free month was almost over, and I'm not sure when I'm going to fit in the time to do this.
Thursday, April 25, 2013
Bits and Pieces
I'm still broke but the month is almost over -- several gigs next week, mostly design and FOH. Plus I have a new prop commission, which I will be logging in detail here as it is an interesting challenge (creating a resin-cast receiver for a de-militarized Suomi).
Which is good, because the latest Poser prop kit made a bit over fifty bucks, and the one I'm working now is starting to bore me (either that, or the modeling itself, which is currently in a fiddly, time-consuming, and, basically, annoying part of the build). So as a second source of income, it hasn't exactly proven itself yet.
In upcoming Poser posts I intend to talk a bit about mesh design for Poser (not "how to model," but how to make a mesh Poser won't bork on), and go into more detail about technical rigging tricks. I realize the tough part is learning the nuts and bolts of basic modeling and rigging and file management, but that's not something I think I can really help with. You have to get your hands dirty. Start small, build some stuff. Find the tools and processes that work for you.
I am sad that due to being sick part of the month and broke all of it, I was unable to properly focus on getting any new gadgets built. I may skip Maker's Faire this year anyhow; Last year there wasn't much showing by music people and it was actually a bit boring. With a lot of luck, though, I might get a prototype "Duck Node" built in time to have it available in case some application shows up for it on "The Wiz."
We are finishing up on the first "robot" with my youngest niece. She constructed a head that is a bit large for the servo I had, so I need to build a new base. Haven't been able to decide whether I want to make the circuitry visible and accessible but I'm leaning towards closing this one up and using the next project to explore new functions.
I'd also love to involve her more with the software creation, as that is a major part of, well, practically everything electronic these days. But I've kind of painted myself into a corner here where we are making a "head" bot with a simple tropism; it has a single Sharp distance sensor, and will attempt to point at -- and track -- the nearest object.
When I used the same sensor on my "Square Candies That Look 'Round," the Sharp was only the trigger; everything after that was programmed behavior. That would be a lot more open to a child's development efforts. (Heck, if I was a LOT further on with my own programming, I could design a simplified graphical-based programming environment where she could patch different behaviors to the sensor and get real-time feedback from the robot.)
For this, though, I have to massage the (extremely dirty) sensor data and then feed it to a control loop with a bunch of tricky stuff to smooth out behavior. Hysteresis is not enough, especially as I'm building this with a single sensor (line tracking and similar is usually done with two). To get the effect of the head smoothly "nodding" to determine the peak reading, and moving in on it with smooth curves, I need to be doing the same kind of state modeling done in, say, the inertial navigation system of an Apollo space capsule.
(In very simplified terms, instead of modeling a static position, you model the current acceleration vector. Then you compare the information from various sensors against that model, and toss out those that are both low reliability and stray furthest from the model. You can then generate a difference between the change of state that will converge on your desired state and your current change of state. In this case, I only have a single sensor, and I can add an additional constraint of forcing the head to move only at a given velocity/velocity curve. I can constrain it even further by requiring each "adjustment" move fall within a set oscillation cycle. That smooths out the motion/reaction considerably).
And there are libraries that handle some of these functions, but even the process of finding, installing, and learning your way around a new function library is just a wee bit advanced for someone my niece's age. So as I said, I've basically painted myself into a corner where I can't use THIS robot to help her learn programming.
It will have to happen on the NEXT one.
Thursday, April 11, 2013
How to Poser: Rigging Tricks
I'm pressed for time, so this is going to be an overview. No pretty pictures this time.
First off I want to re-iterate; there are tools inside Poser, and there are third-party tools. I don't use them. I've found I can do everything I need to do with a little text editing, and it feels more in control that way.
It isn't programming. It is more like being a Script Kiddie. In fact, I am told that the current maintainers of the code don't even know what some of those lines in the markup do. The Poser files are filled with more and more cruft as time goes on. Fortunately, it's just ASCII text so it doesn't take up much file space!
A little history of Poser, and a brief breakdown of the cr2 with an eye towards tricks you can use in your custom content, are below the fold.
Wednesday, April 10, 2013
How to Poser: Textures
Assuming this series continues, I will be getting to advanced rigging for mechanical props and figures; ERC, magnet morphs, Point At, dynamic cores, injection code, etc. And more about cleaning and dial-hiding.
This is a rambling set of essays, all right. B.L. Render does a much better job of introducing the concepts of figure creation in small, logical steps in her book "Secrets of Figure Creation with Poser 5." And Doctor Geep has his lovely series of humorously illustrated basic lectures as well.
Be that as it may. Today I'm going to touch lightly on the subject of creating materials -- a subject close to my mind at the moment because I just last night submitted my new prop set for testing at Renderosity.

(As an aside, I'm not happy with them. Oh, they look decent. But I was hoping for a lot more florid detail and random piping and rust and grunge and other deep textures. On the former, I'm just too unimaginative to stick on random gears that don't do anything, and too practical to have spiky bits and wires and glass tubes going everywhere. So they have the solidity of things with an actual design and function...but look a lot less playful and baroque.)
Lecture begins below the fold.
Monday, April 8, 2013
From a View to a Pixel
I admit I was tempted, for this next article on building custom content for Poser, to go into the history of 3D graphics.
Instead I'll be satisfied with a mini-lecture -- poorly illustrated -- on some important concepts in optics.
Instead I'll be satisfied with a mini-lecture -- poorly illustrated -- on some important concepts in optics.
Saturday, April 6, 2013
Mad Science
I didn't get the gig. Dangit. I was rather looking forward to mixing a show again, and in a new space. I've worked with the director, the music director, the producer, and in that building as well (used to design lights over there, plus helped set up sound a time or two).
This leaves me without any real work this month. Pity the bills don't go away so easily.
But it does mean I can finish this dratted Poser project and see if anyone will purchase it. I'm getting faster -- more efficient -- at Poser content, but I have a long way to go before I can knock out the kinds of things that interest me at the kind of pace that lets me finish them before my interest flags.
Doing a little research on materials as I go. And of course thinking about the science -- mostly optics -- involved. And there's the old stage experience (also prop-building, and even model-railroading) of learning how to weather properly; how to look for the spots that get the paint rubbed off, the crevasses that grime collects in, the places where rust might streak or oil drip.
These are always good things to think about to get a realistic look to 3d, but even more, Steampunk is nothing if not about the materials. Plus there's a tendency towards very heavy weathering on Steampunk that I have some aesthetic disagreement with. Just because we find it today with all kinds of wear and rust doesn't mean that's how they kept it when it was new!
Wanted some pictures of Bakelite, it of course is slightly out of period but that led me to reading up on period substitutes and the history of plastics. And I ended up with a Bakelite look anyhow, but on the next prop that research was there for me and I swapped out a material that wasn't working for a handle of gutta-percha instead. And looking for how brass corrodes, I read up on the history of brass and bronze, of latten and Admiralty Bras...and realized along the way just how wide a variety of colors and looks brass comes in.
Optically, most of the materials I'm using are compound materials. Brass with a high polish returns some light diffusely, but it also has distinct reflections -- which are colored by the base material. The specular highlights (which are actually just the reflections of local light sources) are also colored, but in some brasses there is an additional protective lacquer or similar. This separation is more obvious in varnished wood, where the wood is one optical layer, but above it is a transparent layer of extremely high gloss. Of course there is French Finish, a favorite of the Victorians, that returns light from deeper in the wood and in a more complex way.
A great many of these effects are anisotropic. Lacquer coatings are nearly transparent when looking straight down into them, but become more and more strongly reflective when seen off-axis. Some materials are the obverse; velvet is the casebook of a material that looks different depending on the angle (when you look straight down, you are looking between the fibers to the base fabric. When you look at it sideways, the color -- and shinyness -- of the fibers dominates.)
Our own Moon has some of these same optical properties; something I learned about while "debating" online the ludicrous idea that the Apollo Missions were faked in a studio. The lunar soil shares some of the cats eye effect of crosswalk paint and the swooshes on Nike shoes in that it returns light preferentially towards its source. The effect is striking in some photographs taken from the surface. This is compounded by what is called shadow hiding; a rough surface, like the velvet example above, if viewed from the direction light is coming from will become significantly brighter as the shadows are hidden on the non-visible side. Due to these effects, the full Moon is several times brighter than the increase in illuminated area alone would account for.
(There's a LOT more to be said on retroflection, including the tapeta lucidum and the unfortunate genetic change back about when we split off from the tapir, and moving forward a few million years, the corner-cube reflectors left by Apollo astronauts that allow measurement via laser of millimeter changes in the distance to the Moon. But I've digressed enough!)
Of course, not all render engines are sophisticated enough to simulate these properly. Fortunately Poser, as primitive as it is, has a few fresnel functions (Edge Blend the most useful) that can help an effect fall off on edges facing away from the viewer. If you get clever with the nodes, you can simulate some pretty complex lighting (unfortunately, anisotropic maps are not one of these; there is no adequate way in Poser to re-create the look of brushed metal).
As in the gaming industry, as in -- oddly enough -- even the actual painting of scenery for the stage -- many effects are "baked in" to the texture maps. We paint in edge darkening and even simulated specular reflections. And that makes it a little more compatible with even more primitive render engines, such as the base engine included in the freebie version of DAZStudio (there is a better render plug-in available for purchase, but I can't count on the end-users having it).
I'm split, as always. The materials simply do not look very good if I don't use a few of the more advanced functions. But every one I include on my textures, is one more place things won't work correctly in DAZ.
Plus, I'm really hoping to have the texturing done before the weekend is out.
Oh, another bit of weird science. It's probably not a new insight, but I was listening to a show tune today and had the thought that evolutionarily, the only time we hear long continuous vocal production is when someone is screaming or perhaps yelling. So a nice long held "C" in a song grabs us with a "A human is either in pain or is trying to warn me about something or is really, really excited."
Of course, given the knock-back of so many human milestones (and discovering more and more things we thought were uniquely ours are in fact not), it is plausible that our ancestors have been doing something a lot like singing for tens of millions of years.
And, no, this isn't the space for my rant against (pop) evolutionary psychology.* I'm going to save that for the novel.
*Oops. I typed too fast when I first wrote this post.
Tuesday, April 2, 2013
Closer to Normal
Yesterday was a GOOD day. I've been having more of those lately. It is strange, both exciting and scary. I've been dealing with some sort of Chronic Fatigue -- or a lingering upper respiratory tract infection -- for several years, and at the start of this year it was very bad. Then I woke up one morning feeling full of strength.
I don't know what happened. I didn't try a new drug, or change my diet, or make any other lifestyle change. But suddenly I felt...well, normal. Able to face a day without wincing at the joint pain and shortness of breath that had been hounding me for months. And this is now the third week of being mostly free of those lingering pains.
And I felt up to facing new work situations. Brushed off my resume and sent off a bundle of emails. A pity that this is also a period where I committed to finishing some 3d art -- that means that even with all my energy, and the lovely days outside, I'm mostly inside sitting at the computer. Well, except for running out to the gym almost once a day!
Yesterday I was feeling very sleepy and ended up going to bed early, but I still did everything I had hoped to do that day. Which doesn't sound like much, but I'm way ambitious. I rarely finish a day having done everything I intended! But I finished the textures on one prop, worked on the robot with my niece for a few hours, got to the gym, and cooked a meal that used some of the veggies I'd purchased before they all went bad (I got to the red bell just in time).
And yes, I may have found a little work. It isn't signed yet, so I'm being cagey, but, yes, there is another pun in the title of this post.
The other pun in the title is surface normals. Which is one of the concepts of 3d rendering. One day, if I get a bunch of feedback and discover people are actually reading any of my rambling talk about 3d, I might draw up a bunch of diagrams as part of a lesson on the basics of 3d rendering. But anyhow.
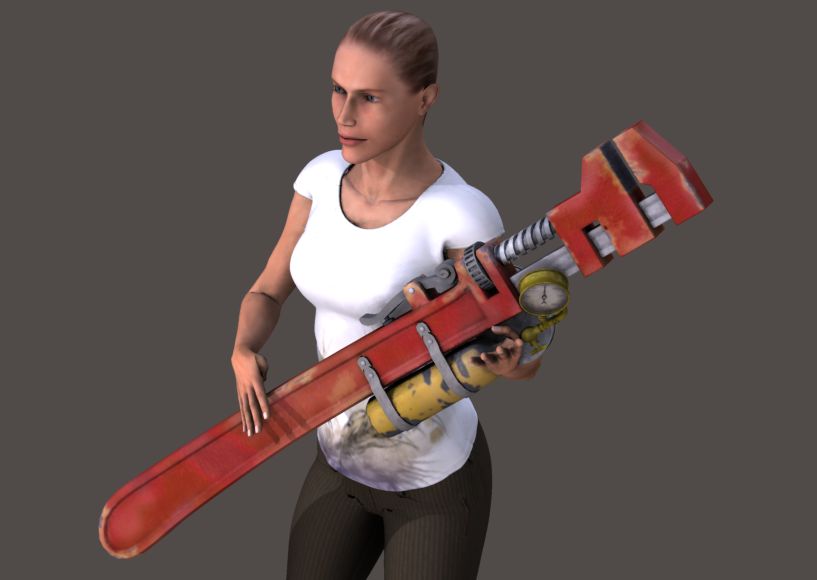
Here's the sanity check on the first prop in the set:

Added a default figure (Poser 9's Allyson) in a default pose (I think it is Guitar Player, which has been around since Poser 3!) The purpose is not to make art. The purpose is to check your texturing work to see if it fits within the Poser universe. It is very hard, squinting at a monitor, to really know if you are working too saturated or not enough, if your details are cartoony or so subtle they don't read, if all your textures are dark and murky or bright and washed out.
Humans are very, very good at setting their own white-balance, though. So drop in something with skin, and the eye will adjust expectations. And this one set-up told me that I was working a little too subtle and not quite as saturated as needed -- which I fixed before the render above.
I'm trying to keep this set simple, but there are ten individual texture maps on that wrench ...not including the reflection map! I could combine some maps and collapse some of the materials zones, but there is a fair amount of work involved in doing that and it makes more sense to move on to the next.
And, yes, that's the default size. But the details are designed so you can scale it down to a size an average person could actually lift...as well as leaving it in Cloud Strife sword-scale.
Oh, yeah -- and a tiny rant. I recently commented on Reginald Pikedevant's "Just Glue Some Gears On It and Call It Steampunk" (a funny YouTube rant). When I started this set, I knew I would have to bow to market expectations and at least put some gears and brass tubing around. But I really, really had to try to make it look like it had reason to be there. I think I succeeded in the wrench (although why you'd need all that fragile excess stuff just to close the jaws!) but, yes, realism shies a bit on expecting either the user to be able to grip the thing comfortably with all the excess bits, or all those tiny gears working for more than a few minutes exposed to dirt and metal chips from the work environment as they are...
But my real rant is tubes. Sorry, the cathode ray tube is post-Victorian. And not only that...who would ever stick an exposed glass envelope on the side of their sidearm! You'd shatter the mechanism before you'd even cleared the holster. For all sorts of reasons, tubes glued randomly around the outside of a prop bugs me even more than seeing random unconnected gears.
I don't know what happened. I didn't try a new drug, or change my diet, or make any other lifestyle change. But suddenly I felt...well, normal. Able to face a day without wincing at the joint pain and shortness of breath that had been hounding me for months. And this is now the third week of being mostly free of those lingering pains.
And I felt up to facing new work situations. Brushed off my resume and sent off a bundle of emails. A pity that this is also a period where I committed to finishing some 3d art -- that means that even with all my energy, and the lovely days outside, I'm mostly inside sitting at the computer. Well, except for running out to the gym almost once a day!
Yesterday I was feeling very sleepy and ended up going to bed early, but I still did everything I had hoped to do that day. Which doesn't sound like much, but I'm way ambitious. I rarely finish a day having done everything I intended! But I finished the textures on one prop, worked on the robot with my niece for a few hours, got to the gym, and cooked a meal that used some of the veggies I'd purchased before they all went bad (I got to the red bell just in time).
And yes, I may have found a little work. It isn't signed yet, so I'm being cagey, but, yes, there is another pun in the title of this post.
The other pun in the title is surface normals. Which is one of the concepts of 3d rendering. One day, if I get a bunch of feedback and discover people are actually reading any of my rambling talk about 3d, I might draw up a bunch of diagrams as part of a lesson on the basics of 3d rendering. But anyhow.
Here's the sanity check on the first prop in the set:
Added a default figure (Poser 9's Allyson) in a default pose (I think it is Guitar Player, which has been around since Poser 3!) The purpose is not to make art. The purpose is to check your texturing work to see if it fits within the Poser universe. It is very hard, squinting at a monitor, to really know if you are working too saturated or not enough, if your details are cartoony or so subtle they don't read, if all your textures are dark and murky or bright and washed out.
Humans are very, very good at setting their own white-balance, though. So drop in something with skin, and the eye will adjust expectations. And this one set-up told me that I was working a little too subtle and not quite as saturated as needed -- which I fixed before the render above.
I'm trying to keep this set simple, but there are ten individual texture maps on that wrench ...not including the reflection map! I could combine some maps and collapse some of the materials zones, but there is a fair amount of work involved in doing that and it makes more sense to move on to the next.
And, yes, that's the default size. But the details are designed so you can scale it down to a size an average person could actually lift...as well as leaving it in Cloud Strife sword-scale.
Oh, yeah -- and a tiny rant. I recently commented on Reginald Pikedevant's "Just Glue Some Gears On It and Call It Steampunk" (a funny YouTube rant). When I started this set, I knew I would have to bow to market expectations and at least put some gears and brass tubing around. But I really, really had to try to make it look like it had reason to be there. I think I succeeded in the wrench (although why you'd need all that fragile excess stuff just to close the jaws!) but, yes, realism shies a bit on expecting either the user to be able to grip the thing comfortably with all the excess bits, or all those tiny gears working for more than a few minutes exposed to dirt and metal chips from the work environment as they are...
But my real rant is tubes. Sorry, the cathode ray tube is post-Victorian. And not only that...who would ever stick an exposed glass envelope on the side of their sidearm! You'd shatter the mechanism before you'd even cleared the holster. For all sorts of reasons, tubes glued randomly around the outside of a prop bugs me even more than seeing random unconnected gears.
Subscribe to:
Posts (Atom)