I made a little more progress with AVR programming; now I can run a timer in hardware mode, without a single line of program code (even an interrupt). Right now one of the last of my working chips is pulsing an LED; Timer0 is hardware driving the pin directly in PWM mode, but a routine running in the main() program loop is incrementing and decrementing a value to smoothly brighten and dim the LED over time.
But I'm not going to talk about that. I'm going to back up, because I realize I skipped over some of the basics of programming an AVR.
Start with the Arduino.
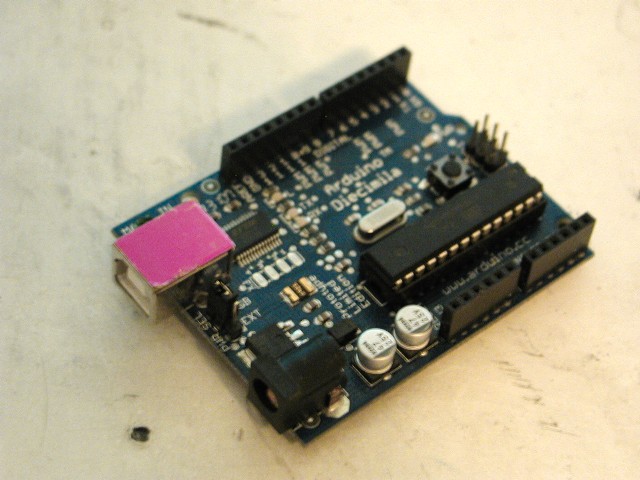
The Arduino is the artist's micro. It is very much non-geek. You can use an Arduino without picking up a soldering iron. You can use one without knowing really anything about programming!
On the hardware side, most Arduinos and clones come pre-assembled and tested. A naked Arduino isn't that interesting to a non-geek, though. All they normally have is a single LED just so you can upload the "hello world" program and confirm the thing is working.
But this is why there are shields. Many shields also come already assembled. There are shields with MIDI jacks on them. Shields with LCD displays and buttons on them. Shields with relays on them. Shields with motor drivers on them. Shields with full-color touchscreens and tiny joysticks on them. Shields with Xbee wireless links, Ethernet jacks, MP3 chips, lithium batteries with charge circuits, even NTSC television output on them.

It is literally as simple as taking the shield and seating it on top of the Arduino. Sticking new RAM in a computer is much harder than that.
Oh, yeah, and you can make your own shields...as scratchy as the perf-board shield I posted in a previous entry, to slightly nicer assemblies on pre-made proto-board as on the right, to professional printed PCBs made by one of the various mail-order fab houses that have sprung up over the last few years.
The point is, the Arduino is designed to get you up and doing what you need to do; remote data logging or adding a startup chime to a motorcycle or controlling a music synthesizer from a wii remote. The heavy lifting has already been done for you. And the same is true of the software.
You can "program" on an Arduino in Script Kiddie mode, in Magic Spell mode; knowing nothing about how the software works or even (especially if you are using library functions) what it looks like.
If you can install a computer game, you can get an Arduino working. I've had a remote control on an old television that was harder to figure out.
Not to disparage the Arduino project, of course. Much of what makes it so easy to do so much now is because of other users; users who started out as total beginners and figured out how to do something, then took the next step and made up a library or a shield and put it back out into the community under the same open-source, open-hardware rules.
And if you want to geek out, there are plenty of places to geek out. Starting with assembling the kit yourself. Sure, you only save a couple of bucks, but it does give you a nicer sense of accomplishment.
It isn't that easy for me to get a good perspective on some of this. I've had a soldering iron in my hands since I was six. I used to cobble up all sorts of basic tricks with LEDs and strobe lights and audio-frequency oscillators -- especially when I was hanging out at Star Trek and science fiction conventions. But I was basically cheating...never did learn much of basic electronics. Even today I have to look up Ohm's Law. Most of the stuff I did then was pretty much Magic Spells; wire up the 555 the way Forrest Mims drew it, and if I was lucky, it worked.
Perhaps another way of putting this is it is recipe-based cooking. When you first cook from a recipe, you are scared to change a single ingredient. Later, you are out of eggs, you substitute oil for butter for health reasons, and you don't bother to measure an exact teaspoon but just toss in a pinch that looks about right.
In electronics and programming this is a good way to get acclimated. Take a working code, or circuit, and tweak some values, mess around with substitutions. You are trying to get a sense of what the different parts are doing by replacing them or taking them out. Most of it will be trial and error.
But at some point you need to move on to grasping the underlying theory. And I am a great fan of manuals. I say -- play first. Get your feet wet, mess around, get creative. THEN hit the manual hard to try to figure out why taking out that one capacitor made the amp stop working, or why changing "A = 2" to "A = 3" made the LEDs chase in the other direction.
At various points, take the time to dig down and read the whole manual (or datasheet, or tutorial, or whatever) from top to bottom. You can still skim over the parts you really aren't grasping, as well as the parts you are sure you know by now, but try to at least skim them. It is there that most of the "Ah hah!" moments come...as you stop at last on something you'd glanced over before, and realize the solution to Why It Isn't Working Since I Changed It is in that chapter.
Enough digression.
I've mentioned that the heart of the Arduino is a chip made by ATmel. That it is a computer-on-a-chip; everything but power regulation and the actual buttons and displays is already included. Again, the heavy lifting has largely been done for you; Atmel's engineers have made a very robust machine full of options, with all sorts of cute tweaks that makes it harder to break in ordinary usage.

Getting code onto a naked AVR is a little more exposed.
There are perhaps a dozen ways of doing it, including bootloaders, especially if you include such esoteric options as high-voltage programming. But I'm going to talk about just one, the first one I picked, the one I use now, and the one that works so well for me I see no reason to change it.

I am using Project Builder, because it is there (free on the Mac, included I believe with the Developer Tools package). Possibly a more powerful editor would be easier to work with, but I don't use half the functions of this one. Really, for the kind of programs we are talking about, typing them up in Wordpad is usually good enough.
More important is what to write! I am writing for compiling in avr-gcc and my main reference is the avr libC manual.
I am also making frequent reference to the datasheets for the AVR I am writing for -- which can be found as simply as by typing the name of the chip into Google -- and reference both to .pdfs found at Atmel's home site and at the sprawling chaos of AVR Freaks.
(I feel a little stupid supplying these links...if you can't Google up a company website, what the heck are you doing reading about how to program an AVR?)

For that, my hardware tool has been the USBtinyISP from Adafruit. This easy-to-assemble kit connects your computer (via USB cable) to your AVR (via standard ISP header). It also supplies power to the AVR from you computer's USB port.
Adafruit has a very good introductory tutorial on how to install the toolchain and get the programmer working. The principle is In-System Programming -- as long as the demands on the shared pins are not too electrically strange, you can connect up the six-pin header and program a chip that is already installed into the final circuits it will be controlling. This makes the process of debugging and tuning go a lot faster!

The rest is all software.
I am using avr-gcc as the compiler. That is the software that translates the high-order language I wrote the software in (C) into the actual opcodes stored on the flash memory of the AVR. (Non-volatile flash, did I mention that? The AVR will store, depending on the model, upwards of 32K of program that will last for 20 years with the power turned off. And boot up and run the moment you apply power again.)
GCC stands for GNU Cross Compiler (it used to stand for GNU C Compiler but grew in sophistication). GNU is the open source project (and operating system) that itself stands recursively for "GNU's Not UNIX." (Although UNIX is not, oddly enough, an acronym, but merely the preferred case for a name originally derived from "Uniacs".)
The AVR LibC is a large C library for AVR chips, similarly free and open source. If you wrote using LibC functions, and you have a copy of LibC where the compiler can see it, avr-gcc will make a clean version of compiled code that will run on your AVR of choice. The last two necessary bits are AVRDUDE, available from ATmel themselves if you can't find it elsewhere, and make, the family of utilities originally seen in UNIX, that makes an executable (aka turns formatted Assembly Language into a binary form that a computer can run.)
Up until this point everything I've said applies equally to your OS of choice; OSX, any of the various flavors of Windows, and many of the distros of Linux. The last part of this is, however, Mac-specific.
The best package for the AVR user is the Crosspack for AVR from Objective Development. This free package has everything; avr-gcc, AVRDUDE, and I think it even includes make (although I also installed the "Developer Tools" package that Apple distributes for free and includes on disk with purchase of their operating system).
In all likelihood the latest version of the Crosspack installer will put everything where it needs to go. But you may need to go into the UNIX core of your Mac and move a few things around -- or, rather, tell UNIX where to look if it can't find something in the directory it is looking in.
Yes...Crosspack AVR is composed of Command-Line Tools.
I'd screen-shoot an example but I'm writing this on the desktop and currently programing on the laptop. It isn't that exciting to look at, anyhow. (And, yes, I have my Terminal set to a nice old-fashioned white text on black background. The truly retro green was a little hard to read in room lights. Did I mention the first computer I owned was a green-phosphor screen 8-bit Kaypro?)
The point is, you have to use the Terminal application (or something similar) to navigate to where you located an ASCII text document named "main.c," and use the make command to compile it based on the preferences in your Makefile (also a text document).
Don't worry; the process is thoroughly documented in several excellent tutorials, including the one at Adafruit, and an exceptionally well-commented Makefile is included with your Crosspack AVR package.
You will want to make sure the Makefile has the correct model of AVR in it, as well as the programmer you are using. Leave the rest alone, however! (I blew up a couple of ATtiny45's by monkeying with fuse settings). The default settings work just fine -- or, rather, the suggested settings (there is an example for both with external crystal and with internal oscillator).
Make, guided by the preferences in your Makefile, will call up avr-gcc, which in turn will check your code for syntax. It won't find errors, but it will find bad or uncompilable code and tell you what line it was on and why it stopped compiling there.
Assuming you manage to make a clean compilable, the next command-line call is on AVRDUDE. I find the instructions given by Adafruit were extremely clear, but then again, just by typing "avrdude" in the Terminal window it will list out the programmer options. This is usually enough to jog my memory if I've forgotten the syntax.
For most of the time I've been typing something a lot like: avrdude -c usbtiny -p t13 -U flash:w:main.hex
Pretty easy to figure out. Each "-" suffix (which can be typed in any order) tells AVRDUDE what the following text refers to. When prompted, AVRDUDE will print out a list of viable names for programmers it recognizes and chips it recognizes. The last part is the actual upload; pointing to the name of the binary executable make created, and telling AVRDUDE to write it into the non-volatile flash memory of the AVR chip.
Of course, even someone of my limited skill could wrap all this up into a nice macro or script or even a baby program with a cute little big-button GUI. But I like having access to all the command-line options to do stuff like reset fuses (well, maybe that option would have been better not to have!) and I like the old-school feel of working in the Terminal window. Besides, it all works, and it isn't something I need to change right now.
If all goes well, there will be a moment of flashing lights on programmer and whatever you've attached to the chip, some text scrolls past in the Terminal window, and you now have a working "hello world" on an AVR. Or a 32K video character generator program with accelerometer inputs. Because at this point, its all in the coding.
No comments:
Post a Comment