Saturday, March 30, 2013

Reflections on a Grecian 9/16th Reciprocating Socket Wrench

What I figure is the harder part of texturing my new Steampunk-themed model set for Poser is done.  That being creating a reflection map.

It is a nice feeling when something you got years and years ago, and has been gathering dust since, finally is of use.  This being a CD full of meshes from Baument I bought over a decade ago.  Many of them were too low-poly for the images I was rendering at the time, but to set up a city scene for a reflection map...they were wonderful.

I imported a bunch of his models, changed the default textures on one or two, loaded in a few raw pictures from my Germany trip as sources for tiled textures on streets and paving slabs...and built a sky dome with my hand-stitched cloud map.  The scene was lit with only the sky dome and a single infinite light lined up more-or-less with where the sun appeared to be in the sky dome.


Of course, turns out Carrara runs into RAM issues when trying to figure out the radiosity effects from a giant scene-filling glow object.  And as 7.2 is not 64-bit aware, it couldn't even see the greater RAM my macBook was making available.  But after six hours, I had the raw render.  And a few minutes later, renders of a fog layer and the sky alone for comping the final reflection map together in PhotoShop.

(I used to render a bunch of alpha layers to make comping easier, but since PhotoShop Elements can't see channels, I have to go into one of my few remaining OS 9.1 computers in order to open up the channels in PhotoShop 4.0 and export them.)

So here's the raw image; when finished it will be less saturated, and a bit sepia in fitting with the whole period-look aesthetic.  Plus, you know, distance haze.

Yes; that's a render with Carrara's spherical camera, meaning a full 360 degrees both around and top to bottom.  How it gets used, is plugged into "background" on a raytracing node which is plugged into the reflection channel.  What it does, is fill in background behind the actual foreground objects in the scene; otherwise, every part of a shiny object that wasn't viewing an actual scene prop would render black.

Here's an example, placing the raw map on a prim sphere (with a procedural brick texture attached as a displacement map to give some surface texture and interest):


So this is why I spend time making reflection maps, and including them with my props.  They make it possible to do decent metals and other reflective objects.

Of course, a lot of Steampunk props would look more at home in an interior setting.  But as tempted as I am to construct a full Explorer's Club with paintings hung on paneled walls under ornate brass lighting fixtures and surrounded by overstuffed chairs...well, the result would mostly be murky and amber-colored, and that wouldn't show off the textures very well would it!


That ate up a couple of days.  Now I'm back to painting up  the detailed texture maps for the props.  Today has been largely wrench work.  Specifically, hand-painting the scratches and chips on the red handle of a giant steampunked monkey wrench.

And I had UV map problems.  I'd hoped I could get away with mapping the jaws planar, but I wasn't able to ding up the corners with chips of missing paint and other scratches until I remapped them in box mode.  And although all the parts of the brass piping had been pre-mapped, as used some of the maps overlapped.  That made it difficult to work in a grime layer at the joints between different pieces of pipe.

So it was a dance between PhotoShop, Poser, Carrara, and UVmapper.  As I said, there are advantages in having the object file external to the Poser figure file.  I could update the geometry multiple times as I tested the new maps with roughed-in textures.

On two computers, networked together through the wireless modem.  At one point, when both were rendering the reflection map, I added a third laptop, this one grabbing the files it needed to work on off Dropbox.

The basic texture for the paint job started as a scan of some nubby suede-like fabric.  Then additional layers using the "clouds" texture function, and a lot of tweaking and layering with Adjustment Layers, folding all of these splotches and nubs together with a flat fill of basic red.
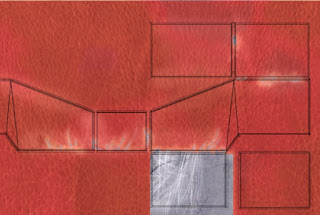
Then the first of several layers for fading/rubbed away paint, scratches into the first layer, scratches and chips down to bare metal, a little subtle shadow edge around the chips, and some oil drips.

I'm doing this set differently; on my last few products, I combined multiple nodes within Poser and included specularity, bump, and even separate grime and diffuse value layers as texture maps (or generated within Poser using procedural textures).  This time, I'm trying to bake in as much as possible.  Less flexible...but it will work much better in DAZStudio.

Tuesday, March 26, 2013

DAZzled By the Ray-Tracing

I've finished rigging my latest prop set and have started texturing.  This being Steampunk, the first task was to make a decent brass.

Of course there turns out to be a Dependency, in project-speak.  Metals are in part reflection, and in a virtual world, you need something there to be reflected.  Hence the need to create a reflection map.  Creating the map led me in turn back to stitching panoramas and playing with HDRI.

So I have a new find. Hugin, a free software application for the Mac.  It may not sit on Odin's shoulder, but it does give a nice view of the world.  Which is to say; it detects correspondences between pairs of images, applies lens models and perspective correction, estimates exposure correction, and does its best to stitch them all together into a seamless whole (which it can then export in spherical, cylindrical, and quite a few other mapping modes, as well as in either ordinary dynamic range or HDR).

It managed to do that trick on a half-dozen basically random hand-held pictures I'd taken from an observation tower over the gemΓΌltlich little hamlet of Bacharach-am-Rhein.  Call me impressed.  The options in HDRI are confusing and lack the direct feedback of software like, say, Light Compressor, but it appears to be assembling a legit .exr file from multiple sources.

But as it turned out, none of my photo collections include an actual panoramic sky (much less a period city-scape.)  So I spent a good chunk of the day assembling cloud photographs taken on several different days into a half-way believable 360' cyclorama.  My intention is to set up some props around a spherical camera and render that as a reflection map. 


Meanwhile, I've made a half-decent "new" brass in Poser 9, using one painted "dark wash" map and a random picture run through a spherize node.  The nodes and the basic behavior of Firefly are the same between Poser 6 (where I started the new material), and Poser 9.  Main difference is that, on the new computer, the test renders are much, much, much faster.  Enough where I'm not tearing out hairs trying to get through tweaking the values.

I also popped the test texture, and some rigged figures, into DAZStudio 4.5 to take a look at them there.  Which means I have a short review of that software as well.

Very pretty, menu options are a bit odd and not always intuitive, but in most cases feel quite decent after you get used to them.  One exception is finding the ERC channels, which always seems to take a bunch of tries.  Also, limits are apparently respected only for rotations, which means some bits of my rigging trickery don't work.  But almost every one of my tricky ERC dials did what they were supposed to and even the odd one out was totally acceptable.  And that's pretty good, considering I have multiple nested dials with negative values and hard limits running translates, rotations, and morphs on parts that also have PointAt on them!

The render engine is zippy fast.  So fast the first time, I was still waiting for the render window to pop up when I realized I was already looking at it.  This is in contrast to Poser, which even on my dual-core i7 takes a half-dozen seconds just to leave the Render view and return to Preview.

But the downside; although there are some nice technical options in the ray tracer, the materials nodes are extremely primitive.  Almost all of the fancy texturing of my previous prop set failed to work properly.  No noise channels at all.  No edge blend (which is essential for decent metals).  Actually, it is possible edge blend is being handled at some other level of the ray tracing, but even then it would be global, not node-based.  No decal or blending.  My drum sets have both a skin texture and a floating logo combined together in shader nodes.  DAZStudio's interpretation of that was to ignore all the texture maps and just put in the diffuse color (a very slight tint I was using for tonal adjustment).

Well, I knew this next prop set was going to be simpler in textures.  This just means I really do have to bake noise shaders and similar if I am going to have any real DAZ compatibility.

Oddly enough, though, the new brass texture didn't look bad.


I still have more work to create my new reflection map, and of course one of my favorite parts -- this is not meant ironically, for once -- of prop creation; painting up the texture maps!  I have various gauge faces and chipped metal and escutcheons filled with funny-sounding company names and slogans to make up.

But not right now.  I need to build a robot, and it needs to be ready by early tomorrow afternoon....when it will meet the little girl who is going to try her hand at programming it.

How to Poser: Joint Parameters

One of the more delightful tasks in custom Poser figure creation is setting the joint parameters.  And I just this week figured out a trick that makes it less painfull...


Monday, March 25, 2013

How to Rig a Poser Prop

This is going to be an overview of the steps and some of the tricks in turning a completed mesh into a pose-able item that will open in Poser or DAZStudio.

It assumes you have some familiarity with Poser, and a general comfort level in crawling inside huge blocks of markup text to make changes.  There are many ways to rig Poser items, and many tools that you may be able to use (depending on your platforms of availability); the below is simply the way I am most comfortable with.  It is relatively fast, and it gives me the degree of control I prefer.


Wednesday, March 20, 2013

Not quite programming, not quite prop building...

...but sort of like the annoying parts of both.

I've been building some Poser content this week.  Every now and then I build a little, and put it up at an online broker that handles all the file hosting and payment processing details in return for a 50% cut.  It brings in a spot of cash every now and then, and parts of it are fun to do.

I mean, I like creating things.  I can even get a kick sometimes out of finding creative solutions to the somewhat archaic (and arcane) Poser systems.

But like so many things on the computer, too many parts of it do become drudgery.  Today was mostly the drudgery part.

I finished a model last night.  Today was getting it into Poser.   Technical rant on the joy of doing that below the fold:


Monday, March 11, 2013

Road Tests


I've been installing software and plug-ins on the new MacBook Pro (dual i7): enough where I can actually document which aps appear to run properly under Mountain Lion.  At the moment I am mostly confirming basic functionality; as I work more with them I may annotate this post with my findings.

(Apple makes one concession to the world of software outside of the Apple-blessed Ap Store; an application that when run will tell you if another ap on the same machine is Mountain Lion Compatible.  Probably useful if you have all updated software and are NOT running on Mountain Lion.  Completely useless if you are looking at whether a certain upgrade or even a different software package is a good purchase!)

Long list below the fold:


Thursday, March 7, 2013

Wrestling with Mountain Lions: Don't Fear the Reaper

Yes, I got gifted a fresh new Mac.  It's been an amusing experience.  Throughout most of my computer life I keep getting told by vendors and tech support, "The problem is your machine is too old."  Now, I keep getting told, "Your machine is too new!"

More rant and so forth below the fold:


Saturday, March 2, 2013

Objective....Not Attained

I'm taking a break from Objective-C.  The "Hello World" tutorial I was following doesn't work.  Odd.  It is off the Apple site and should be compatible with the latest version of Xcode and Cocoa.  The tutorial included the final complete code and I copied that over to make an exact image -- and it still didn't work.

In the process of trying to figure out why, I learned a lot about working in Xcode, and about the language.  I think I grasp the concepts and syntax of Objective-C now, and am fairly confident in being able to write working code in it.  But the stumbling block is working within the Cocoa framework and in the Xcode development environment.

So I'm ducking back to Processing to move my DuckNode project forward.  Realized that I can model accelerometer data as a point in 3d space -- but it will require I re-learn some of my trig.  If I can plot a combined vector and a single acceleration value, I can construct "target" values as a 3d planar surface.  So the code would ask whether the measured acceleration is of sufficient magnitude to cross the plane, is of the correct vector to intersect the plane, and remains within or above threshold values for a preset interval.  This should be sufficient to discriminate a small number of simple motions.

The next software step, though (work incrementally, remember!) is to expand my current Quacker software to retrieve and display a real-time analog value from a DuckNode.

(Sure, I'm dreaming of more.  I want a piece of software that can display real-time the pin reads off the remote XBee, as well as any serial messages sent, AND pop up a standard AT mode terminal for on-the-fly reprogramming.  But that's all for development.  For the Quacker package, I want it to be third-party friendly, allow patching of multiple XBee receives to both MIDI events and direct software sound playback.)

(I'm still toying with LCARS, of course.  Even though that is a potential huge waste of time -- the interface doesn't need to be pretty, it only needs to work.  The LCARS methods are actually a pretty good match for Processing -- Processing loves doing color-changing blocks and lines of text -- but it isn't necessarily a great interface for connecting a remote sensor to options in a sound or lighting cue playback environment.)

I've also re-thought part of the DuckNode itself.  LiPo might still be necessary for power density -- I need to calculate the drain of not just active constant radio activity (the XBees are designed for low power use, but they achieve that by lowering data rates.  Unless I add an interactive layer for on-the-fly reprogramming of the XBee nodes, I'm stuck with having to run three + analog channels at a high data rate continuously for as long as the node is active.)  Oh, and the accelerometer is also a surprisingly high power drain.

In any case, although "permanently installed" LiPo and a charging jack makes sense for much remote sensing, for theater use it makes much more sense to design around removable batteries.  You don't want to be dependent on the LiPo charging cycle to have a safe margin going into the second show of a two-show day, or the tenth hour of a twelve-hour tech day.  You want to be able to put in fresh, trusted batteries at the top of the show.  And, for that matter, monitor them remotely.  In any case, what with wireless microphones, theaters have an existing infrastructure of AA batteries, often rechargables, and the ability to throw in a fresh pack if there is any doubt at all about the battery status of a show-critical bit of technology.

Mostly, though, I've been working a tough load-in at my local facility.  I'm sore and covered in splinters, and I haven't had the time or energy to do much more than glance at my programming books or scribble a few drawings of interface needs on a scrap of graph paper.