It totally makes sense. The moment I figured out how to create and use a full-functioned class (in Java), I switched to a completely different language with different syntax and different paradigms. Objective-C, which uses messaging instead of methods, meaning late binding and dynamic typing and all that.
Plus, you know, Processing is a stripped-down version of Java and constructs code that runs on the Java Virtual Machine. I'm learning Objective-C within the framework of Cocoa and the Apple environment. Which means I'm exposed to a lot more of the code behind the window than I am writing a Processing PApplet.
And I have yet to get to "Hello World." Oh, sure; I can create a program that compiles, that has a window and buttons, and the buttons and other elements interact with each other. But I haven't quite grasped the methods to pass messages to a custom class -- even as much as I've managed to both create a class and instance it in ways that didn't throw up a compiler error.
I'm working through a tutorial right now. One of my habits is when I'm using example code, whether it is a sample or a full tutorial, is that I will re-name every variable. This makes it a lot easier to learn which are actual variable (or otherwise user-assigned) names, and which are inviolate software functions. I also change around other things, for the same reason.
I have to say, though, XCode is a big step up in programming environment. The Processing and Arduino "sketchbooks" will color code core functions, and highlight matching brackets. XCode goes quite a bit further with throwing up contextual menu suggestions and auto-fill boxes. And there is a lot of drag-and-drop functionality, especially around interface design; you literally control-drag an interface item in order to insert the proper messaging code into your text.
I'm still going to be very happy when I finally make a button that can do something. Happy enough that I may take a break from programming!
Thursday, February 21, 2013
Wednesday, February 20, 2013
LCARS to Z-CARS
I'm not really going to do an LCARS - type GUI for my new XBee software. Well, probably not! In fact, especially since I learned you can put a Cocoa wrapper around a Java program, in a way that makes it possible to even do with Processing (or you could just grow up a little and learn to use standard Java)....
Oh, yes. I downloaded the latest XCode/developer environment from Apple. I think the last time I messed with I got to "Hello World" but gave up on actually linking to useful libraries. Maybe this time I'll get further.
 In any case, I spent time today learning how to make LCARS shapes in Processing. Which wasn't as frivolous an exercise as it seems. First off was finding out about the LINE and BEZIER classes. And, unfortunately, although lines and lines with rounded ends are a natural for Processing, the LCARS "Sweep" -- a curve that goes through 90 degrees and from thick to thin -- can't be done with those simple tools.
I graphed out an LCARS sweep and plotted it in vertex by vertex; that worked, but besides being non-scalable annoyed me as a long-way-round way of doing it. More careful investigation showed the LCARS sweep is basically two filled circles; one positive, one negative.
Ah, but the trick is to write this stack of shapes once, and reference it as needed within the program. This also makes it easier to dynamically change the display! So the next thing to learn was PShapes; a class that wraps various sorts of geometry to allow it to be manipulated more easily within the Processing window.
Except PShapes didn't seem to give me the instancing I wanted to selectively modify the shapes I called up from the template. Either that or I wasn't understanding how to properly use it. The answer was obvious -- it just took me most of the evening, a full mug of coffee and a lot of Bach to get through it.
Object-oriented programming. I had to actually sit down and make my first full-fledged class. Not a function I referenced from elsewhere, but a class that could be instanced to objects with methods that could be called on a per-object basis.
And that's done and I feel a little more like a proper beginning porgammer///progerammer//pregoram/////guy who writes code. Now I just have to refine my understanding of inheritance................
 Oh; this has nothing to do with the British television series Z-Cars. Which happened to include in the original cast a young BRIAN BLESSED.
Pity they never had a uniformed PC on that show named Gordon. Who would be, you know, ALIIIVE!
Oh, yes. I downloaded the latest XCode/developer environment from Apple. I think the last time I messed with I got to "Hello World" but gave up on actually linking to useful libraries. Maybe this time I'll get further.
In any case, I spent time today learning how to make LCARS shapes in Processing. Which wasn't as frivolous an exercise as it seems. First off was finding out about the LINE and BEZIER classes. And, unfortunately, although lines and lines with rounded ends are a natural for Processing, the LCARS "Sweep" -- a curve that goes through 90 degrees and from thick to thin -- can't be done with those simple tools.I graphed out an LCARS sweep and plotted it in vertex by vertex; that worked, but besides being non-scalable annoyed me as a long-way-round way of doing it. More careful investigation showed the LCARS sweep is basically two filled circles; one positive, one negative.
Ah, but the trick is to write this stack of shapes once, and reference it as needed within the program. This also makes it easier to dynamically change the display! So the next thing to learn was PShapes; a class that wraps various sorts of geometry to allow it to be manipulated more easily within the Processing window.
Except PShapes didn't seem to give me the instancing I wanted to selectively modify the shapes I called up from the template. Either that or I wasn't understanding how to properly use it. The answer was obvious -- it just took me most of the evening, a full mug of coffee and a lot of Bach to get through it.
Object-oriented programming. I had to actually sit down and make my first full-fledged class. Not a function I referenced from elsewhere, but a class that could be instanced to objects with methods that could be called on a per-object basis.
And that's done and I feel a little more like a proper beginning porgammer///progerammer//pregoram/////guy who writes code. Now I just have to refine my understanding of inheritance................

Pity they never had a uniformed PC on that show named Gordon. Who would be, you know, ALIIIVE!
Tuesday, February 19, 2013
Back to Processing
I'm moving away from hardware MIDI.
9/10 of the time, the MIDI signals generated by my various gadgets are going into a laptop anyhow. And as I gain confidence in programming, I think it is easier to write client-side software than to try to do everything on the embedded processor of a black box.
This seems like it is going to be the form of my DuckNodes. On the Node end, LiPo battery and charge circuit, monitor/feedback LEDs, XBee. On the master end, Xbee node with FTDI adaptor plugged into a USB port -- and the rest is software.
 Sure, I could dress up the receiver with some indicator blinkenlights. I'm also tempted to make it in the form of a Diesel-Punk USB stick. The first show I did using software at the receiver end, I stuck the receiver XBee inside a rubber ducky -- a yellow plastic bathtub duck -- to protect it.
(That's the actual hardware in the picture there; one Xbee inside the television remote, one inside the duck, with the latter connected by USB cable to the Processing sketch visible on the desktop.)

This is a bad time for me to be buying parts. So this will have to do to construct the prototype DuckNode; a Modern Devices accelerometer, XBee (not XBee Pro), and AAA batteries. I need to read up on the chip, though, to find out the voltage tolerance and so forth. But for the nonce I'm working on the software layer, and for that my XBee-equipped Easy Button is sufficient.
9/10 of the time, the MIDI signals generated by my various gadgets are going into a laptop anyhow. And as I gain confidence in programming, I think it is easier to write client-side software than to try to do everything on the embedded processor of a black box.
This seems like it is going to be the form of my DuckNodes. On the Node end, LiPo battery and charge circuit, monitor/feedback LEDs, XBee. On the master end, Xbee node with FTDI adaptor plugged into a USB port -- and the rest is software.

(That's the actual hardware in the picture there; one Xbee inside the television remote, one inside the duck, with the latter connected by USB cable to the Processing sketch visible on the desktop.)

This is a bad time for me to be buying parts. So this will have to do to construct the prototype DuckNode; a Modern Devices accelerometer, XBee (not XBee Pro), and AAA batteries. I need to read up on the chip, though, to find out the voltage tolerance and so forth. But for the nonce I'm working on the software layer, and for that my XBee-equipped Easy Button is sufficient.
Sunday, February 17, 2013
Tools
I'm between shows. No design deadlines, and no props with deadlines either, now that the Maverick is shipped. So this might be a good time to build some tools.
 I've been having great fun with my wireless EasyButton. Used it to run the lights on one (simple) show. Used it a couple of times to check sound cues as I walked the house. Has only been in one show so far -- or, rather, the guts were, transplanted into a television remote and used by the actor/narrator to "control" the action of the play. (For that show, the XBee triggered a sound effect in a small Processing ap running on a laptop, which plugged into the sound board).

I've had even more fun with my simple MIDI button (this spits out MIDI over the standard 5-pin DIN connector when a switch contact is closed). It has been in an orchestra pit twice to allow the percussionist to trigger a sound effect. Another time it was wired into an intercom box to play a buzzer sound. The flexibility of this is that the trigger is just a button or sensor; the resulting command is interpreted, usually by QLab, meaning we have total control over what kind of sound, where it is placed, etc.
I've been trying to dream up a new device along these same lines, that is a plug-and-play solution for any number of sound/lighting/effects coordination problems. Something I could have in my bag, that would hook up quickly with minimum wiring to a variety of inputs/sensors; something we can use to explore the kind of dynamic cue'ing new technologies have made possible.
Friday, February 15, 2013
Yippee-Kai-Aye
Sure, I could have done more with this. The original idea included opening up the cylinder and replacing the barrels with individual tubes, Gatling Gun style. Plus I wanted to put on a proper spur-type Western hammer, and cut off the not-particularly period T-rail.
Next one. This one is only good enough now to slap a coat of paint on. Besides -- there's plenty of mistakes to make in paint, plenty of experiment there.

Painting steps below the fold:
Next one. This one is only good enough now to slap a coat of paint on. Besides -- there's plenty of mistakes to make in paint, plenty of experiment there.

Painting steps below the fold:
Thursday, February 14, 2013
Keep Those Doggies Rolling
So to review: the project is a Steampunk re-dress of a NERF "Maverick" (Rev-5). First step was taking it completely apart.
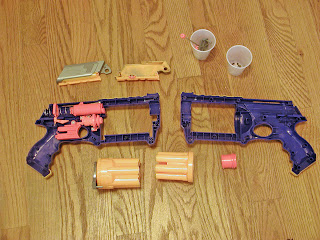
Then the rather silly-looking grip is cut off, and the frame for a new grip fabricated from 1/4" birch plywood.

The adventure for the next day is shaping the grips around the new frame. I roughed out the shapes in 3/8" basswood with my "new" Dremel Scrollsaw, and attached them with zap-gap. I also sanded off all the NERF logos and branding, and cut off the muzzle.

Then comes shaping -- mostly with the small (but very sharp) carving knife I picked up at Hida Tools (a local Japanese Woodworking and gardening tools store.) Then sanded down, and patched; first with Bondo auto putty to fill the larger gapes, then Bondo Spot Putty for the small remaining gaps.
Oh, yes. The new muzzle is an ABS plumbing coupler, cut down and attached with ABS solvent cement.

By this point my errors are compounding; I had trimmed unequal amounts off the two halves of the original gun to fit the new grip frame, meaning the build-up is about 1/8" off center. Added to that, the cuts where the old grip was removed were not in the same place. Originally I had intended to smooth the join, then create an arbitrary line between wood grips and "metal." But late in the day I decided I liked the basic placement of the cuts -- but this meant spot putty and panel line tool to make them appear to match on both sides of the gun.
In addition, I'd left one spring out when I re-assembled. It's the one that retracts the front end of the cylinder retaining pin. So to open the gun you have to press the button, then hold it muzzle sky-ward and tap it so the pin falls back.

And on to painting.
I didn't think out the process well enough. Started with filler-primer on the new wood -- the basswood furs up something bad so a couple of coats of primer, sanding between. Then black paint over the whole thing. Touched up with a second can of faster-drying paint which reacted to the first; sanded and steel-wooled out the bubbles, then spent a while trying to brush the steel wool fragments off.
Then an intentionally spotty coat of Krylon "Hammered" finish to bring in some texture, and hide the flaws of a quick build and a clumsy sanding job removing the original logos and name and other marks.
My intention is to wash it with black and rust to build up some life, then cut those back with metallic spray paint, then dodge that just a little with more black. And there's a new wood technique I want to try once the metal is dry. We'll see how it goes...
Little Wonder
Since so many people have asked, here is the basic idea of the "Little Wonder" prop as I made mine for a long-ago production of "Oaklahoma!"
 I can not vouch for the practicality or safety of this design. I am drawing this from memory. The one I built was of whatever random bits of pipe and tube were lying around the scene shop. My memory is that the inner tube was metal, but the outer tub and a further decorative ring were from ABS. I'm pretty sure you could do this all with ABS, though, using ABS solvent cement and a NERF dagger, and just find the right lightweight spring from Orchard or Ace's copious selection (or if that fails, order the exact dimensions you need from Grainger.
This also doesn't quite match the description given in the dialog. But it is fun to look at and when it works, dramatic. Since mine had the inner pipe of metal and of course the rod has to be 1/4" metal as well, it made a nice dramatic metal-on-metal "kaclank!" when activated. Although I forget if it is Ali Hakim or Judd Fry who demonstrates the thing.
If I did it today, I'd make TWO -- one firing, that Judd would purchase in the first scene, and a second non-firing that Curly could play with in the second scene.
Paint it up like a Victorian kaleidoscope. Or, considering the risque nature of the supposed thing, in red or burgundy flocked paper and gold filigree to make it look properly tawdry.
Subscribe to:
Comments (Atom)