Felt inspired and full of energy...
...an hour before work ended for the day. It's that last hour that's the killer (why I'm moving towards a 35-hour week instead). I miss ten hour days. Ten is no harder than 8, but it gives you either more pay or a longer weekend.
Put in 20-30 minutes on the fiddle today. Still working on that coordination -- rather, the sequence. According to a study I read, takes 20-40 milliseconds for a string to "speak" from when the bow is applied. You need, however, to be on the correct string and have the fingers in the right position before that happens. And the problem is, starting the bow is a shorter motion than moving the finger or, worse, moving to bow to a different string. The study didn't go into that, but looking at the graph the former is in the range of hundreds of milliseconds, and the latter I'm betting is much longer than that. Like a finger on the piano keyboard, these are ballistic motions; you need to start them well before they are required to be complete.
So you can't just start them both at the same time. You do that, you get squeaks and squeals. You have to anticipate by a fraction of a second. Of course I'm making it harder (much harder) on myself by not using a detache bowing, but trying to do this within the change of direction.
Over the weekend dreamed up a possible motif for my proposed Tomb Raider: Legacy OST (original sound track). Made a quick recording in Reaper off the keyboard (yay! Got some more use out of the Behringer!) Assuming I get that far, I will be doing at least the Nathan McCree motif on my Clarke pennywhistle. But will it take me long enough to get around to it that I'll be able to do a fiddle part as well? Unlikely, either way.
On the way back from the grocery store sung "My Dog Has Fleas" (aka the open-string pitches of standard/soprano ukulele tuning.) And when I got in, a quick check on the uke showed I was right on pitch with all of them. So I think I may have absolute pitch. Far from perfect, however (again, I have indirect evidence I'm only sensitive to 30 cents or more for absolute. Relative, the tuner tells me I'm sensitive to within the limits of the display). I'm still using the Snark every time I practice on the fiddle; it clips right to the headstock so it is easy to look and see if you are on pitch.
Also over the weekend, I borrowed back the Morrow Project CBR and Medkit long enough to stick new batteries in them and to try to do a short video demonstration of the electronics. It did not go well. I couldn't get the display to show up properly on the laptop's built-in camera, and I was awful; rambling, disjointed, uncoordinated. I supposed I could play around with recording a new narrative and doing a bunch of edits to splice the new material together with some better pictures, in-progress construction pictures, etc. But that's a lot of work and my channel has nearly no hits.
Otherwise, I have a buyer in Germany for a couple more M40's, I'm waiting on a new MOSFET for the Holocron (plus four pounds of obsidian flakes), I'm three to five hundred words away from completing the next fanfic chapter, and I got as far as taping a fresh sheet of paper to my drafting board for new Holocron art.
Showing posts with label Morrow. Show all posts
Showing posts with label Morrow. Show all posts
Monday, July 11, 2016
Saturday, May 28, 2016
Canadian Ninja
(Title in reference to the Michael Dudikoff action film from the mid-80's).
Friend of mine is refereeing a "Morrow Project" campaign. Among the many armed groups prowling the post-nuclear-war wastelands are, he decided, at least some who have kept alive certain martial arts traditions. (Even if they have no memory left of the ninja craze that swept the west around the 80's.) When he brought this up, one of the players (presumably facetiously) suggested that the groups "up North" might use throwing stars in the shape of the maple leaf on the Canadian flag.
How canon this eventually became within the campaign, I do not know. But that suggestion called for a prop.

You might call it a "Throwing Maple." Or a "Ninja Leaf." Maybe "Maplekan?" Or my favorite (very subtle), "Shurican." This is a practical prop, in the sense that it is metal and will stick in a tree (or at least a fence).

However. This is not knife-grade steel; it was cut from an outlet box cover, 16-gauge galvanized steel of some ferromagnetic but basically cheap low-strength alloy. It also only looks sharpened. I spent longer researching California Law then I did cutting it out, with the result that is is completely blunt and suitable only for display use and thus fails to meet two of the essential criteria.
This was a quick prop. Found a maple leaf image, printed it out at 4" across and used Spray 77 to stick the print directly to the metal (an outlet box cover from OSH, cost about a buck.) Cut out with a jigsaw with medium metal-cutting blade, then smoothed with hand file. The longest part of the build was making the bevel; that was achieved almost entirely with hand filing, via an old set of needle files.
My original intent was to gun blue or even parkerize. The blue wouldn't take and parkerizing is a little too scary to get into right now. So spray paint. I figured I could go over the edges with a file or emery paper to bring them back to naked steel. Well, yes, if I wanted to spend a heck of a lot longer. After getting the paint all scratched up, I knocked it back with quick passes of the emery paper (aka wet-dry 220 grit sand paper) and did the black with a DecoColor paint marker instead. Then, since it looked banged-up already, dipped the whole thing in Birchwood Casey Plum Brown (aka insta-rust) and buffed/weathered it with steel wool to give it that "been carrying this throwing star around in a pocket of my black gi for a few days" look.
Saturday, March 28, 2015
Light and Form
I had a quick lighting design this week. Quick not because it wasn't an important design, or because it was simple, but quick because we almost lost the venue and only got it confirmed a little over a week before we opened. We had to load in the set and light it in two days, skip tech and go directly into final dress, then previews that same week.
I'm not happy with the lights. But I'm not sure, if I had leisure to plan it all over again, what I would try differently. The director appeared to be asking for a bedroom in an upscale southern home at mid-day, and believed it didn't make sense for anyone to turn on the electric lights. So all the light was motivated as coming through a window -- a window that, alas, is on the fourth wall and not particularly obvious as part of the picture. And many scenes were blocked in the far corners of the room, far away from this putative light source. So I opened up the fronts, increased the levels, reduced the contrast -- so now you can barely tell the light is supposed to be coming from a window, and the scenes elsewhere in the bedroom are still dimly lit (because there is only so far you can push without having to re-hang the plot from scratch).
 When I got home, there was a message from Shapeways. My V150 model was apparently breaking (probably off the sprues) often enough that Shapeways finally downgraded it to non-printable. Would have been nice if they told me before selling it to someone. So I spent 10-14 hours -- many frustrating ones wrestling with file conversions and problems in the Shapeways website -- patching and altering the model once again. I've probably put in close to 200 hours on that damned model now. And model sales have netted me maybe forty bucks.
Among the changes I was forced to make this time was to attach the suspension permanently, and as well fix the gun in the turret (no more posing of that part). Apparently sprues are bad, now; Shapeways not only advises against them, they throw up all sorts of clever little road blocks against their users. Their alternative is to print a mesh bag around the model....increasing the price of the print 150% in the process.
Meanwhile the school tour I've been mixing closes this Sunday. Today I'll be finishing up repairs on some of their wireless microphone elements. Then switch over to work on my wireless microphones, because those get rented out next week. And then perhaps work on repairs for the company that hired me for the season then "forgot" to tell me they'd found someone cheaper. Or maybe not. I don't feel I exactly owe them any extra work!
Now that I'm paying monthly for TechShop, I hate the feeling when there's nothing to go into the shop for. But it is all in the brainwork phase now. Mostly software -- finish the Inkscape files for the new holocrons, finish the CAD for the raygun -- but also raw design work.
And if I'm slow at wrestling with 3d models, you should see how long it takes me to problem-solve mechanical arrangements. Or dream up better ways to light a play.
After posting the above, paused in soldering up microphones to try out the Lithium Polymer battery that just arrived on my Cree driver board. The LED lights up nice and bright -- the 3.7 to 4.2 volts of the Lipo is plenty -- but the chip is still resetting. I need to put it on a breadboard and try out a regulated power supply. But it is enough to tell me that battery will work for the raygun.
I'm not happy with the lights. But I'm not sure, if I had leisure to plan it all over again, what I would try differently. The director appeared to be asking for a bedroom in an upscale southern home at mid-day, and believed it didn't make sense for anyone to turn on the electric lights. So all the light was motivated as coming through a window -- a window that, alas, is on the fourth wall and not particularly obvious as part of the picture. And many scenes were blocked in the far corners of the room, far away from this putative light source. So I opened up the fronts, increased the levels, reduced the contrast -- so now you can barely tell the light is supposed to be coming from a window, and the scenes elsewhere in the bedroom are still dimly lit (because there is only so far you can push without having to re-hang the plot from scratch).
When I got home, there was a message from Shapeways. My V150 model was apparently breaking (probably off the sprues) often enough that Shapeways finally downgraded it to non-printable. Would have been nice if they told me before selling it to someone. So I spent 10-14 hours -- many frustrating ones wrestling with file conversions and problems in the Shapeways website -- patching and altering the model once again. I've probably put in close to 200 hours on that damned model now. And model sales have netted me maybe forty bucks.Among the changes I was forced to make this time was to attach the suspension permanently, and as well fix the gun in the turret (no more posing of that part). Apparently sprues are bad, now; Shapeways not only advises against them, they throw up all sorts of clever little road blocks against their users. Their alternative is to print a mesh bag around the model....increasing the price of the print 150% in the process.
Meanwhile the school tour I've been mixing closes this Sunday. Today I'll be finishing up repairs on some of their wireless microphone elements. Then switch over to work on my wireless microphones, because those get rented out next week. And then perhaps work on repairs for the company that hired me for the season then "forgot" to tell me they'd found someone cheaper. Or maybe not. I don't feel I exactly owe them any extra work!
Now that I'm paying monthly for TechShop, I hate the feeling when there's nothing to go into the shop for. But it is all in the brainwork phase now. Mostly software -- finish the Inkscape files for the new holocrons, finish the CAD for the raygun -- but also raw design work.
And if I'm slow at wrestling with 3d models, you should see how long it takes me to problem-solve mechanical arrangements. Or dream up better ways to light a play.
After posting the above, paused in soldering up microphones to try out the Lithium Polymer battery that just arrived on my Cree driver board. The LED lights up nice and bright -- the 3.7 to 4.2 volts of the Lipo is plenty -- but the chip is still resetting. I need to put it on a breadboard and try out a regulated power supply. But it is enough to tell me that battery will work for the raygun.
Saturday, January 10, 2015
Computer-AIDED Design
There's still a trend in some circles to think of 3d printing, CNC, et al as being "too easy." That instead of all the work of carving and sanding and machining, you just "press a button."
Well, like the story of Basho and the Fish, getting to the point where you press that button is actually a lot of work. What these new tools are, is just another form of jig (or "tooling," if you want to use the fancy aerospace term).
I used a lot of jigs when I was a full-time theater carpenter (that is, a set builder). We'd spray-paint them red so they didn't get thrown out by accident. One show I had to make a whole bunch of fake bolt heads as decorations for some massive girders. Underside of a bridge or something; I don't remember now. Ripped down 1x to 2", cut it into 2" squares, cut off the corners to make a hex shape, then routed around the top. I spent most of a day making a complicated jig that would hold the thing in place for all the cuts and routes.
 Which is the thing, here; if you save any time with 3d printing or CNC machining, it is when you are building multiple copies. The savings, if any, are one of those economies of scale. I could have scratch-built a V150 armored car in less time than it took to make the 3d model. But since the model was made, we've printed four or five of them (plus there's at least two others out in the world).
And, well, you'd think -- for all that computing power you have to throw behind the design process, it still takes horrendously long.
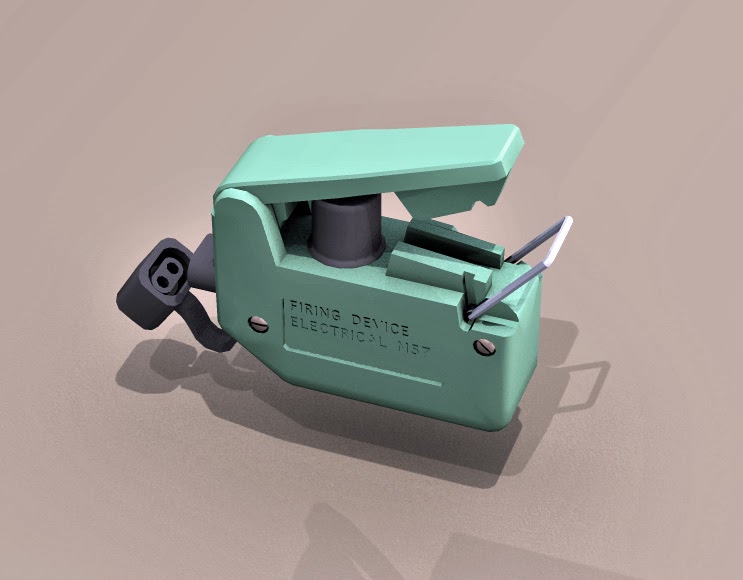 On the 3d side, I've been working on my M57 "Clacker" model to make it 3d-printable. Apparently, some people have used them to make an e-cigarette! Seems like it would be useful anyhow to work up as some sort of general-purpose button-powered prop. But low priority project. Also working on the V150 model again. Someone over at Shapeways has an interest in seeing it in 1/18th scale. Which requires a higher level of detail than is currently in the model, but I have also slowly been working it up as a Poser version anyhow, so that's been happening already.
My old penlight finally died and I thought of yet another project that would be very cute. To wit; a penlight in the shape of a Sonic Screwdriver. But not any of the existing ones; a very small one built around a single AAA cell -- not the dual AA versions which won't fit in a pocket, or the ones using weird rare batteries that are a pain to replace. AAA, with a boost circuit driving half a watt of narrow-beam colored light (we almost always use colored light backstage. Tradition.)
But that requires going into the CAD software and figuring out a casing that can be printed or machined that fits the available components and looks at least something like the sonic of choice (I'm partial to a War Doctor sonic, myself, which is basically a Tom Baker sonic with a different top).
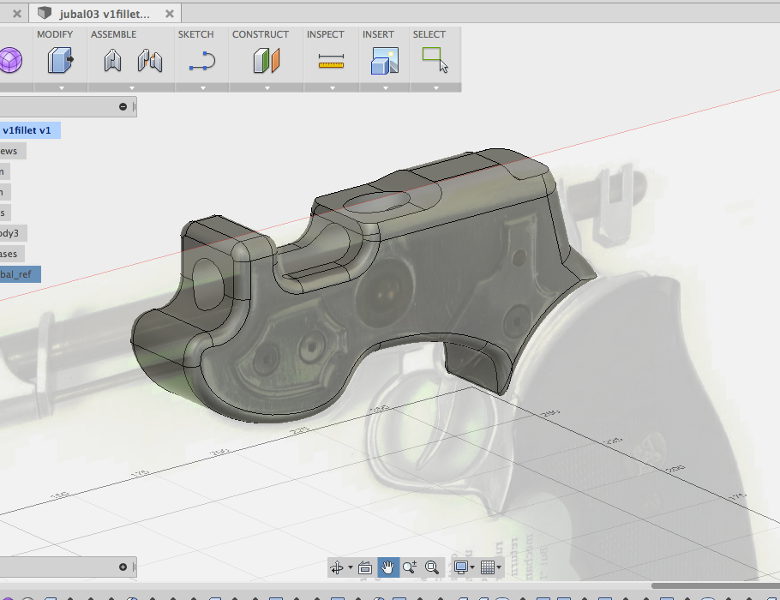
Also back on one of those rear burners is the Jubal Early CNC model. And a turned flash hider for a "King of the Rocketmen" pistol.
 I just got another order for "Aliens" grenades. And since I'm overdue for it, going to revisit the process and some of the measurements. And purchase some new lathe tools. And that's not (mostly) on the computer, but I still think about building my own versions of some of the variant ammunition, and that's probably best done in a CAD application. With an eye towards printing, casting, or even perhaps injection molding custom caps.
 Although I need to order metal and tooling now, the priority machining task is finishing up the Suomi. I have been reading about silver solder and I think I might fill some of the smaller remaining voids with that and deal with the way it will alter the finish in those locations. They are mostly hidden anyhow, so I think it may be okay. Most of the work on this is pretty primitive, though. I did a lot of the milling entirely by eye. Heck -- I didn't even calculate my feeds and speeds, but just set up the mill by ear and instinct.
I've been really pushing on the DuckLight PCB -- working it up in Fritzing at the moment, which seems to be working and saves me the time of learning Eagle properly. Using the prototype in another show helped a lot. I'm getting excited about this thing and think it may be a very useful little trick for the prop-maker's arsenal.
I'm going with an ATtiny84 now. Four channels of software PWM current-controlled to 350ma means you can run a cheap RGB "Cree" LED, an RGBW, or a single-channel LED of up to three watts in bridging mode. ICSP header for the experienced programmer, software serial I/O...and there's enough I/O pins left on the '84 to put in a Program Select button. So the end-user can dial up a bunch of basic effects right on the board, without needing to connect up a computer. The XBee option will be on a daughterboard, though; there's just no space for the pin footprint.
I fully intend this to be offered in kit form. And at this point I've solved enough of the electronics and programming issues I really am ready to make up the first batch of PCB's.
 If that wasn't enough light, I have a second order for the LED stage lights I built. Now I just need to get the client to pay a little better piece-work for assembling them...
Well, like the story of Basho and the Fish, getting to the point where you press that button is actually a lot of work. What these new tools are, is just another form of jig (or "tooling," if you want to use the fancy aerospace term).
I used a lot of jigs when I was a full-time theater carpenter (that is, a set builder). We'd spray-paint them red so they didn't get thrown out by accident. One show I had to make a whole bunch of fake bolt heads as decorations for some massive girders. Underside of a bridge or something; I don't remember now. Ripped down 1x to 2", cut it into 2" squares, cut off the corners to make a hex shape, then routed around the top. I spent most of a day making a complicated jig that would hold the thing in place for all the cuts and routes.
Which is the thing, here; if you save any time with 3d printing or CNC machining, it is when you are building multiple copies. The savings, if any, are one of those economies of scale. I could have scratch-built a V150 armored car in less time than it took to make the 3d model. But since the model was made, we've printed four or five of them (plus there's at least two others out in the world).And, well, you'd think -- for all that computing power you have to throw behind the design process, it still takes horrendously long.
On the 3d side, I've been working on my M57 "Clacker" model to make it 3d-printable. Apparently, some people have used them to make an e-cigarette! Seems like it would be useful anyhow to work up as some sort of general-purpose button-powered prop. But low priority project. Also working on the V150 model again. Someone over at Shapeways has an interest in seeing it in 1/18th scale. Which requires a higher level of detail than is currently in the model, but I have also slowly been working it up as a Poser version anyhow, so that's been happening already.My old penlight finally died and I thought of yet another project that would be very cute. To wit; a penlight in the shape of a Sonic Screwdriver. But not any of the existing ones; a very small one built around a single AAA cell -- not the dual AA versions which won't fit in a pocket, or the ones using weird rare batteries that are a pain to replace. AAA, with a boost circuit driving half a watt of narrow-beam colored light (we almost always use colored light backstage. Tradition.)
But that requires going into the CAD software and figuring out a casing that can be printed or machined that fits the available components and looks at least something like the sonic of choice (I'm partial to a War Doctor sonic, myself, which is basically a Tom Baker sonic with a different top).
Also back on one of those rear burners is the Jubal Early CNC model. And a turned flash hider for a "King of the Rocketmen" pistol.
I just got another order for "Aliens" grenades. And since I'm overdue for it, going to revisit the process and some of the measurements. And purchase some new lathe tools. And that's not (mostly) on the computer, but I still think about building my own versions of some of the variant ammunition, and that's probably best done in a CAD application. With an eye towards printing, casting, or even perhaps injection molding custom caps.Although I need to order metal and tooling now, the priority machining task is finishing up the Suomi. I have been reading about silver solder and I think I might fill some of the smaller remaining voids with that and deal with the way it will alter the finish in those locations. They are mostly hidden anyhow, so I think it may be okay. Most of the work on this is pretty primitive, though. I did a lot of the milling entirely by eye. Heck -- I didn't even calculate my feeds and speeds, but just set up the mill by ear and instinct.I've been really pushing on the DuckLight PCB -- working it up in Fritzing at the moment, which seems to be working and saves me the time of learning Eagle properly. Using the prototype in another show helped a lot. I'm getting excited about this thing and think it may be a very useful little trick for the prop-maker's arsenal.
I'm going with an ATtiny84 now. Four channels of software PWM current-controlled to 350ma means you can run a cheap RGB "Cree" LED, an RGBW, or a single-channel LED of up to three watts in bridging mode. ICSP header for the experienced programmer, software serial I/O...and there's enough I/O pins left on the '84 to put in a Program Select button. So the end-user can dial up a bunch of basic effects right on the board, without needing to connect up a computer. The XBee option will be on a daughterboard, though; there's just no space for the pin footprint.
I fully intend this to be offered in kit form. And at this point I've solved enough of the electronics and programming issues I really am ready to make up the first batch of PCB's.
If that wasn't enough light, I have a second order for the LED stage lights I built. Now I just need to get the client to pay a little better piece-work for assembling them...Monday, August 25, 2014
Vee Hick Cull
The "Morrow Project" XR311 print arrived from Shapeways. It looks real good, even in the cheapest of the available materials (the white nylon). I didn't expect the tread on the tires to show as well as it does. In any case, I'll post some pictures once it gets assembled and painted up.
I'm pushing on contract and hourly right now, as bills are coming due and the next show doesn't go into tech for several weeks yet. So not a lot of time for props or electronics projects.
Successfully replaced another jack on a Sennheiser body pack. It's a pain because the circuit board is so tight, and the traces are fragile. I had to carefully cut apart the old jack with dykes and de-solder the stubs of the lugs one by one. I have at least one more to go through, plus the easier tasks of antenna and LCD, but the big labor is a pile of damaged Countryman B3's. I'm hoping I can return at least some of them to service, but they are all aging.
I may have imagined it -- no way to do a double-blind -- but when I finally washed out the elements the principals were wearing on Shrek, it made a big difference to the sound. Yes; you can actually rinse the Countryman elements in water. Or in alcohol, which is what I do. Do give them time to dry out properly, though!
Meanwhile, the crazy budget system I assembled at another theater made it through the first Theater Camp without problems. I still need to label and document. Downloaded a couple of installation diagramming software packages, but the level of detail I need for these end-users means I'll probably have to do the docs in PhotoShop. Or Inkscape, which is the shareware option to Illustrator.
A Rolls MA2355 is fed by a dedicated microphone (Crown PCC160) and drives two legs of monitors; one in the booth, another in the dressing room. This is completely independent from everything else, but at some point I'd like to link it up to the ClearCom for Stage Manager announcements to the dressing room. (This may be as simple as a length of cable).
The primary system aggregates through a Rolls rack mixer; this pulls in a pair of inputs dedicated to the FOH mix position, a pair from the firewire interphase of the sound effects computer, and front-panel jacks for iPod and dynamic mic for use during rehearsal and by the Theater Camps. On the remaining work list is to cut a plexi shield that will deny access to anything other than the latter two inputs to casual users of the space.
This feeds a DriveRack PA+, which does the absolute minimum system tuning; a little notching in a graphic EQ for gain, a gentle corrective parametric EQ, and delay for the rear speakers (which I'd like to replace, and move further forward to make proper fill speakers out of).
I've also got another rack mixer in there which is not yet connected, but is designed to bring together a second pair of firewire outputs with a second pair of feeds from FOH, to allow both access to the front fill stage monitors.
Still, just this (plus putting in hardwired boxes for the ClearCom runs, adding a Furman to the rack, and a few other details) already cost over fifteen hundred. The bucks add up quickly with sound.
Those bucks went to the theater. My own bucks stretched just enough to pick up a little fabric and repair my futon cover, but not enough, yet, to have any PCB's fabbed off. My browser is still filled with tabs on power MOSFETS and 5-watt LEDs, but that project is going to remain stalled for a little longer.
Tuesday, August 12, 2014
The Pharaoh Three-Dee-Eh-Gahn
The more geeky work is being hard right now. Writing, sure. Electronics, programming, and 3d modeling, not so much. But managed to tweak a third-party model (purchased at TurboSquid) for 3d printing:

This is the FMX XR311, otherwise known as the "G.I. Hotrod." Although never manufactured in other than prototype quantities in the real world, it has made its way into the Morrow Project as a lightly-armed (and very much not NBC sealed) vehicle for general use.
The model omits wheels (at client's request) and because of printability requirements the protective shapes over the headlights are also removed. This is a fairly low-detail mesh anyhow.
Oh, yeah. And the current process? Well, it turns out not only does Carrara export a non-standard Collada file, it also exports a Wavefront OBJ in a way that makes Blender choke. So to get this model in Shapeways, I;
1) Exported from Carrara in OBJ format
2) Imported into Poser 9.0, exported again as a fresh OBJ (but now other applications won't bork)
3) Imported the new OBJ into MeshLab, and exported an STL.
4) Imported the STL into NetFabb, set the scaling and orientation, and exported.
5) Uploaded the STL at Shapeways.
And NOW I'm frustrated. Shapeways is automatically flagging the mesh as bad, and sending me nag notices to fix it, but the check software is stalled. Seems to be a page problem; I uploaded the original test mesh -- the one that passed -- and Shapeways is doing exactly the same thing.
Oh, and on the electronics? I'm committed to throwing together a v. 0.4 version of the Duck Light; ATtiny85 with ICSP programming header, XBee socket, and three (or maybe four mosfets for PWM'ing a 3W LED. No power management, constant-current drivers, level shifting, anything; just naked batteries and a few 1 watt resistors as ballast. On the up side; it should be cheap.
I can learn PCB on this board, maybe even through in some SMD to practice with, and then I'll at least have something for the next time a lantern or magic wand comes along.
Friday, August 8, 2014
Tetris Effect, and other distractions
This is an annoying week. Three or four times a year an anemia hits me. It can linger for almost a week, and nothing seems to make a difference; exercise or sleep in, eat or change diet, medicate or ignore. You know what it feels like after significant blood loss or trauma? Or the first few minutes after giving blood at the blood bank? Try feeling like that all day. Hard to get much done.
I've torn apart a third-party model in the process of making it printable. I think I have an airtight base mesh now. The next challenges are getting the thicknesses to where they can be practically printed in 3d (not too thin, but also not to thick -- because you pay for every CC of material you use).
Also struggling with the engineering of my Prop Light Source, or whatever it is I'm calling it. Basically an Arduino-compatible integrated with driver circuitry for high-power LEDs. How this is different from anything else out there, is most of the existing lighting solutions are smaller -- in the 20-40 ma range. For theatrical use, I need the 3-10W range. (aka 750ma and up).
I'm looking at lots of data sheets now, and there are some very nice off-the-shelf constant-current drivers, but they are all designed for larger voltages (typically 16V) And it seems cleaner to instead use boost power supplies, which are also available in convenient packages with minimal external components. Or...I could build my own, using the PWM outputs as pulse sources, but I'm just not a good enough engineer to figure out current detection and limiting loops on my own.
And since I'm feeling so sickly, spending a fair amount of time just reading archaeology blogs, or playing Tomb Raider. Going through Legend now. Which after the quality of the models and controls of the later games is a bit of a hurdle. Combat feels particularly awkward, especially as there is significant animation lag when you try to jump out of the way of something (as in, she goes through almost half a second of "gathering my legs under me preparatory to jumping" before she actually jumps).
I'm seeing ledges around town now, just as I spent a while seeing portal-able surfaces. The most noticeable Tetris Effect for me, though, tends to be collectibles. I'm seeing arrow reloads and salvage boxes everywhere. Just as during Half-Life I'd see supply crates around town.
The way I think this works, is; after you've been playing for a bit the power-ups get put in hind brain. Your attention is on plotting routes, tracking enemies, and so forth. Your peripheral vision is scanning all the while, applying hind brain pattern recognition to the memorized shapes. And in those odd moments when you aren't actively jumping or shooting, you run over the ones you spotted to pick up a few more points from them.
It is the very low-level, almost-instinctual level at which you put this that makes it stick with you outside the game.
Tetris Effect also refers to thinking in game terms, of course. Classically, in trying to manipulate sofas and house guests in your mind to see how they might stack. (One suspects that Douglas Adams might have been playing a lot of Tetris when he wrote the first Dirk Gently book...?)
And I can't say I've consciously noticed any of this. The problems and solutions of the games I've played are both so contrived, and so alien to every day experience, there doesn't seem to be any cross-over. Which is jus as well. I'd hate to have my instinctual reaction to meeting a stranger to be swinging an ice axe at their head!
As a sideline, the puzzles in Tomb Raider 2013 are quite nice. But on replay, you remember most of them (worse, I watched a bit of a run-through while deciding if I wanted to try the game, so I never got the chance to address some of the puzzles as a completely unique challenge).
Combat takes such primacy in many games because there's enough variation in what you can do, and enough emergent behavior in the AI, to make it fresh (fresh within limitations, that is). And it is relatively easy to add more, once you've established the meshes, combat values, and AI.
As physics engines are getting integrated, more physics challenges are also available to break up the monotony of doing the same challenge the same way. These are all aspects of a multi-body problem; add enough elements, and the possible variations becomes staggering. Whereas most puzzles -- and most platforming -- has only the specific alternatives the level designers put in.
I believe that the Tomb Raider games do not have an overall physics on their universe, not when it comes to climbing. That is, no part of the engine analyzes edges to see if it is possible for Lara to cling to them. Instead, every actual climb-able element is painted in on the level map. So, arbitrarily, one raised brick could be a hand-hold, another not be. The better Tomb Raider games provide enough of these surfaces that there is more than one route to each goal; that breaks things up a bit.
But it still becomes largely rote. So far combat -- and driving -- seem to be the major ways to let the level itself generate fresh play. Everything else is scripting, and limited by the patience of the level designers and the budget of the game.
Saturday, February 1, 2014
CBR Revisited
A nice fellow dropped by recently with a comment on the Morrow Project CBR kit (my monster prop project from last year). I looked at the old paperwork and thought about it for a little and I have some lessons I think I learned.

In general, the design process was good, the design itself good, the electronics and coding good enough. The modeling and casting succeeded, which is all that can be hoped for the first time out on a new technique. If I were to go around again on it, I'd be going into unexplored territory again on a couple places; on designing a 3d print with interlocking parts (well, more interlocking than the V150, or the 1/6 scale Claymore Mine I'm currently having printed), and on making a PCB. I've known for a while I've taken perf about as far as I can take it, and for the larger component counts, smaller footprints, and above all more reliability I need to move to PCBs.
I would like greater interactivity, but what I built already exceeded what was likely to come into play, literally; this was a demonstration piece for a table-top game, and probably was turned on and passed around for no more than a few minutes. And may not have been turned on since.
Specifics:
The Dialights are cute, but not really worth it. The visibility and visibility angle is lower than a standard indicator. Standard indicators domes would also mean I could shrink the footprint of the faceplate components a little and improve the overall fit.
I'd make a fresh 3d model, 100% printed, with a tight-fitting lid designed with pockets for neodymium magnets. That would ease assembly, and access for battery changes. There are several other smaller changes in the faceplate, including a larger relief in the shade hood, and a slightly larger footprint (there is space in the pouch for that).
The model would also be more detailed in the body, with better "battery compartment" detailing, some small raised ribs around the terminals, inset for the dataplate, and so forth.
The electronics would be on PCB of course, with the VFD soldered directly to the board instead of soldering each pin individually to ribbon cable (which was a real pain). I'm tempted to go with encoders instead of rotary switches for flexibility, but the main change here is switching to a double-deck so "OFF" actually works! Another change to the electronics would be a hand-rolled high voltage supply, so I could run the VFD brighter. Lastly, the power would be changed to AA instead of 9V, giving a much longer service life.
The speaker was underwhelming when packaged into the device. I'd have to experiment with this; the first idea is to use a true conduction speaker (with a proper speaker driver aka LM386 or similar) and make a speaker out of the printed shell.
But when all is said and done, the prop did what it was supposed to do, and there's no particular impetus to rebuild it.
Funny. It's something I learned while "debating" with Moon Landing Conspiracy buffs; when you try to "rebuild" a project using everything you learned since -- making use of new technologies and new techniques -- it becomes an equivalent job to designing it from scratch all over again. The main thing that stays in this case is the artistic concept, and all the time we spent developing that.
But that artistic concept is the most fun part of the project, so if I were to embark on a similar prop, I'd really want a chance to re-think that as well. Build one for a different period, or build a different device entirely. Because then you not only get to incorporate the lessons learned on fabrication methods, you also get to do some more creation.
(Picture taken before final, printed, knobs were installed)
In general, the design process was good, the design itself good, the electronics and coding good enough. The modeling and casting succeeded, which is all that can be hoped for the first time out on a new technique. If I were to go around again on it, I'd be going into unexplored territory again on a couple places; on designing a 3d print with interlocking parts (well, more interlocking than the V150, or the 1/6 scale Claymore Mine I'm currently having printed), and on making a PCB. I've known for a while I've taken perf about as far as I can take it, and for the larger component counts, smaller footprints, and above all more reliability I need to move to PCBs.
I would like greater interactivity, but what I built already exceeded what was likely to come into play, literally; this was a demonstration piece for a table-top game, and probably was turned on and passed around for no more than a few minutes. And may not have been turned on since.
Specifics:
The Dialights are cute, but not really worth it. The visibility and visibility angle is lower than a standard indicator. Standard indicators domes would also mean I could shrink the footprint of the faceplate components a little and improve the overall fit.
I'd make a fresh 3d model, 100% printed, with a tight-fitting lid designed with pockets for neodymium magnets. That would ease assembly, and access for battery changes. There are several other smaller changes in the faceplate, including a larger relief in the shade hood, and a slightly larger footprint (there is space in the pouch for that).
The model would also be more detailed in the body, with better "battery compartment" detailing, some small raised ribs around the terminals, inset for the dataplate, and so forth.
The electronics would be on PCB of course, with the VFD soldered directly to the board instead of soldering each pin individually to ribbon cable (which was a real pain). I'm tempted to go with encoders instead of rotary switches for flexibility, but the main change here is switching to a double-deck so "OFF" actually works! Another change to the electronics would be a hand-rolled high voltage supply, so I could run the VFD brighter. Lastly, the power would be changed to AA instead of 9V, giving a much longer service life.
The speaker was underwhelming when packaged into the device. I'd have to experiment with this; the first idea is to use a true conduction speaker (with a proper speaker driver aka LM386 or similar) and make a speaker out of the printed shell.
But when all is said and done, the prop did what it was supposed to do, and there's no particular impetus to rebuild it.
Funny. It's something I learned while "debating" with Moon Landing Conspiracy buffs; when you try to "rebuild" a project using everything you learned since -- making use of new technologies and new techniques -- it becomes an equivalent job to designing it from scratch all over again. The main thing that stays in this case is the artistic concept, and all the time we spent developing that.
But that artistic concept is the most fun part of the project, so if I were to embark on a similar prop, I'd really want a chance to re-think that as well. Build one for a different period, or build a different device entirely. Because then you not only get to incorporate the lessons learned on fabrication methods, you also get to do some more creation.
Friday, January 3, 2014
Small Morrow Update
The second Commando V150 arrived in the mail from Shapeways. We printed this time in "Frosted Detail" material, which was slightly more costly but both captured the detail of the mesh better and provided a smoother surface with less finishing work necessary before painting.
However, a few small parts did break off somewhere between printing and when it arrived here. So I've placed a hold on new orders in my Shapeways store until I've had time to thicken it a little in those spots (specifically, the protective "cage" over the gunner's periscope, and the "grab bar" like shapes that provide a door rest when the lower part of the side doors are opened. The latter was an easy fix with a bit of wire and some zap-gap CA.)

(Printing price is $50 -- I know, it sounds steep, but think of it like one of those Japanese "Garage Kits.")
Friday, November 29, 2013
Ogre Combat
Battlemat, Terran Date 11292013
I come to consciousness and immediately perform a full system and boot-up check. I am eager to begin my service as a member of the Brigade, unit 73583823 CLD, and hope that I will continue to uphold the unimpeachable record of that great unit. The boot check takes an entire 23.0567 seconds due to the need to integrate an operational consciousness mesh for the first time. But by 13.035 seconds I already know something is wrong. I complete the test and move immediately to a level-two hardware diagnostic.
It is as I suspected. Where I should have found smooth flanks of gleaming Iconel are instead a primitive polygon mesh. Instead of hubs I have polygons, and the 20mm smoothbore exists only as an abstraction of numbers. I am, apparently, still virtual. Not yet embodied.
A query through the communications net uncovered electronic communications from the fabricator. Their measurements revealed the shock absorbers under my hull thinned in one location to 0.65mm; 0.15mm under the recommended minimum. According to records unit 735662187 RNI entered service having been produced to that plan. Another search reveals that "Rani"s commander has no complaints and she has, of course, continued to serve in accordance with the high standards of our tradition, but the fabricator's caution is well meant. I concur that there is a .175% chance of failure during final assembly, although my figures disagree with the fabricator's pessimistic estimate of under 67% printability.
I reduce my alert status to something resembling rest, and wait with interest for developments. In 105,600.05 seconds a new design is completed and submitted, one that thickens and extends the area around the difficult joint, at perhaps the expense of the previously elegant line. Another 407,400.4405 seconds pass before the fabricator responds with another electronic missive.
The news is not good. The fabricator has determined that five scale inches is insufficient for the newer Iconel alloy called for in the latest specification. Muffler shroud, headlight cages, and even sprues are all identified by the fabricator's software as potential printing problems.
It takes 200,101.1 seconds for a third design to be completed. This one is a complete revamp of all critical dimensions. I read the design rules myself with interest; this takes .0014 seconds, but locating the design rules within the oddly organized electronic archives of the fabricator consumes nearly 13.8 seconds. No matter. The next reply from the fabricator does not arrive for another 500,147.46 seconds.
I have spent the time reading military histories, both real and fictional. I hunger now to begin my service to the Brigade as Unit 73583823 CLD, named "Clyde." (My name will be chosen by my Commander, but I am sure they will make the logical choice. "Claude" is a poor name for a unit of the Brigade, and "Clannad" would just be silly.)
The electronic missive at last arrives. The fabricator's software has now chosen to flag every rivet, every plate, every detail as if it was a section of hull. The dimensions required are absurd; I would be a featureless cube by the time all of these "errors" were ameliorated. None of these requirements existed before, or were mentioned in any previous missive.
I am sure now. For some reason, the fabricator has determined to obstruct my fabrication by any means possible. I look to a quote from one of the items of literature I so recently absorbed. "Once is happenstance. Twice is coincidence. But three times is enemy action."
Thursday, November 7, 2013
Here We Go a-Morrowing
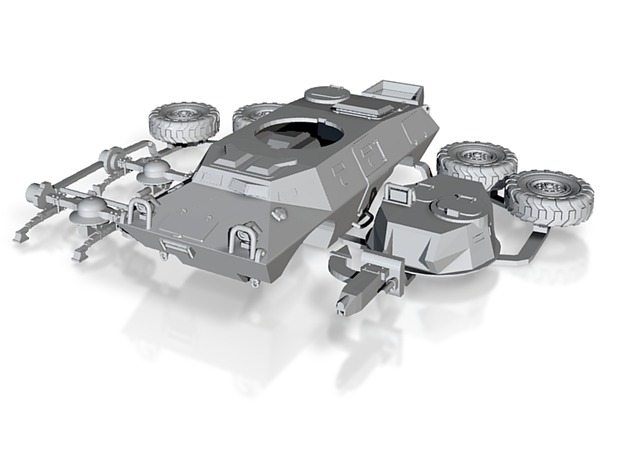
So the V150 model is finished and in my Shapeways store.
Here's how it looks with a coat of paint and a few bits of additional dressing:

More notes on scale; these are old Morrow Project miniatures from the 90's, thus the Ral Partha Dwarf proportions. Technically 28mm, and as you can see, they seem roughly proportional with a vehicle in 1/56 scale. At least, it is as close as I could get to 1/56 by working with the quoted length of the hull, from the blueprints I had available.
To recap the scale process: I scanned blueprint images and cropped and scaled them to be square and dimensional to each other. I took the pixel length of the largest scaled item that appeared in any one drawing and extrapolated the real-world dimensions of the blueprint space.
Within Carrara, I set the working box to the size of the blueprint space; this meant that if the model I was building was lined up accurately on the vehicle in the drawing, it would be the correct real-world size. This worked out, to within a small degree of error (a fraction of one percent error).
The two biggest problems I had within Carrara were, first, that I was working metric while most of the dimensional information was in feet and inches. So a lot of multiplying by 2.54 to get the right units into the modeler. The other is that Carrara, stupidly, only displays two digits to the right of the decimal point. This means that a vehicle sitting within a ten-meter working box can not have any numerical measurement that is smaller than 10 centimeters.
Which is ridiculous! Any of the detailed parts, then, could only be lined up by eye against a grid (which could be set finer than 10 cm). Once again, it is really stupid software for anyone doing a model more elaborate than the Linux penguin.
The drawback of the method is that when I moved into checking for printability I had to divide by 56 all the time to find out what the print size of various parts was going to be. Finally I just reset the grid to be at 1 mm in the final print size of the model (aka 56 mm in world scale), and eyeballed everything to make sure I was staying within the Design Rules.
Since I knew the longest dimension of the completed model in real-world scale, all I had to do is divide by 56 to figure out what the size of the scaled mesh should be. The actual export from Carrara was at arbitrary scale (Carrara doesn't do scaled obj format). But all I had to do is type the correct longest dimension in the scale box in Hexagon 2.5, and the stl exported from there was correctly scaled for the Shapeways printers.
The last scale trick was to line up all critical-fit parts the same way they would be when assembled (as the printers aren't always the same degree of accuracy in x, y, and z axis), and export them together (to make sure they are all scaled the same ratio and will fit properly after printing). In this case, I attached the different parts together with sprue to make it easier for the lads and lasses at Shapeways to handle what otherwise might be small, fragile parts.
Monday, October 21, 2013
Some Day My Prints Will Come
...And they did.


So the box from Shapeways arrived today. Cost of the model with shipping; about fifty bucks (using the sintered Nylon-3 they call "White Soft Flexible.")
 Cut the pieces from the sprue with diagonal cutters, and tried a rough assembly. All the parts fit, and there wasn't any significant warpage.
As it turns out, I needn't have worried about the fit of the "socket" on the wheels; at that scale, it is going to be eyeball and a blob of glue anyhow.
And the turret is plenty generous. I might even shrink that tolerance a little.

For reference, this is a "hero" render of the actual model (note; this is with all edges beveled to reveal the actual polygons better. Ordinary renders would smooth out the curves instead.)

So what is next for this model? Well, a few minor modifications to improve the print -- which is currently being offered for sale at my Shapeways store.
And the Poser version, which is taking a long time; I had to throw out most of the hull thickness so as to permit working vision blocks and opening doors. And although the details are a bit too fine to print properly in the material of choice, they are not quite fine enough for the Poserverse -- I need to replace hinges and latches with more detailed ones, and the vision blocks need to be completely rebuilt. Not to mention, you know, interior detail!


So the box from Shapeways arrived today. Cost of the model with shipping; about fifty bucks (using the sintered Nylon-3 they call "White Soft Flexible.")

As it turns out, I needn't have worried about the fit of the "socket" on the wheels; at that scale, it is going to be eyeball and a blob of glue anyhow.
And the turret is plenty generous. I might even shrink that tolerance a little.
And here it is, rough-fit (omitted the undercarriage and just balanced it on the wheels instead.) As you can see, some details got dropped/filled in. The only really objectionable part, though, is the stair-stepping on the rear of the hull. This is inevitable when combining a gently sloped surface with the 0.12mm print head motion.

For reference, this is a "hero" render of the actual model (note; this is with all edges beveled to reveal the actual polygons better. Ordinary renders would smooth out the curves instead.)

So what is next for this model? Well, a few minor modifications to improve the print -- which is currently being offered for sale at my Shapeways store.
And the Poser version, which is taking a long time; I had to throw out most of the hull thickness so as to permit working vision blocks and opening doors. And although the details are a bit too fine to print properly in the material of choice, they are not quite fine enough for the Poserverse -- I need to replace hinges and latches with more detailed ones, and the vision blocks need to be completely rebuilt. Not to mention, you know, interior detail!
Wednesday, October 2, 2013
Iron Cars, Wooden Fingers
I am on the home stretch now for the V150 model. Adding hinges and lifting eyes and other stuff to it now. Which is going quickly because there's no real point in doing careful research, or even careful scaling; these items are right at the verges of printability and have to be made large and crude just to pass the software tests.

Oops -- got the periscopes turned around. Don't worry, it will be fixed before printing.
I simplified the undercarriage a lot, but it still took up the better part of two days. I left off shocks, power steering cylinders, brake lines, etc., etc. But then messed around for a while figuring out a way to connect to the wheels so someone could use other wheels if they had them on hand (the wheels have enough thickness in them to cost a whopping $3.98 each to print).
For some reason it took the better part of today to work up the rather simple-looking Rheinmetall Mk20, otherwise known as the Rh202 20mm autocannon. Several hours of that was looking for better reference material. The bulk of the rest was not in modeling per se, but trying to get the mesh to agree with two different references which were incomplete, confusing, and contradictory.
For this project I worked in real-world scale. This is what I have been doing with my Poser stuff of late; it is much simpler to set the workspace to real world scale, including a reference grid, and then re-scale during export.
Carrara's obj export is unscaled (thus useless in Shapeways). Collada is broken. So far the only export chain I have working is Wavefront obj from Carrara, re-scale to print size in Hexagon and export as stl (which does have a scale).
But since Hex only displays three significant figures, and Carrara a mere two, I really have no way of knowing if I have more than one piece in scale to each other. So I'm going to have to do something clever when comes time to send the complete model to the printer. It might even involve sprues.
A new trick I used this time; I cropped the reference image square, then, using the exact pixel size of an object of known scale (in this case, the hull of the V150), was able to determine the world size of the reference image (8.21 meters, as it happens). With that, I could set the Carrara working box to 8.21 meters and thus the drawing became exactly world scale.
(Well, almost exactly; an error of 1:100335 somehow snuck in there. And, yes, I'm using entirely too many digits when my confidence is barely to the first "3.")

At least I'm done with shocks and struts. On this vehicle, anyhow. My own needs a little attention now.
Friday, September 27, 2013
Details, Details
The V150 hull is closed up and watertight now, and is probably printable. I'm doing most of the detail work before I send the test mesh in, though.
Yesterday was turning it from a solid model to a hollow model. And that was a lot more painful than I had expected.
First, all of Carrara's automated tools bollixed on the mesh. So I had to do it manually, one plane at a time.
Then I checked dimensions. And the thickness I'd eyeballed was way under. The minimum printable wall thickness is 0.7mm, and I was aiming for a margin with 1.0mm (or a little more). That's almost 6 centimeters in the scale world. Let's put it this way; the bottom plate armor of the real thing is less than 1/4 the thickness I have to make it in order for it to work in the 3d printer.
A lot of this would have been much faster if I hadn't made the doors and vision blocks and hatches as framed "holes" in the mesh. For the battlemat version, none of the hatches need to open and in any case it would have been faster to do the extrusion and thickness if I had the simpler slab sides. Lesson for next time.

So all that ate up a day. Today was starting in on detailing. Although the print will support details as fine as 0.2mm (a bit over a centimeter on the real vehicle), I've enough experience both with how smaller details can collapse or fill in, and how much I have to exaggerate details in order for them to be properly visible in scale. On the real vehicle, for instance, the outside of the vision blocks is mostly a weld line, with a small retainer plate holding a gasket.
In the model, I am extruding the whole edge a couple of centimeters. And, yes...since the shapes are already in the model, I'm making a smoother mesh and less material waste by extruding many details instead of adding them on. The only exception so far is the exhaust shroud.
I've also been tesselating the various curves. Originally, I intended to subdivide the entire model. But Carrara's tools get a little funky around some shapes, and I was having to dial up the Sub-D to ridiculous levels in order to smooth out the puckers. Plus the mesh was wrapping around itself in places and might end up unprintable as a result. Oh, and Carrara crashed a lot. It doesn't seem to like Sub-D on a model with multiple surfaces.
To do all these small details I'm jumping around between nicely drawn plans of a V150S, a walk-around book of the V100, and a plastic model of a late-issue foreign-export V150. Many details don't match, of course. Some are just plain difficult to find reference on. I have a fairly good sense of what should be on a Morrow Project era V150, and I'm able to chart my way around some of the things present on Thai and Philippines reference photographs that shouldn't be on this version.
But with all that, plus the issues of having to build a mesh that can be 3d printed, means accuracy is pretty much gone by the roadside now. I'm eyeballing everything at this point. At least the basic hull shape is about the right proportions and angles. And I've got the locations and more-or-less sizes of the various hatches off of references. But the details and curves and thicknesses are all eyeball and trackball now.
A few more days. I should be able to test the hull with the Shapeways software tonight, but I still have undercarriage, wheel hubs, turret detailing, and random bits like filler caps and jerry cans to do before the thing is complete.
Thursday, September 26, 2013
More Fun With Math, and a Joke
I did a little calculating on the printing cost. Unfortunately, once you assume a hollow model, the final price is exquisitely sensitive to the wall thickness. So the difference between a generous thickness and getting right down to the margins of what is printable is a range of 4:1 in cubic centimeters of plastic, hence cost.
And this is the point at which the project forks. The original request was for a hex mat model; detailed enough to be representative, but no functioning hatches or interior detail and, indeed, few small details of the sort that might break off in transit to the game and back.
The laser-sintered nylon (PA 2200) Shapeways offers as "White Strong Flexible" is the best choice for this, and can print down to a wall size of .7 mm, but given the strength should probably be between 1 and 2 mm in wall thickness for this model. At $1.40 a cm^3, the hull comes out under $25. So as a guess, the entire model is around $40 in this material. Sans wheels, which as solids add as much as $8 to the print.
Since I intend to add some of the surface details, including suspension and hubs, jerry cans, lifting eyes, etc., I figure the complete and total print cost will be a bit over $60.
Here's the current state of the thing:

I am ready now to close up the hatches and vision blocks, add thickness to the walls and make them "watertight" (necessary for printing), and then extrude some select surface details around the vision blocks and hatchs. The Rh202 barrel is just a mock-up for me; the final print will omit the gun barrel as it is too thin to print.
Actually, I have one other step before that. Right now the mesh is at arbitrary scale (it is scaled to how big the drawings were in the workspace). I need to fiddle with the bounding boxes and so forth in order to get a true scale representation, so I can keep the printable mesh within the Shapeways design rules. Of course Carrara is poor at dealing with changes to its workspace defaults (and what else is new?)
The second fork is a diorama version with posable hatches (although I shudder at the idea of interior detail). The thinner walls are more than offset by the possible upgrade to SLS ("White Detail" on Shapeways); a full $2.99 per cm^3. I've worked with the SLS more than I have with the nylon, so I am not a good judge yet whether this materials upgrade is strictly necessary.
There has always been a military modeling community in 1:56, although they tend to gravitate to World War II era. There is a growing number of models available of later armor these days (by much better modelers than I am), but, as yet, obscure post-Vietnam armored cars are not among them.
So there are people who could make use of this. Enough to justify the effort, I don't know.
The putative third fork would be Poser-izing it. Which would be a pain, mostly as my current mesh has extremely poor flow, is not Poser-optimized, and isn't UV mapped either. Wouldn't hurt to have another 3d model in my online store, though...
Someone landed on this blog with a search for theater tech jokes. Given time I'd remember a few. At the moment all I remember is traditions at certain theaters, like "Pumatic" tools at the Rep (due to a badly spelled drawer label on the road box).
And a few lightbulb jokes. The kind of theater person who says each, you can probably fill in on your own...
"How many ___ does it take to screw in a lightbulb?"
"One...two...one...two..."
"It's a LAMP, dammit!"
"It's not a prop or a set piece. Get an electrician to do it."
"Ooh, I like it. Keep it!"
"Five six seven eight!"
And related, there's the one a bass player told me; "One, five, one, five, one, five, one, five, one, five......"
Tuesday, September 24, 2013
Hunger Games
Hard to concentrate like this, but made a little more progress on the V150.

For some reason, I don't trust the TimeLine set of plans. The Cadillac Gage plans are cleaner and more detailed -- even though they are of a V150S. Unfortunately, the TimeLine plans (and the Hobby Boss model kit) are the only ones with the 20mm turret I wanted.
So first thing I did today was remove the "stretch," bringing the hull I'd made off the Cadillac Gage plans closer to the dimensions of a standard V150. There were multiple places where the plans disagreed, and several where they were unclear, so I compromised.
More compromises with the turret. The TimeLine plans don't match the Hobby Japan model. And, unfortunately, I've had a lot of trouble finding photographic reference of that turret. Well, more or less. I've found several similar turrets. Enough to conclude that there are a lot of variations, and that I am probably fine with modeling whatever seems clear and resembles as much of the reference material as is practical.
Similarly, I've been quite unable to track down information on the actual wheel wells (whatever is behind the cut-outs). The best I can figure, from the V100 walk-around book, is the they have a curve on the trailing edge and are squared off on the leading edge. Which is pretty bizarre. And they also get a "plank" on top of them on the inside; it is an obvious larger slab that sits over the flattened top.
For this, I've decided to go with what is on the Hobby Japan model and live with it. Because there's enough to model already on this thing. I still haven't figured out how I'm breaking it up to make it printable.
And then Carrara started crashing for no discernable reason, and while I was wrestling with that my dinner burned. Tomorrow, I take a crack at tires. Then start making hatches.
And NOW I'm tired.


For some reason, I don't trust the TimeLine set of plans. The Cadillac Gage plans are cleaner and more detailed -- even though they are of a V150S. Unfortunately, the TimeLine plans (and the Hobby Boss model kit) are the only ones with the 20mm turret I wanted.
So first thing I did today was remove the "stretch," bringing the hull I'd made off the Cadillac Gage plans closer to the dimensions of a standard V150. There were multiple places where the plans disagreed, and several where they were unclear, so I compromised.
More compromises with the turret. The TimeLine plans don't match the Hobby Japan model. And, unfortunately, I've had a lot of trouble finding photographic reference of that turret. Well, more or less. I've found several similar turrets. Enough to conclude that there are a lot of variations, and that I am probably fine with modeling whatever seems clear and resembles as much of the reference material as is practical.
Similarly, I've been quite unable to track down information on the actual wheel wells (whatever is behind the cut-outs). The best I can figure, from the V100 walk-around book, is the they have a curve on the trailing edge and are squared off on the leading edge. Which is pretty bizarre. And they also get a "plank" on top of them on the inside; it is an obvious larger slab that sits over the flattened top.
For this, I've decided to go with what is on the Hobby Japan model and live with it. Because there's enough to model already on this thing. I still haven't figured out how I'm breaking it up to make it printable.
And then Carrara started crashing for no discernable reason, and while I was wrestling with that my dinner burned. Tomorrow, I take a crack at tires. Then start making hatches.
///
And NOW I'm tired.

My Car, it's Full of Holes
I have three days off before I have to get back to the monkeys. Time for a bit of 3D!


This is the start of a printable model of a V150 armored car.
Well, V150S at the moment. Cadillac Gage first came out with the "Commando" during the Vietnam war. The V100 went through a bunch of changes, from squared-off wheel wells to ever-changing numbers of vision blocks on the sides. The V150 series adds some more changes, and the "S" model was the first "stretch," about 50 cm longer. Cadillac Gage had few enough orders that they optioned the heck out of them, with all sorts of different turrets/wells/pedestals/boxes on top, different hatches, etc., etc. And that's not even counting what some of the end-users did with them!
Anyhow. I have some nice drawings of a V150S, a Hobby Boss kit in 1/35 of a late-serial-number V150, a walk-around book on the V100, and some other references. And I'm not going to try to make every variation. Heck, Bruce Morrow bought enough of Cadillac Gage's entire factory output that he could have the things customized however he wanted them.
So I'm not sweating the details. I'm building a generic that more-or-less fits the median of these variations; my major guidance is what I've good a good reference for. Followed by what is easier to model.
Anyhow. Current progress is a mostly-done hull (I have details in the back and a lot of work to go on the underside). I've cut out most of the hatches and vision blocks, even though for the printable model I'll probably fill most of those in again.
And, yeah, you do end up with quite a lot of holes (and I haven't even included the firing ports!)
Saturday, September 21, 2013
The Cold Equations
Lord Kelvin once said:
"I often say that when you can measure what you are speaking about, and express it in numbers, you know something about it; but when you cannot measure it, when you cannot express it in numbers, your knowledge is of a meagre and unsatisfactory kind; it may be the beginning of knowledge, but you have scarcely in your thoughts advanced to the state of Science, whatever the matter may be."
Numbers are a tool. They are a way of characterizing a thing or effect or event in a form that can be manipulated and translated usefully. Doing the numbers is the only proper way to do engineering. And even a quick-and-dirty order-of-magnitude is an invaluable tool for figuring out basic problems.
Even if (or, perhaps, especially if) the numbers reveal a painful truth.
I have been tasked with creating a printable 3D model of a Cadillac Gage Commando (an armored car). I scanned and cropped the reference materials, started reading about variations in hull shape and accessories. And refreshed my memory on the Design Rules for the "Fine Detail" (objet printer) material at Shapeways.
To within a power of 2, that particular printer is as detailed as an extrusion-molded plastic model kit.
A quick calculation show that at the intended scale of the final model (1/56) I could represent surface details as fine as 1.2 cm, with extrusions as fine as 5.6 cm. Which is almost fine enough to represent individual grab bars to scale.
Even using conservative values, I appear to be obligated to make an effort at detailing headlight assemblies, vision blocks, gun ports, hinges on the hatches, etc. So this model is going to take a while.
Thursday, January 10, 2013
Build your own Morrow Project CBR Kit

Assuming you want to make a prop vastly similar to this one, this post assembles all the parts, links and diagrams I can provide.
Wednesday, January 9, 2013
Penultimate Morrow Post
This is the threatened "How we designed them" post. I'm going to try to make it short with lots of pictures.
The design process was exploratory and iterative, but it was framed into two distinct sections; the "on spec" preparatory work, then a firm commitment to build. The only late adjustment in contract was pushing the deadline back. Of course I was consulting at every step, floating lots of sketches and renders back and forth as ideas developed.
As is usual with such things, it ends up being as much compromise and circumstance as it is art and science. We were always aware of how things should "really" be both in the world of the Morrow Project and in the real world we pretended this project might exist in. We chose to go in different ways not due to ignorance, but due to need.
Subscribe to:
Comments (Atom)