Showing posts with label laser. Show all posts

Monday, October 3, 2016

Holocron history

This prop took forever. But there is reason for it. Basically, it isn't "a" prop. There wasn't a straight-forward design process from a base idea through a directed iterative exploration.

I was handed a kit to assemble and paint. I'd just been introduced to laser cutting and engraving, though, and I thought I could pimp it up a little.

The experiments worked. Well enough I ended up documenting the project for Instructables. And that's where the trouble started.

Enough people at Instructables showed an interest that I made my files available. Since some of the parts weren't originally mine, I had to come up with designs for those, as well.


It was through Instructables that I was contacted by the master of a Jedi Temple, wanting a custom design made for his students. I agreed to work on it. Many emails and iterations and a full free kit shipped out no charge and I stopped being able to shake the feeling that he wasn't actually going to be good for the cost of the final kits. So I parted ways with that customer.

Since I now had a new and tested shell design I tried for a while to generate a new holocron based around it. But I didn't like (and still don't like) and of the results.

The holocron does not yet appear in any movie. It appears in some games and animations; one appearance being the best documented appearance I've been able to find. This natural goal was blocked, however, by the seeming impossibility of achieving it with the materials at hand. So I continued tinkering with other alternate designs, trying to fold in various motifs from the Star Wars universe.

It was at that juncture that I opened an interest thread at the Replica Props Forum. I got strong interest there, but still couldn't satisfy myself with the design.

Took a break to work on other projects. Did the Retro Raygun, some other things. My Croft necklace was also a hit, and I gave it away on long-term loan, which led me to starting the Wraith Stone project, and that looked to require some advanced electronics, so I picked up the holocron project again just to be able to work out the charge circuit and load sharing and surface-mount issues on a simpler board than what I intended for the Wraith Stone.

And when I returned to the holocron, what I had seen as an unsolvable problem turned out to be trivial. The critical insight might have been a function introduced on the new lasers just installed at TechShop; vector engraving. In any case, I immediately moved to front position a design much more closely based on that one animation.

It is just different enough from my first holocron, though, that the lighting didn't look right anymore. So back to some very basic development to rethink how the lighting circuit interacts.

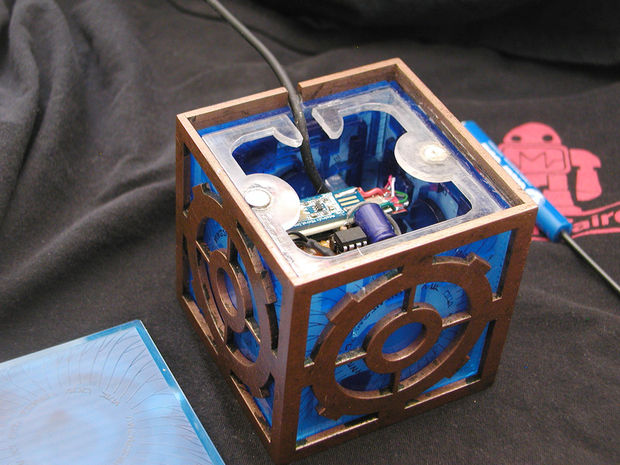
And, of course, late in the day I realized there were possible ways to get it to look even more like my selected source. The very first holocron was a three-layer model; painted shell, solid diffusion layer, then the vector-cut "circuit" layer. I finally broke through this paradigm -- first through having to add a diffusor cube, then through realizing an inner "hypercube" might be an even closer match to what was seen on screen.

And that's where I am right now; cutting out yet more test pieces to see if this idea works out, while my growing list of confirmed customers are demanding I let them give me money...

Which is of course the absolutely perfect time for a major change at my day job.

Tuesday, March 15, 2016

Holo promises

I just got a message through the RPF, reminding me there are still people interested in the idea of a cheap-and-simple Holocron kit.

The first one I built, I extensively modified a kit I'd purchased. I documented the build on my Instructables page. I got enough expressions of interest to start an INT thread over a the RPF.


Besides the ideas I'd already tested, like using the laser engraver to frost the inner walls with a pattern, I knew I could improve on the assemble-ability of the kit. It took quite a few weeks of tinkering but I at last had a set of shell parts that would snap together and make for quite a bit less time spent in trying to line up everything so it could be glued together, and patch it up once the glue was set.


Another element was boiling down the somewhat baroque electronics package of the first attempt into a simpler board suitable for a more typical end-user; based of course on my LED driver board in progress:


But then problems surfaced. I spent way too much time working with one prospective client on a design with proprietary elements. He never did quite get to the point of actually paying anything for this work, and as this dragged on I lost all trust in him as well as desire to continue the relationship. He got a complete holocron kit out of me for free (minus the majority of the electronics, though):


All this time meant a lot of the design elements had evolved along a path towards adaptations that simply didn't exist anymore. I wasted more time trying to pick up from that point, but at last have accepted I need to throw away the most developed designs, go back multiple generations, and work from design elements that are more suitable.

I would say "canonical," but there is sadly little canon yet on holocrons. The best-documented holocron comes from one of the 3d animations, and is the so-called "stolen" holocron:


This design however is difficult to realize in the materials I've chosen to work with. The frosting pattern simply doesn't work, the groove interferes with the mechanical structure, and worse yet, one of the keys of the thing in the canonical (well, Extended Universe!) depiction is that the corners rotate.

At least it is easier to realize in laser-cut acrylic then this over-sized prop made entirely for an advertising photograph:

So this leaves me without really clear directions to go in order to find a design that really speaks Star Wars. That looks like it could be canon.

This was as far as I got before I decided that the "shapes surrounding a central engraved image" approach was the wrong one. And believe me, there were a lot more shapes that never got past the Illustrator file stage (but there were still more than this example that got as far as the laser).

I am stalled here by the inescapable understanding that even limiting myself to this particular technology (aka laser-cut acrylic) I should be able to make a very deep and interesting shape (aka using multiple layers, diffuse elements, etc.)

But also by the realization that problem-solving how this can be assembled without glue stains and fiddling around and so forth is an ongoing challenge and whatever I dream up is going to have to go through more rounds of materials and time-expensive test cuts.

Probably all this would sort out if I could come up with a vision that I really liked. Some kind of a look for the thing that uses the strengths of the materials I have available but that is exciting (or, at least, as exciting as the original proved to be).

And then hopefully that would give me enough impetus to struggle through solving how to make an electronics package that is cheap and flexible and is easy enough for the end-user to work with.

Sunday, February 21, 2016

Imperial Highway IV

The first four segments are done.

I'm not happy with the engineering. Basically, I had no real sense of the shape and how it would work (as in, how best to hook them together, how best to be self-supporting, how to mold, whether they would be stackable) until I'd built the masters, and at that point I was loathe to take the time to strike off in new directions.

Which means what I ended up with is casting the side pieces with a supporting ledge, and with both that ledge and the deck pieces having holes sized for the smallest readily available (aka could be bought by the packet at my local hardware store) supermagnet.

The ledge didn't mold well, and the material of the master wasn't well-suited for holes, so the magnets don't fit that well. And they sort of stick out, too. Which along with the ledge makes the things stack quite badly. And superglue is not as strong as supermagnet; it is unfortunately easy to tear a magnet out when dissembling a road segment.

I'm still not sure which alternatives would be strong enough to support themselves safely enough to permit figure miniatures to be placed on top. I think based on my Holocron experiments that snap-fit acrylic might be stable enough. It would be even better if I could design some simple bracing scheme. And I have a feeling I could come up with a way to transfer the detailed texture of the master to vacuum-formed shells that could then be glued to acrylic backing.

If someone asked for a lot more of these things, I'd definitely experiment. As it was, I made about two dozen casting attempts over most of a week just to achieve four complete sets. And painting, as crude as it was, took another three or four days.

When I have some fresh casting compound I'll try to run off a couple more. I'm also still planning to try to make both an access ramp and a tower, both of which it is my intention to make a simple shell mold and slush-cast (the poor man's roto-cast) in one piece. No more fumbling with magnets. Might also desire some of the pillar elements which are used in conjunction -- these I am assuming I can model and 3d-print easier than anything else (although possibly cast instead of wasting the print time making more than one).


Yeah; basically, the lesson of the raygun strikes home; I would have done better making a full CAD aka 3d model first. And possibly printed the master. Pity it seems so difficult to transfer out from CAD to a good EPS file for laser cutting. Working it out in 3d allows you to visualize, and get all the dimensions, and makes it a lot easier to make changes as your design evolves. It does take longer to start with, but the time-savings only get larger as you get further and further into the design and build cycle.


Saturday, May 9, 2015

Pictures soon...

Atrociously slow work on the Space Helmet. I'm worried -- the deadline on the Raygun is getting far too close for comfort, and I really want some Holocrons in the RPF sales section. I need the money!

Took a plaster cast off the fitted eye lenses. Something reacted to the clear acrylic, though. Might have been the mold release, or the cast itself. They came out yellowed and didn't cure properly. The mold, of course, did not survive demoulding, but the casts are good enough (after a test fit) to make another mold off them. Unfortunately the last of my Oomoo-30 set up in the jar, leaving me with nothing but a bit of Rebound-25 to try to take a new cast.

I did use a little of the excess casting resin to coat and reinforce the PETG pull of the mask, though, plus put some divots in a chunk of clay and cast some possible rivet heads. Once I get the side pieces cut out the rest should go fast. Sigh. Been hard enough getting laser time together, I'm tempted to grab a sheet of heavy styrene and hand-cut them from that.


On the Holocron side, Novus #2 appears to restore the clear acrylic panels after flaws (glue spots and melted overflow from the laser cutting) have been sanded down. It takes a lot of it and a fair amount of work, though. Power buffing did not work; even at low speed my Dremel melted right into the plastic and made nasty grooves. It is possible a large buffing wheel would do better, but I'd have to find a clean one that hadn't been used to buff freshly-welded metal (which seems to rule out using the one at TechShop!)

I'm still not entirely happy with the Temple design. Worse, I haven't been able to come up with a new design I really like. So I'm still pretty far away from having samples for any new Holocrons.


On the Raygun, the surface-mount driver I was waiting on showed up and I've experimented briefly with it. Still can't tell if it is going to work. The problem here is the body of the gun is way too large to permit iterative design. I need to figure out everything in the 3d model and cut exactly that, since the CNC machining step is going to take upwards of eight hours of solid machine time.

All I can say right now on the driver is, from experiments putting it inside pots, ukulele, unfinished holocrons, and the like, it will at least make a noise. It may turn out to be necessary to not just mill some speaker slots in the gun, but re-cut the speaker mounting after machining the gun.

I'm also procrastinating on the trigger design. I wish I had just picked a button I knew would be a common stock item, so I could pop that into the CAD. Well, Fusion 360 does allow importing of parts from various sources, but in this case I'd feel better if I could hold the part in my hands and feel how the trigger motion works. Maybe I need to add making a mock-up to my growing list of laser needs?

At least I think I've solved the repro issue. Assuming I am making a limited number of ray guns serially, I will 3d-print them myself over at TechShop. The lower quality of the prints there is fine because the outer surface is all smooth curves anyhow -- no real problem in just sanding the heck out of it.

Monday, May 4, 2015

Distressingly Analog

Another TechShop member (who was in the middle of a 3d print), asked me how I liked the vacuum-forming machine. I told him "Distressingly analog." I think he got what I meant.

For all that the high-tech fabrication methods are replete with numbers; for all that they come (often) out of computer models, go through digital positioning; and for all that the knob-setting is replete with numerics and other quantization, the final results still depend too much on the less quantifiable.

Even at the laser cutter; although the beam position may be as accurate as 10 micrometers, and the beam around .001 inches wide, the width of the kerf will depend on not just the laser settings but how good the focus is, how flat the table is that day, even the color of the plastic.

I've been lasering out holocron pieces with an aim to get a good snap fit. But the necessary precision for this is roughly the same as the variation in thickness between different sheets of material from the same manufacturer, and variances in how wide the laser kerf is. I can adjust the latter a little to take up errors in the former, but that still means trial and error. As digital as the process seems, it needs that analog touch, that craftperson's touch, to get the desired results.


This was my first start-to-finish use of the vacuum former as part of the build of a prop. This is the oxygen mask for the pulp "space" helmet. And as usual, half the techniques were chosen because I wanted to learn more about those techniques. And half the remaining decisions were forced by time and availability of materials (I'm trying not to spend much on this particular prop!)

First step was a duct-tape dummy. This is a well-known budget technique for getting a rough body cast. As it happens, not the best technique for a partial cast like this, or a chest plate; the mold tends to flatten out considerably once off the body.

I reinforced the first try with plaster bandages, and when they started to dry out and come apart, paper towels dipped in white glue. It was heavy and didn't look right and I abandoned it half way through the modeling process.


The next one, I poured plaster in and carefully propped it up to keep it from flattening out too much. This was closer, but what was more useful, is I was able to pry the plaster out and thus work on the actual inner surface instead of the less accurate top surface of the duct tape.


There's a lot of discussion about what materials are strong and temperature stable enough to make a vacuum former "buck." Consensus is that there is little competition for MDF for the small props builder. Hydrocal rates a good second -- in the form of a positive mold taken off a garbage mold of the original cast.

The selection of air-hardening clay at my favorite store was poor, so I tried Sculpey for this project. It will never replace FIMO in my heart.


Unlike other clays, Sculpey seems resistant to smoothing. So I baked it then used sanding paper and spot putty to get the final surface.

Which was an adventure on its own. I used a toaster oven rescued off the street. Those things do not have precise temperature control, and my first cook was a little cold. My second cook burned the material, and because the additions expanded slightly, it cracked the surface. A little Bondo repaired that, but that made sanding an even more onerous task. I'll use clay next time!

Before finishing off the sculpt I roughed in what the other pieces were going to look like. The side plates will be laser-cut acrylic, but are simulated here with sheet styrene.

Oh, yes -- and after taking this shot, I re-thought how the inlet should work, and built up a different shape on the finished sculpt.


And here is the last of the three pulls I got in .040" PETG. I mentioned above there were concerns about certain materials holding up to forming? Well, I'd managed to forget since taking the SBU for the machine that the heater hood was not controlled from the front panel. I left the heater running, bubbled the PETG and cooked the buck hot enough to soften the Sculpey.

But I was able to repair the buck with sandpaper and some quick spot putty, and it held up for the pull to the left without collapsing. So it was a good mistake; now I know more about the limits of the material.

And I like the extra dents. Of course, if I had sculpted them, they would look even better, but oh well. This is rough-trimmed, primed with Krylon Fusion for Plastic, and I'm testing the rubber edging that will go on after it is glued and painted.

Today I picked up webbing and d-rings. Not quite right; I'd like some nice hardware and leather straps, but the only place for those seems to be Tandy, and I'm eager to get this thing out the door. And keep the expenses down on it, too.


In the meanwhile I made a plaster mold from the bits of carved foam and apoxie sculpt I carefully pressed into the eye slits. The mold looks horrible and I'll be lucky to have one good pull from it. I'll be pouring clear acrylic into it tonight.

I have several different approached to the insignia on the painting table. The only other major bit for this prop, then, is to create substitutes for the vintage oxygen canisters (which are chemical oxygen generators that we almost certainly do not want to open up). I've been measuring soup and oatmeal cans but it looks like I'll have to fabricate these from scratch as well. There might even be a little vacuum forming for the distinctive top (or I might do as I did for the insignia; heat it up with hot air gun and press it over a form with my fingers).

I need this project to complete and clear the decks. My holocron just got a mention at Adafruit, there's interest at the RPF and the Jedi Master is getting closer to purchasing a half dozen or more for his students. And the "Tiki" raygun needs to start machining before the end of the month!

Friday, April 24, 2015

Stolen... Holos...

(With apologies to Oliver Nelson)

I have some interest at the RPF in making a holocron kit, but I've been really struggling with the design. Here's what the first one looked like:


Since the shell design was not original with me, I have to re-think that. Here's a mock-up (I had the wrong acrylic on hand for the interior panels) for the "Jedi Temple" version I agreed to do for a potential customer:


The big differences are the use of dove-tail jointing instead of having to fill corners, the inclusion of USB port cutouts in the design, and that it is now the (canonical) 4" in size. But the diffusion-layer graphics on this one are for the Temple, so I can't use those either.

Here's the new hybrid design I've been working on, re-using the original diffusion and circuitry layers:


It works, but it doesn't inspire me. I found while working on the Jedi Temple holocron that I could cut finer detail than this in the circuitry layer. Also, the diffusion layer looks rather crude to me now (besides, it was designed to work with a shell that filled center.)

I sorta know where I want to go, but it is the sort of thing that PhotoShop is best at. And I don't have PhotoShop any more, and I have extreme reluctance to deal with Gimp or InkScape's work-arounds and other peccadillos for this particular bit of art. So I've been procrastinating.

While looking around, I found more information about one of few truly canonical holocron designs, the "Stolen" holocron from the animated series:


And, although it is a little tricky, I think I can get there with a similar construction method to my other holocrons by using both a deeply engraved detail line in the shell, and by back-painting the diffusion layer (both effects indicated but not simulated here in an InkScape file):


To really get the look of the Stolen, though, I need to do something which is only visible in some views, to wit; make an internal second cube and whatever clever acrylic cuts allows it to be suspended there.

The other major canonical holocron is one that was apparently made by prop artisans as part of the advertising campaign to one of the games. I find its design extremely attractive -- but also difficult to achieve. The simplistic method of slapping laser-cut acrylic pieces together can stretch for the Stolen, but not enough for the "Transformers" style:

The prop was apparently constructed at 2x to 4x scale in order to get all that detail in! So I'm not quite ready to try to tackle translating that into a simple holocron kit.

Wednesday, March 11, 2015

New Holocron

So I built a holocron a while back, starting from a kit (of which I ended up using very few parts). I also wrote the build up as an Instructable, and included -- free of all restriction -- all the SVG files I had created.

That Instructable caught the eye of a fellow RPF member, and thus I'm back in the holocron business, but this time with a completely custom design.


The original Golden Armor holocron was twelve pieces of laser-cut acrylic. Apparently this was how the three holocrons built for Lucas (for some sort of game promo) were done as well. Golden Armor's scheme wasn't bad; sand the internal panels lightly to diffuse the internal lighting better, and glue the outer panels corner-edge to corner-edge, filling the resulting void with Bondo.

But even on my first I thought I could improve that a little. So I threw out the internal pieces and laser-engraved new ones, then laminated those up with yet a third layer, this the "circuitry" layer inspired by the panel lines on the Millenium Falcon consoles. That gave a very nice depth to the holocron, even when the internal lighting was off.

To finish the Golden Armor shell, I used small pieces of acrylic square rod, gluing them along the edges before assembling the whole thing.

This is a stop-gap. For the new shell design I included on my Instructable, I made the pieces in three different sizes; two full sides, two interior sides, and two inside ends. But this is still stop-gap; if you made the pieces with fingers, then they could all be identical footprint but interlink together to the right combined thickness.

Thus my new shell design. And, yes, it was a lot easier to line up the pieces. But it could be better yet (also, the location of some of the splices would make them hard to clean up).

So back to Inkscape one more time to make complete finger joints. Only that isn't all there is to it. On the gross scale, these are just up and down jogs. But on the millimeter scale, they are having to adjust to the fact that the laser has a kerf, and the cut is not entirely square either.

So first they have corner passes. These are because the laser has a slight radius, and tends to melt the plastic a little on inside corners; left without correction, the corner will be slightly rounded and thus the intersecting finger won't quite fit.

Second, there's a slight outward curvature. The reasoning behind this; although the kerf of the laser should technically make the pieces about .2 mm undersized, the way the laser cut angles in slightly means that taking this error completely out might make too tight a fit and bind. So instead of narrowing the entire slot, it just pushes out in one place to provide a point of pressure -- allowing the plastic to deform a little if necessary to make the joint. If I managed to get all these values right (I haven't tested the new cuts yet) the pieces should "snap fit" into place and stay there without any further support while the gluing proceeds.

The rest of the "look" of the new design is a new circuitry pattern, and a logo drawn by the client and vectored by me. Plus one more thing. Various people asked on my Instructable why I hadn't used a USB socket instead of a trailing cable. The reason was the shell design didn't permit it. This design does, hidden by the repeating square motif on the center of two edges.

And of course the new interior pieces interlock as well. My first run (for which I purchased the wrong material, which is why it lights nicely but doesn't contain any of the engraved or interior detail) they are simple staggered edges. Assuming the new snap-fit interlock works, however, they will get those fingers.

The design here is that the interior box interlocks in such a way as to hold everything aligned without needing to glue it -- because glue can spoil the looks of the translucent pieces if dabbed in the wrong places. Also, since the outer shell is sanded and painted, the one panel that removes for access is designed to fit entirely inside instead of interlocking.

What I haven't quite worked out are the last pieces that hold the internal circuitry, and provide a place for magnets to hold down the lid. I'm also wondering if there is a way to deal with the "circuitry" layer so it doesn't have to be carefully glued to the back of the diffusor panels.

And this is where the design rests, until I can get out to Tap Plastics for the right acrylic, then manage to find a slot on the calendar when one of the laser cutters is free.


(The first run, with the wrong kind of diffusor panels), lit for test purposes with one of my Cree).

Tuesday, March 10, 2015

Room Full of Bicycles

I laser-cut most of the next Holocron today. But I don't like it. The parts all fit, but it is still fussy to line everything up while the glue dries, and with just a little more work it should be possible to snap-fit the parts together.

I finished revisions on the shell before I left TechShop, but there were no more empty slots on the lasers (not at least until much later than I meant to stay).

Oh, yeah. It also took me a few minutes to remember how to use the controls on the laser, lower the bed, do an air pass...(and more time puzzling out Illustrator, and getting the files correctly imported from InkScape).

Yeah, it's like riding a bicycle. You never quite forget...but you can get pretty rusty. TechShop. It's like a big room just full of a really wide variety of bicycles.


Sunday, March 8, 2015

Are We Multitasking Yet?

(With apologies to Bill Griffith.)

I'm still working serially, but the job slotting in the task manager has been on shorter intervals the past few days. I've been plugging away at three rather different projects, and the moment I get stalled on one, I switch to one of the others.

(Or browse random web comics...I'm not that task-focused!)


I finally got a concept sketch approved for the Ray Gun (more on that next post) and have moved on to mock-up:


In the meantime, the next Holocron is approved for trial cut, but there is a lot of work involved in making the pieces fit together better than the last one:


And I haven't managed to quite let go of the Poser content creation I started back when I was sick. Getting closer to having a few new clothing meshes ready for something...possibly my online store, which could really use more stuff, but rigging clothing is such a pain:


Wednesday, February 25, 2015

Knot Working

I still need another job.

The props stuff is keeping me busy, but with only a sound op gig, a small lighting design, and some microphone rentals I'm just barely going to scrape by.

I was messing around with knotwork today -- or more specifically, looking at a lot of stuff about Islamic interlace patterns. The idea was to work up something for my new Jedi Holocron project that takes the "Millennium Falcon Circuitry" pattern of the last one and moves it to more of a repeating decorative pattern...and the religious-art connotations don't hurt, as this is a design for a Jedi Temple.

Not sure why I thought of going in that direction. Maybe memories of the fantastic clockwork facade of the Institut du Monde Arabe in Paris.


So I'm slowly getting used to both Inkscape, and GIMP. Flipping back and forth between them is still...interesting...however, as the key commands are completely different for each. In fact, because Inkscape is running on Xquartz via a Java VM, it remaps command (Mac standard) to control. So something as simple as saving the file takes an extra little bit of concentration.


I still have no idea how to proceed on my power issues with the DuckLight. Seems like I need to live with the idea of larger battery packs if I want the full output power, and add on-board regulators. Which not only adds parts, and footprint, but also means you'd have to change jumpers or something for all those applications where a smaller battery pack is more appropriate. 

Hrm. Maybe regulating the ATtiny down to 3.3 volts regardless of battery source makes the most sense. 2xAAA just doesn't light anything but a red LED anyhow, and that's the only set that would be too low for even an LDO. And with a powerful enough regulator, it could supply an XBee, meaning I wouldn't really need a custom daughterboard for those.

One thing I have figured out is what I want to do with those flexible USB lights I picked up for a buck each at Wallgreens. Make little Steampunk-Tiffany task lights out of them. Add a laser-cut acrylic clip/magnet on one end, paint the flexible rod up a nice brass, stick a super blue LED in, and pull some painted/dyed PETG over a hand-carved buck to make a shade.


Now if only I had some sketches I liked for the Raygun. I need to start getting client approval and move into the next design phase!


Saturday, March 1, 2014

Holocron Hold

My desk -- and place -- is getting awful cluttered and I was hoping to finish a few projects and put away the parts, materials and tools peculiar to each. No such luck.

I was going to start the final assembly of the holocron using the acrylic pieces that came with the kit, but I just had to do one last lighting test with one of the laser experiments:


No, that's too lovely not to do. So I've changed my mind once again, and scheduled a couple of hours on the laser for Thursday next week. Which means I probably won't be able to box that project up until sometime the week after.

This is three layers here; the outer acrylic shell is now painted with hammered copper and distressed gently with acrylics. The inner-most layer is a "Millennium Falcon Panel Lines" abstract shape in dark blue acrylic, and the middle layer is laser-engraved at 300 dpi to make the frosted diffusor, with gaps in the engraving forming the lettering and other graphics. The light for this test is a single neopixel (the mostly-completed holocron circuit running my capacitance sensor test software, in fact).


Meanwhile on the grenade front, the spring-loaded button is inserted (and if this was a real M40 it would have gone off dozens of times by now.) With two-show days all weekend, it will have to wait until Monday to finish machining. The prototype is getting a little battered traveling back and forth with me, plus I managed to drop it once on a concrete floor (made a gorgeous sound, though!)


I'm thinking about the cap, and some of the other details. There's a concept over at the Replica Props Forum called "Idealized." In general, the attitude with replica props is to get as close as possible to screen-used, which means including the compromises and even errors of execution of the original.

The idea of idealizing is coming as close as possible to how the prop would have been built if the prop department had the time, and how the prop would have looked before it got all beat up during filming. Things like machining in aluminium for props that were originally painted wood is part of this, in my mind.

Plus, I suspect Aliens had a much greater consistency than many movies, but it is still quite possible that several variations appeared on screen; one or two "hero" grenades actually cut from solid-body aluminium snap-caps, and others resin-cast or cut from wood and painted to use as scene dressing and costume parts. So there may not be a single standard to hew to in the first place.

It is definite that the illustrations in the "manual" (the role-playing game) and the various fan-made grenades over the years have had a lot of variation. So in my mind there is wriggle room to pick and chose the best dimensions and shapes. And I think I've managed to come up with a set of plans that has a good line, a good aesthetic, and matches closely to what was seen on screen as well as being straight-forward to make more of.


The purists may argue, though. Or it may be that some ideas -- like making the cap flush with the sides (as it appears to be in some scenes) is a defensible choice, even if there is evidence that some of the original props had a cap that was smaller in diameter.

The drawing needs a lot of cleaning up in any case (even aside from changes I've made and not annotated yet).

Friday, February 7, 2014

First TechShop Project

I've been taking classes over there, and yesterday I finally reserved a tool.

Sorta. The tool I'd reserved broke down the night before, so I lurked for five hours until I was able to jump on one for a few minutes between reserved users.

Still, worked out I managed to accomplish all four tasks I'd planned for that trip. So not bad at all.


These are lasered out of 1/8" colored acrylic from Tap Plastics. The light blue is engraved with some lettering and other details, and the dark blue is, obviously, cut out. The intent is to glue six of these together, plus the existing outer pieces, to make a cube, and light that from within.

I taught myself Inkscape just well enough to work up the artwork at home. Then at TechShop I went to one of the workstations and transferred to Illustrator (which is preferred format for the Epilog laser cutters). So I had to learn yet another piece of software, on the fly, on PC (which I don't know). And do so in time to get it to the laser.

And, well, they don't stack up quite like I hoped so I need to rework the artwork and run another set off. When I can get a slot on the laser again (the four machines at TechShop are in almost constant use, and reserved out to a couple weeks!)


The other thing there is a replacement rack adaptor plate for my Sennheisers (one of the people I rented to lost the part and all the screws that go with it, too). I refreshed my memory of the cut-off saw by successfully chucking the work, lowering the blade, then hitting emergency stop when it didn't want to play nice with 1/16" steel. Hammered the piece flat again with a ball-peen and did the cuts on the bandsaw instead. Marked the holes there, but did the drilling at home in my underpowered-but-cute Central Machinery drill press (a Harbor Freight special -- and you know what that means.)

Oh; this is the current electronics package for the Holocron (the light that will be behind the acrylic pieces):


Adafruit neo-pixel being driven by a Trinket (Arduino-compatible ATtiny board), 500 ma/h LiPo and USB charger. The current circuit was a test of whether you could charge the battery in-circuit, and run the lights while charging. You can.

The next test is whether you can put a thumb drive in parallel with all this and charge the batteries, run the lights, and still access the thumb drive. Last step is using the old capsense code once again to allow the end-user to switch the light without opening up the box.

Friday, June 7, 2013

...and fricken lasers!

I keep hoping to get started on that machine gun.  Or, for that matter, the drum magazines.  But the hot projects on the table now are lighting effects for the next production.  So my work table is covered in light pipe, LED's, Arduino clones, and laser diodes.

Like these: