Showing posts with label maverick. Show all posts

Sunday, August 16, 2015

Mavericks

No, still not this guy.


Nor is it this:


But, in fact, a long-delayed OS upgrade. And no...I don't really want to go to Yosemite yet. There's no clear evidence that it breaks any of my production aps, but there's also no good evidence that it doesn't.

Mavericks, though. So far...everything works! I'd heard of some minor audio issues so I started by testing Audacity, QLab, and Vox. All worked normally. Tried Scrivener. Tried Steam, Wine, and Steam Wine, and played a little Dead Space (a PC game). Then played Tomb Raider 2013 on the Mac side -- and it looked nicer than it had on the PC emulator (better color balance, basically).

And Fusion 360. Which was the main reason. Autodesk had pushed through a basically mandatory upgrade to Fusion, and the upgrade wouldn't run on my previous OS. And since the upgrade either stalled or required me to quit, the only recourse I had to finish the Raygun project was to take the computer off line every time I needed Fusion. But with it off line, it could not import, nor could it open the "cloud stored" (really, I have no idea where they are stored) other projects I wanted to work on. Like this:


I stil have yet to test Eagle, Cura, Arduino, Reaper...

Friday, February 15, 2013

Yippee-Kai-Aye

Sure, I could have done more with this.  The original idea included opening up the cylinder and replacing the barrels with individual tubes, Gatling Gun style.  Plus I wanted to put on a proper spur-type Western hammer, and cut off the not-particularly period T-rail.

Next one.  This one is only good enough now to slap a coat of paint on.  Besides -- there's plenty of mistakes to make in paint, plenty of experiment there.


Painting steps below the fold:

Thursday, February 14, 2013

Keep Those Doggies Rolling

So to review: the project is a Steampunk re-dress of a NERF "Maverick" (Rev-5).  First step was taking it completely apart.


Then the rather silly-looking grip is cut off, and the frame for a new grip fabricated from 1/4" birch plywood.


The adventure for the next day is shaping the grips around the new frame. I roughed out the shapes in 3/8" basswood with my "new" Dremel Scrollsaw, and attached them with zap-gap. I also sanded off all the NERF logos and branding, and cut off the muzzle.


Then comes shaping -- mostly with the small (but very sharp) carving knife I picked up at Hida Tools (a local Japanese Woodworking and gardening tools store.) Then sanded down, and patched; first with Bondo auto putty to fill the larger gapes, then Bondo Spot Putty for the small remaining gaps.

Oh, yes. The new muzzle is an ABS plumbing coupler, cut down and attached with ABS solvent cement.


By this point my errors are compounding; I had trimmed unequal amounts off the two halves of the original gun to fit the new grip frame, meaning the build-up is about 1/8" off center. Added to that, the cuts where the old grip was removed were not in the same place. Originally I had intended to smooth the join, then create an arbitrary line between wood grips and "metal." But late in the day I decided I liked the basic placement of the cuts -- but this meant spot putty and panel line tool to make them appear to match on both sides of the gun.

In addition, I'd left one spring out when I re-assembled. It's the one that retracts the front end of the cylinder retaining pin. So to open the gun you have to press the button, then hold it muzzle sky-ward and tap it so the pin falls back.


And on to painting.

I didn't think out the process well enough. Started with filler-primer on the new wood -- the basswood furs up something bad so a couple of coats of primer, sanding between. Then black paint over the whole thing. Touched up with a second can of faster-drying paint which reacted to the first; sanded and steel-wooled out the bubbles, then spent a while trying to brush the steel wool fragments off.

Then an intentionally spotty coat of Krylon "Hammered" finish to bring in some texture, and hide the flaws of a quick build and a clumsy sanding job removing the original logos and name and other marks.

My intention is to wash it with black and rust to build up some life, then cut those back with metallic spray paint, then dodge that just a little with more black. And there's a new wood technique I want to try once the metal is dry. We'll see how it goes...

Thursday, February 7, 2013

Maverick!


No, not this guy.


I'm starting a new prop.  Tight budget, tight deadline.  The best kind.

For a friend, I'm joining the legions who have re-painted a NERF gun.  And the smaller legion (but still enough to rate at least a Centurion), who re-painted, specifically, a NERF "Maverick" to look Steampunk.

Here's the main requirements:

It should still fit in the same holster (the friend is ordering one of those custom-made ones).
It should be study enough to wave around.
It would be nice if it still worked.


Now, I'd seen a few NERF re-paints around.  And a few Mavericks, of course.  And a couple things always bugged me about the Maverick, especially when it is in a Steampunk guise.  The worst of these is that grip.  It just looks too...well....NERF.
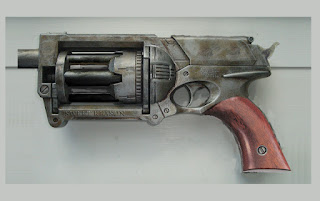
So I grabbed an image (of a gorgeous re-paint by "boon119" over at DeviantArt), a couple pictures of Colt revolvers, and opened PhotoShop to brainstorm ideas.

This was the concept: a Hogleg Maverick.  Or, rather, a NERF with a Colt-type grip.


Taking Down:
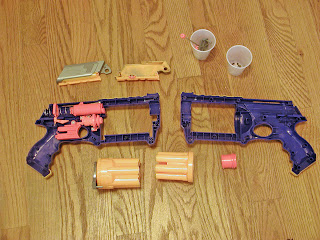
Boy, there are a lot of parts in this thing!  The cups are of course holding the many smaller screws and springs.  What all of them do isn't entirely clear but the basic mechanism is understandable.  The problem is going to be working around it.

Cutting Up:

I have no pics (I took one, but it didn't come out well enough to use).  An hour or two with scale rule, razor saw, and X-acto knives and I had trimmed a quarter-inch space between the halves, where the frame of the new stock would fit.


Fit-Up:
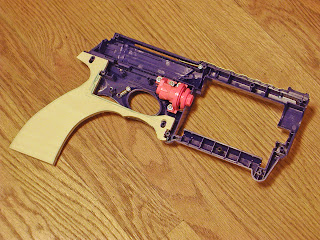
As careful as I was in tracing, the alignment wasn't quite there.  Making holes for the various posts was even harder...I smeared them with paint but the test alignment was far enough off that I had to re-drill and expand them anyhow. 

However, this did give me a chance to try out my new tool.  Someone right in my own neighborhood just tossed out a Dremel Moto-Shop.  No, not the rotary tool.  This is an ultra-cute scroll saw with a 15" throat.  After cleaning up a little rust, and buying a new set of 3" pin blades on eBay, I put it into action.  It cut right through that birch ply.

So I'll probably glue this in, as rough as it is.  But I'll save a trace in case I want to make another one of these one day.  And that way the next one can be a little more accurate.

(Interesting, but there is a suspicious gap behind the trigger that suggests NERF planned to put a switch in there at some point.  Suggesting the possibility of electronics.  Not for this particular mod, though, I think.)


Proof of Concept:
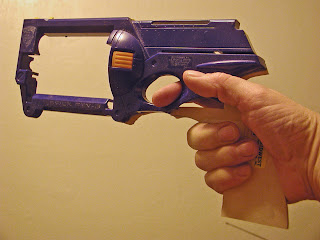
The shape looks right, it feels comfortable enough (though not that comfortable, alas).  And even without the epoxy, quite solid enough to wave around.  I have no problem believing this will support the weight of the final prop, even firing it.

Now the question remains how to finish the shaping.  The original idea was to actually carve grips out of soft wood.  But there is a bit of a gap, there are several funny places in the fit, and I think I might be smarter to just build it up with Bondo/Apoxie Sculpt, then paint it to look like wood.


 Whatever I do is going to have to be fast.  I only have twelve more days.