I'm still trying to find the time and energy to throw out much of the small scraps, found objects and saved hardware I've accumulated in my props-building. On my new schedule and budget it makes more sense to purchase materials and hardware on a per-project basis, instead of wasting time sorting through existing stock and trying to make it fit.
Also want to toss the several tubs of random electronics parts and especially the "this might be repairable" stuff.
Today, however, I was monkeying with some drivers (what people outside the audio world call "speakers.") Which are also salvaged scrap, and what's more, I can't seem to stop myself from bringing more home.
Purchased a couple small amplifiers from Adafruit. Used the 2.8W to test which drivers still worked. So was able to toss two (pity I still have five or six tucked under the desk at work!) Left the 20W alone for the moment to see if I could wake up a salvaged TWO HUNDRED TWENTY watt amp which wants 48 volts (presumable at some ridiculous amperage). Turns out an old computer power supply brick pushing a mere 24 volts is sufficient not to trip any brownout detection circuits in the thing, and run one of the salvaged drivers at more than sufficient volume for my personal listening needs.
Of course, at that point I might as well pack along one of my Jolly 5A's; that's already over a kilogram of hardware, and I need a solid box to get the best sound out of it, and it pretty much has to plug into the wall at those numbers. But I'm still toying with the idea of working up a neat looking replica to house it in -- maybe the Portal radio, perhaps the radio from Bioshock or something from the Fallout series.
But first step is to make a box out of some of the scraps of high-density plywood we've got in the scrap bin at work. And see if there's any tuning I can do with the shape (porting is probably out, as the physical size is too small to permit a decent extension. Although some people have done some crazy stuff with external ports...)
Of course, this is all salvage (power supply included). Nothing says it won't suddenly let the magic smoke out a few minutes after I power it up again.
Oh, yeah. And I loaned my sister my "Tomb Raider" necklace. So now I need something else prop-related that I can wear. I was tempted by Daniel Jackson's "Ra" amulet but I'm afraid I find the actual prop rather ugly...
Saturday, October 31, 2015
Friday, October 30, 2015
Open the Pod-Play Door, HAL
More than once I've been disparaging about something I consider too trendy and popular but basically useless. I remember thinking Cliff Bars were a bad-for-you sweet confection sold to fitness wanna-be's with a stupid cartoon of a rock climber on the wrapper. Well, that was before I started climbing, found out the company was started by climbers, and found out it was low-sugar, very solid food -- like good old-fashioned trail mix in a compressed form. Like Dwarvish iron rations only somewhat better tasting. And the cartoon of the climber is technically accurate, too.
I've never had a strong need to surround myself with music while working. In fact, I often prefer silence when I'm trying to concentrate. But then came a spell when I was working near the main assembly floor, and being driven to distraction by the incessant and loud radio station played over the PA -- the auto-tune vocalists (as far as I can tell, there's only two; one male, one female. Otherwise they all sound identical) are tolerable, but the marathon sessions of happy-idiot banter from the hosts is hair-tearing.
So I started to bring in earphones as self defense (oddly enough, a good half of the people on the shop floor seem to have a similar problem with the piped-in music.) I have a couple basic mp3 players I picked up surplus for a buck or two each to use for sound effects in a prop. But I keep all my sound files, imported CDs, and so forth in 44.1 uncompressed; the only mp3's I had lying around I could throw on to the player in the hurried minutes of a work morning were game soundtracks.
I listened to a lot of Tomb Raider (1 through Underworld, minus #2 which I haven't gotten around to downloading yet). Also Portal2, Black Mesa, and Mass Effect.
And that was getting old. I figured out how to batch-process in Audacity and flipped some Chopin piano in there as well, plus the entire three-something hours of "How the West Was Won." But this approach had a basic problem; there's no indexing on my bare-bones mp3 player, and if I found out in the middle of a long session of stripping wires that I was cued up for Tomb Raider Legends once again, I'd be faced with trying to hit the "track advance button" 96 times in a row to find whatever folder might be next.
So, right, I'm facing exactly the reason the iPod came along (and the same functionality in smart phones and, today, smart-enough phones). But I can't quite muster the strength to purchase one, along with the not-plastic water bottle and the polo shirt with the alligator on it. And as it happens, I'd just picked up a Raspberry Pi.
So, great! I can learn how to work in the Pi environment and make a geeky, balky, conversation-piece playback machine that is suitable enough for my modest needs.
Except, as work went on and I found myself listening to music even when the shop radio wasn't blasting cocaine-freak morning-person inanities at me, I suddenly realized that the kind of mindless work I was doing could share CPU space with more engaging audio fare.
In a word, podcasts. Brush up (more like, learn the basics of!) a little history while I broke up old pallets and rolled black paint on plywood.
So, yes. Podcasting is not the useless gen-x endeavor I might have characterized it as. Well, maybe a lot of them are, after all. But there's some pretty good free history and science stuff out there.
And at fifteen to thirty minutes a 'cast, the indexing problem I mentioned earlier no longer applies.
Wednesday, October 28, 2015
I Dunno
Two months now of full-time work. And as of two months, my pessimism is still holding true. I used to argue that full-time was not panacea; your costs went up, and the income was not actually that much larger than what the part-time work nets (which is more irregular, averages close to as many hours, but often works out to a higher effective pay rate). Oh, yes; and working full-time, you start to lose many of the low-income benefits, making the supposed advantage even smaller.
So as of this moment, I don't have any real money in the account, I haven't added anything to savings, and I haven't made any deep payments on my old credit card. The best that I can say is that I have paid all my current bills, on time, without having to borrow anything to do it.
And as little as I'm getting, it is still significantly better than minimum wage. So, yeah; as of this moment, it looks like if I had given up on theater work and gone to work for McDonald's, I'd be homeless now. Full-time work is, again, not a panacea.
On second analysis, though, I was behind when I started. I've paid (or will be paying) rent thrice in that same two months, paid one overdue bill, paid off a small personal loan, and put $400 into auto repairs (which unfortunately wasn't nearly enough). So if the numbers continue in that direction, my first estimate that I could basically pay my expenses with two weeks out of the month, leaving every other week to go towards paying off debt and repairing infrastructure.
It is just going to be slower than I could have hoped.
Sunday, October 25, 2015
I'm not even sure I like programming
Of course, what I'm doing is somewhere between "scripting" and "magic incantations" -- I'm using beginner-friendly tools and I'm copy-pasting lots of code blocks I barely (or don't at all) understand. What little I do understand, I am applying with equal measures of kludge and brute force and ignorance. A Bubble Sort would be an improvement on most of my algorithms!
Anyhow.
A friend just called wanting to see if I had a suggestion to spit out a MIDI event from a detected physical event on stage (the pedal of an otherwise gutted prop piano being depressed). Yes, I do. I've built the circuit in the past. I keep meaning to put it in a nice box (and even make it available in kit form for others) but I keep getting distracted both by Feeping Creaturism, Creeping Elegance, and the uncomfortable realization that 99 times out of 100 a technological solution (even one that is available out of the box and has already been well-tested in practice) will be passed over in preference for a Stage Manager squinting at the stage and calling out "Sound Cue Go!" on headset to someone else who presses the play button.
Such is theater. We're more conservative than aerospace. If it works, we don't like to mess with it.
 So anyhow, I have the guts of one of my old button-press-to-MIDI boxes on the desk and all it would take is about an hour to figure out which pins I chose to wire up or otherwise reconstruct the original code for it. It seems sturdy enough and it is well-tested -- been through at least three stage productions that I remember, being used to fire off intercom buzzer sounds for "Moonlight and Magnolias" and a baby's cry for "Into the Woods" and... some show I've already forgotten.
It isn't of course elegant.
So I've spent the morning going back again through the perennial problem of getting no-driver MIDI to happen over USB. And, yes, the least elegant method is the most robust; buy a $40 MIDI adaptor from Guitar Center, hack it up, wire it to the Arduino's serial port and stick it in a project box with the Arduino. Once the lid is closed, no-one will know the difference.
The newest solution on the block is that the Arduino Leonardo (and some others that come after it) use a chip that speaks USB natively and it is now trivial to turn one into MIDI or HID (aka emulate a keyboard or mouse.) This is completely class-compliant and requires no special drivers or client-side software; just plug it in and most modern computers will recognize it.
 I don't happen to have a Leo. I don't think RadioShack carries one and this is a project I want done this week -- Tuesday if possible.
So the most plausible option seems to be using an ATmega32u breakout board I just happen to have, and trying to get either the LUFA framework or the more complete-and-friendly Teensy working on it. And although this might be approached at least at first through the Arduino IDE, it looks probable that once the USB port thinks it is a class-compliant MIDI device I'll have to resort to going through my AVR programmer -- and quite possibly having to delve down into make and avr.gcc and other things I've nearly forgotten.
 And of course I'm right in the middle of learning Raspberry Pi now. So C or the Arduino macros or, worse, the avrdude toolchain aren't on the tip of my programming "tongue" right now. Instead I've got bits of Python and lots of Linux commands filling up my brain.
I'm getting a little more comfortable on the Linux command line. That's one of the major things I hope to accomplish playing with the Pi, anyhow. I mentioned before that the GUI (I'm mostly using X, when I use it) is like a coat of paint. A thin coat of paint. It isn't uncommon within X to find yourself presented with a command line in the middle of a drop-down menu or otherwise innocuous selection box, and it is often transparent what command line, err, commands you are issuing even when you make a radio-button selection in that GUI.
So I've got "sudo apt-get" and "cd /dev/pi" and "pkill x" and "nano /dev/config.txt" and so forth all clogging up my brain.
(Among the other amusements, command-key sequences become alt-key sequences on the current Raspi keyboard, except for within the nano editor, where I have to remember to use the "window" key instead).
I'm making progress. Tried out OSMC and OpenElec (different wrappers for Kodi, basically) but neither was friendly towards further hacking; no terminal, difficult to exit X, difficult to SSH into even (I managed to confuse my MacBook into thinking someone was attempting a man-in-the-middle attack and for a while it refused to even connect with the Pi anymore. Say, who is all this security for? You trying to protect me, the owner of the computer, from taking risks I think are justified? Did or did not I pay for the thing?)
So back again (at least twice now by my count) to the Debian clone, Raspbian. This time I hand-installed the Adafruit patches and nano'd the additional lines and config files necessary (err...I said I wasn't going to try to explain Raspberry Pi processes in detail. nano is the default text editor, a utility almost as old as but far less venerated than "ed.")
So now it doesn't force X to go to the PiTFT (Adafruit 2.8" full-color backlit LCD touch-screen). I can chose to throw the GUI, images, or movies to the device of my choice. Can play mkv, mp4, mp3, aiff...but not all with the same application. Each requires different phrasing to set up the options correctly, plus more options to get sound to go to the correct port to accompany a movie. So lots of typing out "sudo SDL_VIDEODRIVER=fbcon SDL_FBDEV=/dev/fb1 mplayer -vo sdl -ao alsa *.mp4" for the present.
I have a theory now why so many people asked at so many forums how to get X back to the HDMI port, and were all given the same answer that does not work by the gurus at Adafruit and elsewhere. Here's the theory; the gurus actually have HDMI monitors. The people with the problem -- like me -- are using an HDMI to DVI adaptor to drive a DVI monitor. So my bet is that when the Pi doesn't "see" the full HDMI it expects at the other end of the cable, it throws up an error and reverts to the last-used display port. Thus going back to the PiTFT instead of switching to the HDMI as requested.
And the gurus never realize this because their gear is too good; they never experience this problem. Whereas the poor noobies are left with no working answers and get frustrated and after a few more posts, leave.
Anyhow.
I have control now. And I figured out how to resize enough of the icons and otherwise reorganize X so I can sort of work with it on the tiny 2.8" display. So I have a couple of options to make transportable, battery-powered control of the Pi. My aim is to make a Headless Pi, but reality is I'll probably have to go in and tinker with stuff anyhow.
I also have some options for my eventual goal of playing mp3s off a USB stick. Unfortunately, the plug-and-play options -- aka various flavors of Kodi -- aren't easily compatible with the 2.8" display. So I'm looking now at either a lot of tinkering to get various third-party projects adapted to my particular hardware, or rolling my own. Either option is going to require a lot more time staring at the command line. And going deeper into programming for the Pi, too.
Anyhow.
A friend just called wanting to see if I had a suggestion to spit out a MIDI event from a detected physical event on stage (the pedal of an otherwise gutted prop piano being depressed). Yes, I do. I've built the circuit in the past. I keep meaning to put it in a nice box (and even make it available in kit form for others) but I keep getting distracted both by Feeping Creaturism, Creeping Elegance, and the uncomfortable realization that 99 times out of 100 a technological solution (even one that is available out of the box and has already been well-tested in practice) will be passed over in preference for a Stage Manager squinting at the stage and calling out "Sound Cue Go!" on headset to someone else who presses the play button.
Such is theater. We're more conservative than aerospace. If it works, we don't like to mess with it.
 So anyhow, I have the guts of one of my old button-press-to-MIDI boxes on the desk and all it would take is about an hour to figure out which pins I chose to wire up or otherwise reconstruct the original code for it. It seems sturdy enough and it is well-tested -- been through at least three stage productions that I remember, being used to fire off intercom buzzer sounds for "Moonlight and Magnolias" and a baby's cry for "Into the Woods" and... some show I've already forgotten.
It isn't of course elegant.
So I've spent the morning going back again through the perennial problem of getting no-driver MIDI to happen over USB. And, yes, the least elegant method is the most robust; buy a $40 MIDI adaptor from Guitar Center, hack it up, wire it to the Arduino's serial port and stick it in a project box with the Arduino. Once the lid is closed, no-one will know the difference.
The newest solution on the block is that the Arduino Leonardo (and some others that come after it) use a chip that speaks USB natively and it is now trivial to turn one into MIDI or HID (aka emulate a keyboard or mouse.) This is completely class-compliant and requires no special drivers or client-side software; just plug it in and most modern computers will recognize it.
 I don't happen to have a Leo. I don't think RadioShack carries one and this is a project I want done this week -- Tuesday if possible.
So the most plausible option seems to be using an ATmega32u breakout board I just happen to have, and trying to get either the LUFA framework or the more complete-and-friendly Teensy working on it. And although this might be approached at least at first through the Arduino IDE, it looks probable that once the USB port thinks it is a class-compliant MIDI device I'll have to resort to going through my AVR programmer -- and quite possibly having to delve down into make and avr.gcc and other things I've nearly forgotten.
 And of course I'm right in the middle of learning Raspberry Pi now. So C or the Arduino macros or, worse, the avrdude toolchain aren't on the tip of my programming "tongue" right now. Instead I've got bits of Python and lots of Linux commands filling up my brain.
I'm getting a little more comfortable on the Linux command line. That's one of the major things I hope to accomplish playing with the Pi, anyhow. I mentioned before that the GUI (I'm mostly using X, when I use it) is like a coat of paint. A thin coat of paint. It isn't uncommon within X to find yourself presented with a command line in the middle of a drop-down menu or otherwise innocuous selection box, and it is often transparent what command line, err, commands you are issuing even when you make a radio-button selection in that GUI.
So I've got "sudo apt-get" and "cd /dev/pi" and "pkill x" and "nano /dev/config.txt" and so forth all clogging up my brain.
(Among the other amusements, command-key sequences become alt-key sequences on the current Raspi keyboard, except for within the nano editor, where I have to remember to use the "window" key instead).
I'm making progress. Tried out OSMC and OpenElec (different wrappers for Kodi, basically) but neither was friendly towards further hacking; no terminal, difficult to exit X, difficult to SSH into even (I managed to confuse my MacBook into thinking someone was attempting a man-in-the-middle attack and for a while it refused to even connect with the Pi anymore. Say, who is all this security for? You trying to protect me, the owner of the computer, from taking risks I think are justified? Did or did not I pay for the thing?)
So back again (at least twice now by my count) to the Debian clone, Raspbian. This time I hand-installed the Adafruit patches and nano'd the additional lines and config files necessary (err...I said I wasn't going to try to explain Raspberry Pi processes in detail. nano is the default text editor, a utility almost as old as but far less venerated than "ed.")
So now it doesn't force X to go to the PiTFT (Adafruit 2.8" full-color backlit LCD touch-screen). I can chose to throw the GUI, images, or movies to the device of my choice. Can play mkv, mp4, mp3, aiff...but not all with the same application. Each requires different phrasing to set up the options correctly, plus more options to get sound to go to the correct port to accompany a movie. So lots of typing out "sudo SDL_VIDEODRIVER=fbcon SDL_FBDEV=/dev/fb1 mplayer -vo sdl -ao alsa *.mp4" for the present.
I have a theory now why so many people asked at so many forums how to get X back to the HDMI port, and were all given the same answer that does not work by the gurus at Adafruit and elsewhere. Here's the theory; the gurus actually have HDMI monitors. The people with the problem -- like me -- are using an HDMI to DVI adaptor to drive a DVI monitor. So my bet is that when the Pi doesn't "see" the full HDMI it expects at the other end of the cable, it throws up an error and reverts to the last-used display port. Thus going back to the PiTFT instead of switching to the HDMI as requested.
And the gurus never realize this because their gear is too good; they never experience this problem. Whereas the poor noobies are left with no working answers and get frustrated and after a few more posts, leave.
Anyhow.
I have control now. And I figured out how to resize enough of the icons and otherwise reorganize X so I can sort of work with it on the tiny 2.8" display. So I have a couple of options to make transportable, battery-powered control of the Pi. My aim is to make a Headless Pi, but reality is I'll probably have to go in and tinker with stuff anyhow.
I also have some options for my eventual goal of playing mp3s off a USB stick. Unfortunately, the plug-and-play options -- aka various flavors of Kodi -- aren't easily compatible with the 2.8" display. So I'm looking now at either a lot of tinkering to get various third-party projects adapted to my particular hardware, or rolling my own. Either option is going to require a lot more time staring at the command line. And going deeper into programming for the Pi, too.
Friday, October 23, 2015
Pi-radigm
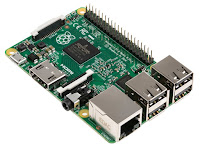
Although the boards look vaguely similar at first glance, Raspberry Pi is quite different from Arduino. The difference is not in functionality (although it has that, too); the difference is in paradigm.
Arduino is at heart an AVR chip. Imbedded micro-computer designed for physical computing; reading knobs, controlling LEDs and servos. When you work with an AVR you are working practically on the bare metal (as the old computer people would call it). Although the Arduino IDE (programming environment) offers some slight distancing, you are basically throwing together straight C code which is compiled right into the chip.
I don't know how I can express the visceral sense of this on the non-programmer. When you write "sudo apt-get install mpg123" on a Linux command line you are passing on a general idea to a host of smaller programs which check your bona-fides, look to see what is installed already, talk to yet other programs which help them get online and look for the materials they need to fulfill your request, etc. When you write "DDRA = (1 << 7);" you put -- after a trivial bit of math -- voltage on the selected pin.
The AVRs are tough. Nominally 5v (or 3.3v) devices, you can run them from under two volts to six or seven volts before they start getting buggy. You can abuse the inputs the same way, and the outputs are beefy enough to drive high-intensity LEDs. Anti-static measures are pretty much extraneous. They would like to see a nice steady clock signal as well but if your application is brute force and ignorance (like flashing a couple of LEDs) then the internal clock is close enough. Same for protecting the chip from power fluctuations or holding down unused inputs; although the Arduino does all of this, it isn't unusual to find an AVR with nothing attached to it but batteries and a load.
Raspberry Pi is a computer. That means it has a whole operating system in there, with GUI if you want it. It is generally expected to be connected to the internet, and it is fitted out with standard USB (host) ports and HDMI output and even a little headphones driver. Doing any one of these tasks will practically cripple a poor AVR.
But with that operating system comes overhead, and the pitfalls. Raspberry Pi's do crash, sometimes corrupting the OS in the process. They are sensitive to what happens at their general-purpose input/outputs. And when you program, even though you are generally working at just a coat of paint (X-windows) from the Linux core, and even though you are frequently at the command line (so much so that command line forms an integral part of the interface window for many programs), you are still at several layers of abstraction as your commands are invoking various helper programs which are accessing several libraries which are eventually calling on built-in functions within the Linux kernel.
And which means you aren't going to be seeing the same kind of documentation from me about Raspberry Pi as I've given on the AVRs. Because it is a computer, meaning every installation is subtly different and every experience becomes different. What worked for me in setting up the Adafruit PiTFT touch-screen and SSH from my MacBook may or may not work for someone else, even if they have a seemingly identical setup.
Thursday, October 22, 2015
Fruits and Nuts
I got my Raspberry Pi working. Turns out neither of the images from Adafruit boot up "instantly" but with an adaptor from RadioShack I was able to see Raspbian installing. Funny, isn't it, how computers all moved to HDMI outputs but monitors continue to be made with mostly DVI inputs. Is anyone paying attention out there?
Once I had the Pi working, I got it online via an ethernet cable and Wireless Sharing off my Powerbook; it sees my AT&T wifi, then passes it on via the ethernet cable to the Raspberry Pi. Fortunately I've got a pre "retina" Mac so it still has an Ethernet cable. What's next, Apple? Dump the USB connector and force everyone to use officially unsupported external hardware for that, too?
Anyhow. With a working connection (thank you, random blogger who explained how to dummy up a DNS addy for the Raspi to see when it tries to connect), I could go into Terminal/command line mode and patch the kernel from Adafruit's site until the 2.8" TFT touch-screen worked.
Unfortunately, the touchscreen is all but unreadable and unusable in the GUI. Just not enough screen real-estate, and too many windows don't resize (and can't be dragged so all the contents are visible). So I imaged that working OS and reconnected the HDMI.
Next thing to try was OSMC. Which looks very cool, but was just a little opaque. I watched an anime episode off a flash drive, which looked pretty decent -- the quad-core in the Pi 2 is working hard, even at a mere 700 mHz. But there doesn't seem to be a simple way to get to the command line any more, and the software threatens to auto-update anyhow, so it seems a chore to patch that kernel to use the mini display. That, and I'm not sure it can be resized to be useable, either.
I really need something simpler, anyhow. My first goal is just to be able to do a simple slide show (I want to show some pictures of recent projects to my dad, and he has no online presence, and laptop or even wall outlets are inconvenient for our usual meeting-up place.) My next goal is to make a music player that improves on my cheap-and-basic mp3 player by actually displaying track names and allowing you to chose which album to play from. Okay -- I suppose I could just go back to minidisc, but getting the albums in there isn't simple.
SSH seems to be the ticket for working up said slide and music players; set up the Raspi for the tiny display (with the same footprint as the Pi itself) and use my laptop for the full keyboard and bigger display to play with the command line and wrangle code.
So, whatever, I'm installing a fresh Raspian now and after I get SSH running so I can navigate in from my laptop, I'll patch THAT version with Adafruit's touchscreen files...
Success so far. Put in a fresh install of Raspian from NOOBS and tested omxplayer from the command line. Got SSH running -- was dead-simple to do -- and invoked omxplayer on the Raspberry Pi from the SSH terminal window on my MacBook. Oddly enough, hotkey command of omxplayer then defaults to the SSH terminal that invoked it; I can pause or skip the video from the MacBook.
What I'd like to know now is if I can send images to the tft touch-screen without having to have that the default monitor. SSH is nice but would be nice to be able to use the GUI when not running the Pi in "headless" configuration. Looks like it might be as simple as keeping the "console" in default and invoking the framebuffer image viewer to buffer #1 instead of buffer #2. But I need to back up my current install or better yet get a new SD card to try this on...
Monday, October 19, 2015
Fresh Pi
I worked the East Bay Mini Maker Faire yesterday. It seemed calmer, also smaller than the years previous. I was only supplying PA to one room this time, and I didn't have any competing gigs, so it was a very relaxed day for me. I tried not to pack too much this time; even though I did end up with extra, I didn't feel like I was making a hundred trips to the car lugging audio gear.
Basic PA was my two Jolly 5A's mounted horizontally with an ad-hoc adaption of the U-brackets I bent out of bar stock a number of years ago -- bolted them to Yamaha stand adaptors and that let them sit on top of my 6' On-Stage speaker stands. I did try to print a more elegant adaptor, but the print from the M3D Micro failed under load. I'm pretty sure the SLS (nylon) prints I've been getting at Shapeways would have held up. And I think I got better adhesion between layers with the Type A machines at TechShop, too. Not to say the Micro can't be tweaked a little and possibly get better performance...
Anyhow, ran them from my aging Mackie 1202VLZ Pro, so I could patch four different microphone options -- hand-held, hand-held wireless, lapel mic, and headset mic -- as well as a stereo feed for any audio tracks that might come with the various video presentations.
I did use all the mics. It was nice to have those options, in fact; some lecturers were comfortable with a hand-held and some wanted to go hands-free. The only failure was one very quiet speaker that went with lapel (and would have benefitted from headset mic).
I stuck compressor, Lexicon effects processor, and a Firewire interface in the rack but didn't use any of them. Basically, the rack functioned as a mixer table. If the layout had been very different, I was thinking about going Maker and using Reaper as speaker processor (and probably mixer as well). But I didn't need the various delays I was contemplating, or a graphic, or even compression (except for that one presenter. Sigh.) So I kept it simple -- simple enough I could just hand the mic over then go stroll the faire.
This time was volunteer. I wanted nothing more than ticket, lunch, and a t-shirt. Didn't get a t-shirt (that makes three years running they've forgotten!) Lunch was skimpy. So on one of my wanders I picked up a bottle of honey from some of the beekeepers. And a Rasberry Pi.
Been meaning to play with Pi sometime but the price point always made me re-think. So grabbing one on day-of-faire sale was a good way over that hurdle. I've just started looking into what I need just to get the thing up and running. I don't think I even have any spare keyboards drifting around. Bought a touchscreen, but there's a Munchausen problem here; have to get in to the Pi to program the touchscreen to be able to use it to get into the Pi.
So I'm probably dropping some more bucks at Adafruit. I'm in no hurry. I think working with the Pi is going to improve my Linux/command line skills, and I have thoughts towards building my own media player (I'm getting bored enough at work to listen to music I bring, and the only portable player I have is a no-name three-button MP3 player that doesn't give the ability to select albums or even see what you are playing. Was $2 at Allelectronics and I got two of them entirely as a possible cheap sound playback device for future props.) But other than that I have no real application for Pi.
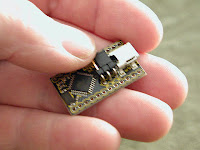
Really, electronics speaking, I need to move ahead on the next revision of the DuckNode -- specifically, work up the Holocron fork, with an on-board LiPo management system. Gonna be a lot more surface mount in the next iteration, too. Someday I need to either build a reflow oven, or learn about Seeed Fusion (or whatever they call the thing that looks like it might be a full board fabbing service).
Basic PA was my two Jolly 5A's mounted horizontally with an ad-hoc adaption of the U-brackets I bent out of bar stock a number of years ago -- bolted them to Yamaha stand adaptors and that let them sit on top of my 6' On-Stage speaker stands. I did try to print a more elegant adaptor, but the print from the M3D Micro failed under load. I'm pretty sure the SLS (nylon) prints I've been getting at Shapeways would have held up. And I think I got better adhesion between layers with the Type A machines at TechShop, too. Not to say the Micro can't be tweaked a little and possibly get better performance...
Anyhow, ran them from my aging Mackie 1202VLZ Pro, so I could patch four different microphone options -- hand-held, hand-held wireless, lapel mic, and headset mic -- as well as a stereo feed for any audio tracks that might come with the various video presentations.
I did use all the mics. It was nice to have those options, in fact; some lecturers were comfortable with a hand-held and some wanted to go hands-free. The only failure was one very quiet speaker that went with lapel (and would have benefitted from headset mic).
I stuck compressor, Lexicon effects processor, and a Firewire interface in the rack but didn't use any of them. Basically, the rack functioned as a mixer table. If the layout had been very different, I was thinking about going Maker and using Reaper as speaker processor (and probably mixer as well). But I didn't need the various delays I was contemplating, or a graphic, or even compression (except for that one presenter. Sigh.) So I kept it simple -- simple enough I could just hand the mic over then go stroll the faire.
This time was volunteer. I wanted nothing more than ticket, lunch, and a t-shirt. Didn't get a t-shirt (that makes three years running they've forgotten!) Lunch was skimpy. So on one of my wanders I picked up a bottle of honey from some of the beekeepers. And a Rasberry Pi.
Been meaning to play with Pi sometime but the price point always made me re-think. So grabbing one on day-of-faire sale was a good way over that hurdle. I've just started looking into what I need just to get the thing up and running. I don't think I even have any spare keyboards drifting around. Bought a touchscreen, but there's a Munchausen problem here; have to get in to the Pi to program the touchscreen to be able to use it to get into the Pi.
So I'm probably dropping some more bucks at Adafruit. I'm in no hurry. I think working with the Pi is going to improve my Linux/command line skills, and I have thoughts towards building my own media player (I'm getting bored enough at work to listen to music I bring, and the only portable player I have is a no-name three-button MP3 player that doesn't give the ability to select albums or even see what you are playing. Was $2 at Allelectronics and I got two of them entirely as a possible cheap sound playback device for future props.) But other than that I have no real application for Pi.
Really, electronics speaking, I need to move ahead on the next revision of the DuckNode -- specifically, work up the Holocron fork, with an on-board LiPo management system. Gonna be a lot more surface mount in the next iteration, too. Someday I need to either build a reflow oven, or learn about Seeed Fusion (or whatever they call the thing that looks like it might be a full board fabbing service).
Monday, October 12, 2015
Writing: On Location
When a writer sends their protagonist out to some exotic part of the world, sometimes all they give you is a list of place names.
You can do this. It isn't too hard to find good names, either. Some time with a good atlas or in Google Maps may work. Other things may require deeper regional sources. The Harvard "Let's Go" series (and of course similar travel books) have a wealth of recommended hotels and eating places and enough minutia about transit arrangements to suit even LaHaye and Jenkins.
I've been writing a Tomb Raider/SG1 cross-over fanfic, and for several of the chapters I made use of various online travel services to plan flights, locate hotels; basically those parts of her trips I planned the way I would plan my own (if I had her budget, of course!)
And place names by themselves are not all bad. They may be familiar to your reader. That gives them an extra layer of association, emotional resonance and detail, that they can bring to the story. They may be unfamiliar; but if the reader is intrigued by mention of real-world places, giving them names will aid them in looking up more about them on their own. And if all else fails, place names give a sense of the language, as well as the geography (are most of the names "this crag" and "that falls?" That describes a dramatic mountainous region) And they can give a glimpse of other elements below the surface; the American Southwest, for instance, with names that show clear origin in both Native American and Spanish sources.
I tend to aim towards place names that speak of a little back story; "Old Church" or "Millennium Bridge" or "Grant's Tomb." Barring that, it helps to use place names that can be given (or customarily include) a descriptive marker; "Highway 17" or "Owl Creek Bridge."
Which begins to hint at the real trick. First, just as in naming characters, you need to add attributes to ensure reader recognition. If she hasn't been seen for several chapters, I'm not going to write "Janet Frasier" or even "Doctor Frasier." It is going to be "...the Chief Medical Officer of Stargate Command." As important as position and relation to other characters is, it is also nice to put in a little look and feel; "The petite, serious brunette" or, "With a white lab coat over her Air Force Blues." This will bring the visual impression back into the reader's mind as well.
And this is necessary for places. I set several chapters in Prague. Prague is many things; a modern and cosmopolitan capitol, but also, an ancient city in the heart of Old Europe. It is famed for the flowers in Spring, but for my purposes I also wanted to show the narrow medieval alleys of certain districts of this ghost (and golem) haunted town. So each time the city is brought anew into the text, "Prague" is accompanied by a brief attribution or descriptive phrase; as brief as "the old city" or as extensive as a little recap description.
Which brings us around to the importance of going beyond just a list of names. You want to bring places to life. First that means appealing to the five senses; the heat, dust, and traffic noise of Cairo, or the leaf-shaded yet somehow expectant quiet of Arlington (another ghost-haunted town, at that, with ghosts that range from Revolutionary and Civil wars that sometimes seem a mere generation ago, to the bodies of more recent war dead, to the in a certain sense more literal spooks inhabiting the various agencies headquartered not far away).
Think of weather (which is actually pretty easy to look up), the sights (Google Street View is but one of many options) -- but even more than how the Eiffel Tower looks against the sky, look to the full setting and the smaller pictures, whether it is stick-like trees wintering in the Tuileries or the surprisingly antiquarian-looking books in the ramshackle stalls set up along the banks of the Seine.
Especially look to the people, the dress, the behavior. And here is where the real fun begins. Because every place is a thousand on-going stories often coming out of generation upon generation of tangled histories. Think of the way the American Civil War is always lurking beneath everything else in certain places in the South, combining with the evolving but still quite extant racial divide and the politics of statehood to color everything from window displays to who habitually uses "sir" or "boss" to address whom.
Every place has these current prides and these old wounds and these patterns you won't understand without delving deep into their evolution. Every place has a pace, a meter, a music of its own both in tempo and in the subtle subdivisions of rhythm. Fortunately for the purposes of fiction you can simplify! Look for primary emotions, strong visuals, a color, a temperature, a sound; "busy, grey streets" or "softly-lit, almost melancholic woods" or "sweltering, muggy nights filled with cigarette smoke and jazz."
(And, yes -- if you are going to be jumping around between various locations, use every color grading trick you can; emphasize the different color pallet, the different weather, bits of language; everything you can highlight and thus contrast to help the reader re-locate along with the text each time you jump.)
Nothing really replaces going (but as a Berliner told me on the train, you can be in a city for seventy years and it will still surprise you.) For me, watching video helps more than anything else. I also had some good luck with blog entries by tourists -- although blogs by ex-pats with extended stays go into a lot more helpful detail. Listening to local music also helps -- during the Cairo sections of my Tomb Raider fanfic I set iTunes to various modern Egyptian streams and listened mostly to those while I wrote.
And look especially for specifics. One concrete will outweigh thirty adjectives when it comes to making a place stand out in your reader's mind. These are of course the hardest of all to find, of course. It takes every thread of research you can pull on; reading biographies, watching movies, talking to people who know the place, whatever you can to find those things that are so characteristic and quirky of that particular place that once you've learned them, you question why you'd never heard of them before.
A last note. If you are going to be globe-trotting in your story, then at the start of every chapter that is in a different location than the previous (and that doesn't have some other over-riding material that needs to lead, such as resolving a cliff-hanger), lead with a recap of where you are. Don't open with your characters talking and let it become slowly obvious they are still in Boston. Start with them on that red brick made slick with the dirty slush of last weekend's snow, have them leaving Quincy Market well-fed on pastromi on rye and cold Sam Adams, or (if you must) parking the car in Harvard Yard. (And, yes, it is pastromi in that little corner of the universe. And never with mayo, either.)
It's the same rule as working with a POV character or your main protagonist. Name them in the first paragraph. Let the reader find their feet before you start throwing action verbs at them.
Sunday, October 11, 2015
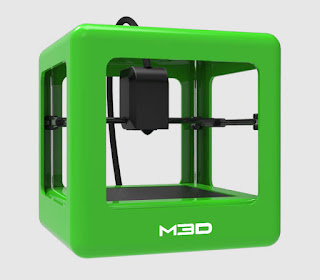
M3D Micro
I'm borrowing an M3D "Micro" 3d printer this week. Finally threw together a CAD for the "10x24 caseless armor-piercing" the M41 Pulse Rifle is supposed to fire; the 3d print represents the "Nitramine 50" solid propellant and a flat-nose .40 FMC bullet is shoved in the front in a semi-telescoping format. The total length of the round is the same as the .45 ACP chambered in the M1A1 Thompson the prop weapon was build around.
In any case!
The Micro is very cute. A cube less than 8" on a side, and around $350 new. Unlike other printers near that price point it is not a kit; it goes in fact in the other direction trying (but not always succeeding) to be a plug-and-play experience.
In this lies the majority of its real flaws. The build area is small but this is not of consequence for a home printer; large builds are simply too time-consuming to attempt all in one chunk (and tend to distressingly fail right in the middle). It is slow, but that comes from the price point; you get the hot end you pay for.
What are actual issues is the firmware uses non-standard interpretation of G-code, making it almost mandatory to use the provided software. That software hides much of the functionality behind a light-weight interface, giving you idiot lights and a handful of buttons instead of diagnostic tools. And this pipeline also stands in the way of using external slicers to better tailor your g-code towards a specific print. In short, it is Macintosh-like in approach; hide the scary options behind a friendly facade.
But it fails to provide the other part of that equation. The software doesn't just run (well, it doesn't on a Mac!); it required a certain amount of under-the-hood work to get it working. However. Once I'd sudo'd the right directory links and gotten used to drag-and-drop around the broken file selection handler, it functioned without problem.
Physically, it gave me good prints right out of the box. Well; I wasn't the one that opened the box. But when I got my hands on it, I ran the calibration routine, and after solving the software the first print was good. So far, none of my prints have failed.
I am, however, currently printing out new filament spool brackets. The original design of the Micro puts the filament reel inside the base of the machine itself, which would be very neat if anyone could figure out how it works. How it actually sits isn't documented and more than one person has fiddled with it for a while without figuring out how to thread it. So never mind that.
Fortunately, this special undersized filament spool -- which M3D sells in their store -- doesn't mean this printer has taken the lamentable course of some other printers I could name, and made it so attempting to use third-party filament places you in potential violation of the DCMA. No; this printer is filament-manufacturer agnostic.
And of course Thingiverse has several pages of spool brackets (and other accessories) that you can print out to mount on top of the machine either the smaller spools supplied by M3D, or standard-sized spools. It was literally a one-click search to find them, and I'm printing one now.
I am told that it can handle other materials other than PLA, but this is apparently right at the margin of what the hot end can deal with. There is also a third-party software solution that front-ends the clever (and free) Cura (the same slicing software, actually, that is hidden and inaccessible below the Micro's hood). That software is as I understand currently in command-line format and has some bugs itself, but it is a good sign.
Another thing M3D sells is BuildTak Sheets. These also look at first glance as a "make more money from the customer" toy, but they work very well. Other users report having problems with prints pulling up, and retreating to the old standby of blue painter's tape (TechShop has moved on to glue sticks, which work very well once you get used to them) but I've completed a half-dozen prints now without a single problem with the first BuildTak sheet from the package.
So it is a decent printer for someone who doesn't want to deal with a lot of start-up complexity. It will more-or-less print out of the box, and aside from some minor software and hardware issues it will do the job of plug it in and just print. And the print quality and speed are acceptable. Support could be better; it took an hour of reading the forums to solve the Mac compatibility issues, and that's something M3D really should have fixed themselves if they want to offer it as plug-and-play.
As for me? Well, this printer is getting me through a current project (the M41 Caseless) but I have the MakerBots at TechShop for most quick turn-around printing needs and of course Shapeways for the bigger stuff (and stuff that needs either higher quality, different materials, or things that can't be achieved without more support structure than I'd like to be printing on a PLA machine).

Incidentally, several test M41A Caseless printed now, but the tan color isn't working for me. I'm going to try Tamiya's Olive Drab 2 again. Of course, this shot was taken in Rosco #22 and quad layers of Rosco #65, so green doesn't render well....
Thursday, October 8, 2015
...maybe
Tuesday I did the full day at work, quickly showered and had something to eat and ran out to the city to put in four hours on the lathe.
Today I lined up with about half the company for the flu shot. And I'm just barely holding it together now to clean up the first four of the new grenades and prep them to be mailed out tomorrow.
There's no way I could have done that show in Newark. Not without going on half-time during the run. At it is I'm dragging just with the forty hour day job -- I'm barely touching on any of my other responsibilities.
Funny. A lot of places are looking for full-time staff right now. Real theater work, too. But I'm still enjoying what I'm doing and my only real complaint is the hourly pay is still pretty low. Hopefully after they pick up my contract it will get better.
(Pretty much everyone I grew up with in the theater program at High School and college has gone into related fields; trade shows, events, a few management positions here and there. I was practically the last holdout actually there working as part of the crew after the house lights went down. And I'll come back to it -- but after I've settled in a bit more. And paid up some bills.)
Sunday, October 4, 2015
Back in business
I did a full day at the machine shop and I now have ten completed M40 grenades (well -- still have to do the final steel wool clean-up and trim and paint the caps). I have three different people wanting to order at my Etsy shop, and one at the RPF, and they all want four or more.
I am going to have to raise prices. Or stop with the $5 off each grenade and go for a single $10 off for a bulk order. It is still two hours or more lathe-work for each, and that's not counting the final clean-up, or the work on the cap. Or primers...I tend to run a bunch of those off at one time and haven't been adding that to the per-grenade total.
At least I've found a better way to do those particular parts.
First step is face off the brass rod stock. Then take it down to .236" in diameter.
Switch tools, cut the chamfer at the front (which makes it look like a primer), then cut a v-shaped groove with the same tool.
Switch back to the right-hand bit again, and do the finishing pass at .232"
Finally, take a hacksaw and cut down the groove from step four. Much less scary than using a parting tool on a small diameter brass rod.
Advance the stock another .2", lather, rinse, repeat.
Now if I could just print off some caseless AP ammo for the Pulse Rifle, I'd be able to take some nifty pictures. But my first Etsy customer is already getting antsy so I might just have to throw the first of this batch into a shipping box now instead of later.
Saturday, October 3, 2015
Retro-Tech
Also, personal archaeology.
I've been trying to clean out the bins full of old junk. I figure, now that I'm working full time, it makes more sense to purchase new rather than try to repair things like broken coffee grinders and headphones so ancient all the foam has crumbled away.
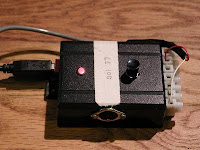
And I discovered this:


That's discrete logic. Or to be precise, TTL 700-series logic gates, 1960's technology. I had time and patience then, and as a legacy of a mis-spent youth behind a soldering iron, a bin of old chips. Even back when I made this thing, there were simpler options. Going back to individual gates is just plain hard-core.
If I reconstruct correctly what I designed here some twenty years ago, the much-loved 555 to the far left is used as a clock, with that blue trim-pot presumable setting the pulse width (the front panel sets the frequency). Then the 7474 dual flip-flop, set up in cascade mode, counts repeatedly to four in binary.
Things get trickier with the 7400 chips. At least one of these quad NAND gates -- my memory has it -- is doing a sort of binary inversion; changing the count from 0-3 to 3-0 instead. I'm betting the 7404 hex inverter is being a primitive output driver, because that's what I tended to use them for back then (except for one time I created two oscillators out of one DIP's worth!)
And that chip on the bottom? Binary to BCD decoder, entirely to drive the 4 LEDs on the top surface. (And if you are the kind of person who read this far, you don't need me to explain the 7405 sitting in the upper right corner. Which is, despite the name, not part of the 7400 series!)
And that's a whole bunch of soldering for the actual function. Which was a test instrument for a stepper motor driver.
What? Okay; a stepper motor is a motor wound with multiple windings, each with their own wire. Instead of free-spinning when current is applied (like a DC motor) a stepper flips to the selected winding. By switching rapidly through consecutive windings you cause the motor to rotate -- at a extremely accurate rate and position. You'll find them in 3d printers (among the many applications).
I had another box, basically full of solid-state relays, that was providing the amperage necessary for the stepper. But the signal was being shoved down RJ11 -- telephone wires and connectors -- so it was converted to binary for the journey.
And also because it started as binary; the final form of the controller was one of these:
I've been trying to clean out the bins full of old junk. I figure, now that I'm working full time, it makes more sense to purchase new rather than try to repair things like broken coffee grinders and headphones so ancient all the foam has crumbled away.
And I discovered this:

If I remember correctly, it had yellow vinyl lettering once -- which didn't make the controls any less enticingly obscure. But the fun part is what I discovered when I popped the lid to put in a fresh battery and see if it still ran (it does):

That's discrete logic. Or to be precise, TTL 700-series logic gates, 1960's technology. I had time and patience then, and as a legacy of a mis-spent youth behind a soldering iron, a bin of old chips. Even back when I made this thing, there were simpler options. Going back to individual gates is just plain hard-core.
If I reconstruct correctly what I designed here some twenty years ago, the much-loved 555 to the far left is used as a clock, with that blue trim-pot presumable setting the pulse width (the front panel sets the frequency). Then the 7474 dual flip-flop, set up in cascade mode, counts repeatedly to four in binary.
Things get trickier with the 7400 chips. At least one of these quad NAND gates -- my memory has it -- is doing a sort of binary inversion; changing the count from 0-3 to 3-0 instead. I'm betting the 7404 hex inverter is being a primitive output driver, because that's what I tended to use them for back then (except for one time I created two oscillators out of one DIP's worth!)
And that chip on the bottom? Binary to BCD decoder, entirely to drive the 4 LEDs on the top surface. (And if you are the kind of person who read this far, you don't need me to explain the 7405 sitting in the upper right corner. Which is, despite the name, not part of the 7400 series!)
And that's a whole bunch of soldering for the actual function. Which was a test instrument for a stepper motor driver.
What? Okay; a stepper motor is a motor wound with multiple windings, each with their own wire. Instead of free-spinning when current is applied (like a DC motor) a stepper flips to the selected winding. By switching rapidly through consecutive windings you cause the motor to rotate -- at a extremely accurate rate and position. You'll find them in 3d printers (among the many applications).
I had another box, basically full of solid-state relays, that was providing the amperage necessary for the stepper. But the signal was being shoved down RJ11 -- telephone wires and connectors -- so it was converted to binary for the journey.
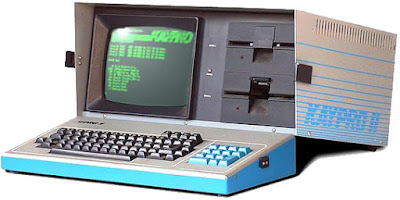
And also because it started as binary; the final form of the controller was one of these:

This was my first computer, purchased somewhere around 1984. Lovely machine and I still own it but even when I used it to control a stepper motor I hadn't turned it on in over a decade. It had a parallel port and an operating system so transparent (CP/M) that it was easy to write a program in BASIC that spat binary out to the first couple of pins on the port.
A lot of effort for the original application, which was merely to run a motor at a pre-determined rate. But as they say, once you are in the software domain... Half a decade or so later, I pulled the thing out for an exhibit and fund raiser for an attempt to put on William Gibson's seminal work of cyberpunk science fiction, Neuromancer, as an opera. And it was trivial even after having not written any code in years to tinker up a quick routine in BASIC that would turn a pair of motorized slats, pause, then turn them back to the starting position. Lather, rinse, repeat.
The driver box hasn't existed in years. Nor is there any application for this baroque control chain. All I'm left with is the elegant little box, which will dutifully chase on command when the switches are placed in the right configuration.
(Just for completists; the knob is rate, the switch below it is direction, the switch below the button inhibits the oscillator so the button can be used to "bump" the circuit in precise single steps. Or would, if there was a debounce circuit on that board.)
Subscribe to:
Posts (Atom)