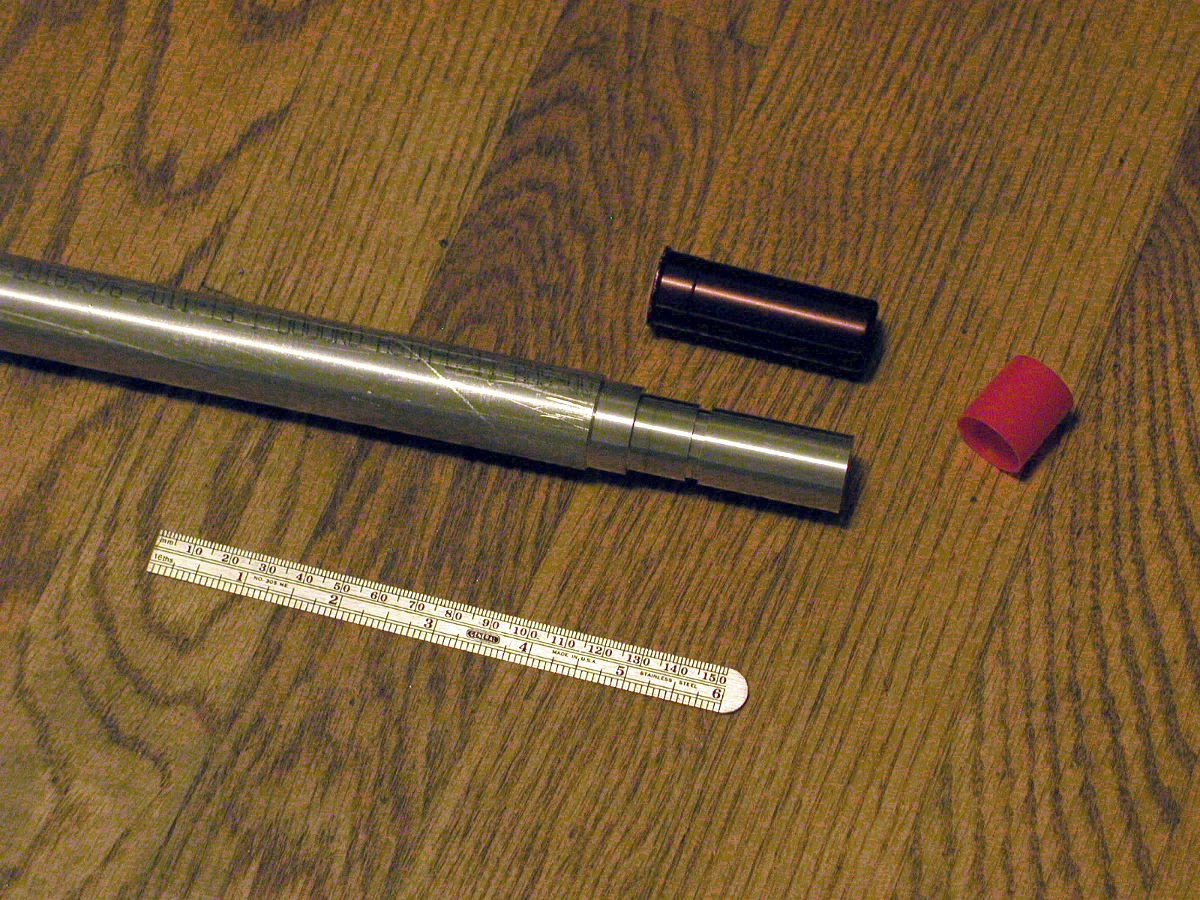
So I abandoned my first attempt at the plug and primer for the M40, and went in today to cut a new set. Which took a lot longer than it should have, because the lathe was seriously run out.
I was a bit run out myself this week what with wet weather and a cold.
This was the potentially trickiest bit of lathe-work. I was doing press-fit, which meant the pieces had to be within a few thousands of an inch in precision. The original attempt I cut the primer to one or two thou big, heated up the plug with MAPP gas, and hammered it in. More-or-less. Then I picked up a couple of coffee cups from upstairs, filled one with ice water and the other with boiling-hot tea water.
See, aluminium expands when heated. Heat it enough, and you can slide the part into the hole. After the assembly cools, it isn't coming apart again.
But the piece refused to go in. I gave up for that day, went home, and read up on the actual coefficient of thermal expansion for aluminium. Which is 21 x 10^-6. Which works out to, with a hole diameter of around 3/8", only about a thou per hundred degrees delta-T. That's about a third of what I'd been estimating, And my Starbucks Special setup was giving me fifty degrees if I was lucky.
Unfortunately the pieces had to be cut off after being turned to diameter, and it was impossible to re-chuck them in order to adjust the dimensions.
So back in today with a new plan. Here's the setup; there's a hole drilled through the grenade body. The button is inserted from the back, along with a spring, then the hole is plugged. And in the center of that plug is where the primer goes (a tiny bit of 1/4" brass rod). To keep the button from falling out the front there's s shoulder on the button. Starting from the estimate from the screen shot of about a 5/16" button, adding the shoulder and clearance brings the plug to almost 3/8". I'd ordered 3/8 stock, drilled the next size down and needed to take just a few thou off the stock in order for it to fit snug.
But the lathe was not cutting straight. One of the shop guys checked and the headstock was running out of true by 8 thous. By the front of the jaws, 12 thou or more, and by the time you got an inch or two out from the jaws the stock was wobbling so bad you could see it. I was able to shim the jaws of the three-jaw chuck with cardboard ripped from the front of my binder, and that got the hole reamed out to the new dimension. Sure, you can establish a new lathe center on any stock, but there wasn't enough metal to get there; by the time I was centered again my diameter was too small.
Well after all, this was picked as a learning project. So I didn't get a lot of metal cut today, but I learned how to replace a chuck, use the dial caliper, and set up a four-jaw chuck. And with that last, I was at last able to get cuts within the required tolerance.
I'd also come up with a better idea. Instead of forcing in the primer first and seating it to depth, then seating the plug and hoping I didn't cut too deep in the final facing, I'd shove the plug up to a shoulder. That way, I could pound the primer in last, without risk of the plug falling inside (and since there's no mechanical load on the primer, it didn't have to seat all that well...could even be a little loose and held in with a drop of glue).
Drilled a bigger hole to make that shoulder. At which point I realized that although the tailstock wheel is in inches, the markings on the tailstock spindle are metric. I'd confused centimeters with tenths and cut the hole way too deep. So had to go up a couple more drill sizes, and at that point the hole was much, much larger than the 3/8" stock.
So chucked my 1" bar in the four-jaw, trimmed it up to a runout of under five thou just because, and hogged it down to .405" in diameter. Cut the tiny nub that retains the spring, parted off, shut down the lathe and vacuumed up.
Yes, of course. The new part went right into the vacuum. Fortunately it was lying right on top when I opened up the shop vac to search for it. I cleaned it up, oiled it lightly, assembled the grenade and cranked down on the arbor press.
It seated. It is in there well enough I'm fairly confident I can do the finishing cuts now. But it was a long day, and a lot of struggling with a piece of equipment that needs a little more maintenance than it has gotten this week. And I'm on 12-hour days for show call until Monday.
Friday, February 28, 2014
Wednesday, February 26, 2014
Action Verbs
"Lathing" is yet another term, like "painting" or "sewing," in which the activity directly indicated by the verb is the smaller part of the total activity.
In painting, you spend far more time in sanding, dusting, taping, and otherwise doing prep work, than you do with a brush or rattle can in your hands. In sewing, the larger part of your time is cutting and pinning, not putting in stitches.
And in lathing, a whole lot of grinding tools, checking measurements, tightening bolts for every actual metal-removing pass.
My lathe learning project is progressing:

This is an excellent learning project for the lathe, as it requires a good variety of operations. Today was grooving, cutting a chamfer, cutting a radius, knurling, drilling, and parting. And many of these operations can be accomplished with a variety of techniques, providing even more chance to learn.
The front grooves here are supposed to be 3/32" according to the plans I drew. The parting tool I ordered from McMaster-Carr arrived Monday -- but unfortunately it doesn't fit in any of the tool holders at TechShop. However, I found in the bit bin a 1/8" parting tool that someone had already partially re-ground for a smaller size. I took over that project and made a custom shape just deep enough to make the cuts I needed.
The next operation to try was the angle. I unlocked the Compound Rest for this, setting it up so I was traversing with the Compound Rest instead of with the Carriage. Several cuts back and forth along that angle, and I had the chamfer I needed.
This was also possibly the way to do the nose radius. I set up for doing this freehand (you operate both the crossfeed and compound rest simultaneously), but decided I didn't want that much a test of my dexterity just yet.
McMaster-Carr to the rescue again. I'd also purchased a pair of cheap carbide-insert RH turning bits. Which are basically a blank of tool steel -- high-speed-steel -- with one end ground and a carbide insert brazed on. So I flipped one over, and using the corner of the grinding wheel created a custom radius tool of high-speed steel. All those videos on grinding tool bits seems to have helped!
Then there was knurling. Stuck the live center back in (if I was really smart I'd flip the thing over and knurl towards the headstock). There's a fair bit of conflicting advice on knurling. Or, rather, there is a school that believes you need to calculate your radius carefully to be a multiple of a whole number of teeth. And there is another school that thinks that knurling tools are designed to slip a little, and will adjust if you give them a chance.
I align with the latter. Particularly when you think about actually cutting a knurl; as you drive in, the effective radius is going to change.
One trick I picked up from the many videos I've been watching is that you don't want to tiptoe up to the knurl. You want to move the tool in aggressively and give it a good chance to start. Well, this advice seemed to work. The main issue I had is I'd cut the angle in the grenade just a little too steep; I couldn't bring the knurling tool all the way in without it rubbing against the other side of the groove. So I had to compromise and bring it in at a slight angle relative to the working face.
Drilling did not go so well. Well; I got a hole, and I didn't break off the bit inside. That's all to the good. But the hole is awful. According to more reading, I needed to take it even slower, backing out the bit even more frequently than I had. I also think I'll get better results not trying to drill through the entire grenade from the front; just drill past the internal shoulder, and do the longer hole from the other side with a larger drill bit.
I also didn't manage to get a good fit with my first try at turning down the 3/8" stock to the right diameter for the button. And I crashed the headstock -- okay, tapped the headstock -- cutting up to the shoulder on that piece, and that was a really good signal it was time to shut down for the day and clean up. Getting the interference fit on the rear of the grenade is going to be an "interesting" exercise and that's best left for another day.
And, yes, that's why the rim looks odd; after the spring is inserted and the plug pressed in, I'll face to the final dimension. And also adjust the shoulder on the rim, and do a little radius on the rim itself.
Meanwhile, the holocron is getting painted:

Okay, that was acrylic wash over Krylon hammered copper. Except that something didn't like the Jenkins Happy Medium I'd used to cut the acrylics, and I ended up having to strip that paint job back to primer and start over again.
And the circuit is coming along:

It is hard to see in this pic (what with the incredibly messy desk and all) but this is me testing the capacitance sensor. A wire is taped to the underside of one of the acrylic pieces making up the holocron body, which in turn is being held by my third hand jig as I wave my hand over it. So far, the sensitivity is less than I would like, but I can get a solid trigger by touching or nearly-touching the side of the holocron, and that's all I really need for this.
There will be a full entry on the build later. Once it is all working.
In painting, you spend far more time in sanding, dusting, taping, and otherwise doing prep work, than you do with a brush or rattle can in your hands. In sewing, the larger part of your time is cutting and pinning, not putting in stitches.
And in lathing, a whole lot of grinding tools, checking measurements, tightening bolts for every actual metal-removing pass.
My lathe learning project is progressing:
This is an excellent learning project for the lathe, as it requires a good variety of operations. Today was grooving, cutting a chamfer, cutting a radius, knurling, drilling, and parting. And many of these operations can be accomplished with a variety of techniques, providing even more chance to learn.
The front grooves here are supposed to be 3/32" according to the plans I drew. The parting tool I ordered from McMaster-Carr arrived Monday -- but unfortunately it doesn't fit in any of the tool holders at TechShop. However, I found in the bit bin a 1/8" parting tool that someone had already partially re-ground for a smaller size. I took over that project and made a custom shape just deep enough to make the cuts I needed.
The next operation to try was the angle. I unlocked the Compound Rest for this, setting it up so I was traversing with the Compound Rest instead of with the Carriage. Several cuts back and forth along that angle, and I had the chamfer I needed.
This was also possibly the way to do the nose radius. I set up for doing this freehand (you operate both the crossfeed and compound rest simultaneously), but decided I didn't want that much a test of my dexterity just yet.
McMaster-Carr to the rescue again. I'd also purchased a pair of cheap carbide-insert RH turning bits. Which are basically a blank of tool steel -- high-speed-steel -- with one end ground and a carbide insert brazed on. So I flipped one over, and using the corner of the grinding wheel created a custom radius tool of high-speed steel. All those videos on grinding tool bits seems to have helped!
Then there was knurling. Stuck the live center back in (if I was really smart I'd flip the thing over and knurl towards the headstock). There's a fair bit of conflicting advice on knurling. Or, rather, there is a school that believes you need to calculate your radius carefully to be a multiple of a whole number of teeth. And there is another school that thinks that knurling tools are designed to slip a little, and will adjust if you give them a chance.
I align with the latter. Particularly when you think about actually cutting a knurl; as you drive in, the effective radius is going to change.
One trick I picked up from the many videos I've been watching is that you don't want to tiptoe up to the knurl. You want to move the tool in aggressively and give it a good chance to start. Well, this advice seemed to work. The main issue I had is I'd cut the angle in the grenade just a little too steep; I couldn't bring the knurling tool all the way in without it rubbing against the other side of the groove. So I had to compromise and bring it in at a slight angle relative to the working face.
Drilling did not go so well. Well; I got a hole, and I didn't break off the bit inside. That's all to the good. But the hole is awful. According to more reading, I needed to take it even slower, backing out the bit even more frequently than I had. I also think I'll get better results not trying to drill through the entire grenade from the front; just drill past the internal shoulder, and do the longer hole from the other side with a larger drill bit.
I also didn't manage to get a good fit with my first try at turning down the 3/8" stock to the right diameter for the button. And I crashed the headstock -- okay, tapped the headstock -- cutting up to the shoulder on that piece, and that was a really good signal it was time to shut down for the day and clean up. Getting the interference fit on the rear of the grenade is going to be an "interesting" exercise and that's best left for another day.
And, yes, that's why the rim looks odd; after the spring is inserted and the plug pressed in, I'll face to the final dimension. And also adjust the shoulder on the rim, and do a little radius on the rim itself.
Meanwhile, the holocron is getting painted:
Okay, that was acrylic wash over Krylon hammered copper. Except that something didn't like the Jenkins Happy Medium I'd used to cut the acrylics, and I ended up having to strip that paint job back to primer and start over again.
And the circuit is coming along:
It is hard to see in this pic (what with the incredibly messy desk and all) but this is me testing the capacitance sensor. A wire is taped to the underside of one of the acrylic pieces making up the holocron body, which in turn is being held by my third hand jig as I wave my hand over it. So far, the sensitivity is less than I would like, but I can get a solid trigger by touching or nearly-touching the side of the holocron, and that's all I really need for this.
There will be a full entry on the build later. Once it is all working.
Tuesday, February 25, 2014
Brass
We're now in the middle of the our run for The Music Man.
In many small houses there just isn't the budget to hire a full pit. You can try to fake your way towards that sound by using canned (aka pre-recorded) music, or a full-but-synthesized score from something like Orchextra, or you can lump a bunch of keyboards and a few choice "real" instruments together and try to fake a full sound that way.
Or you can re-score. Given the period of the show and the emphasis on band music, our music director chose to re-score for a brass band. And he pushed to budget it, too. So we have two trumpets, two trombones (a tad shy of 76), and tuba. Plus piano and drums.
Which was the first issue I had to deal with. We also have a set built on a full-stage rake, and said rake was quite noisy underfoot. And we also chose to do sound effects practical and live. Which means actually mixing the show is easy. Engineering it was the hard part.
To fight both the brass band and the squeaky floor I went into the speaker processor and created a custom patch. Unlike The Wiz, where I was able to amp both singers and band to such levels as to allow the house system to dominate -- and thus I could set the house system to produce a nearly flat field across the depth of the seating area -- this show required I work with the acoustic sound that was already in the space.
I created a strong taper, emphasizing the front fill speakers and reducing the delay speakers over the seating to almost nothing. The taper was dialed to match as closely as I could estimate the natural fall-off of the brass band (who are seated in the back of the acting area). This also put more vocals in the speakers nearest the stage, helping the singers.
Of course it isn't quite this simple. The actors are projecting acoustic sound as well. The stage floor is making noise, and the inverse-square fall-off for that is sharper (since it is closer to the audience). And because of the nature of the speakers, the reinforced sound becomes more localized and brighter (aka more of the higher frequencies) as you get closer to the front and center (because you are looking straight down the cones of the tweeters).
So I trade off a little of the sheer volume necessary by knowing there is an element of perceptual volume both in frequency emphasis and in localization cues.
It does mean that where I am, at the "front of house" mixing position just at the fringe of the rear-most speakers, I really can't tell what the sound is like for most of the house. I did as much rabbits as I could through previews -- getting up to walk up and down the aisle and try to get a sense of what it sounded like closer to the front -- but now that we've hit performance, I'm mixing by a combination of instinct and intellect and indirect clues.
Effects are being performed live by the actors. The "Foley Table" full of train whistles and china cups (for horse hooves) and similar is also behind the acting area, roughly level with the band. But many of the effects are subtle, and have to be mic'ed. So I ran this mic through one of the on-board processors to delay it about 25 milliseconds, and fed it strongest into the side-fill monitors, thus allowing the combined sound to "waft out" from the stage in a similar way to the on-stage action.
I wish I had been able to spend more time during the development of the effects. As is usual, the were rehearsed piecemeal and I simply am not paid enough to attend every single rehearsal in hopes of getting a minute of work done on one day, a minute on another. The thunder effect never quite worked but it was too late and there was too little budget for a thunder sheet. I may yet make up a slapstick as a backup for the firecracker sound, though.
This may have been instructive for the director, too, in seeing just how much effort it takes to get not just "a train sound" but the right train sound for that moment -- in timbre, in volume, in timing as well as in the specificities of period and style.
My feeling in effects like this, though, is that it is less important that the effect works as an effect. It is more important that it works as a performance. So I'll keep something even if it doesn't really sound like a train crossing warning bell, because it is an interesting moment and it breaks up the sonic landscape and it gives the audience one more thing happening on stage. And when it all breaks right, they even realize what it is supposed to represent (or they come up with some rationale themselves for what the sound is supposed to represent -- and that's all good, too!)
The last issue in this show I expected was electronics. But due to a complex series of events, the live tuba left, and the temporary substitute music director didn't own keyboard (or a tuba, either). The theater has several Casio keyboards around for use in the rehearsal rooms. They have built-in speakers but no audio outputs.
The best one we have -- an 88-semi-weighted-key Privia -- had a USB connector, though. So I brought in one of my spare laptops and ran the Aria player packaged with Garritan Personal Orchestra. This was sent to one of my tiny but powerful powered monitors in order to make the tuba and piano sound appear to be issuing from the pit with the other (real) instruments.
It took several performances worth of tweaking but I finally got a half-decent piano and tuba sound out of it. Unfortunately, during the final performance of the weekend -- a performance already racked by electronic gremlins and a possible power outage in the building -- the software locked up just before "Marian Librarian."
We made a temporary MacGuyver by pulling the microphone off the brass section and shoving it up against the Privia's own speakers, and I quickly dialed that out to the side-fill monitors to give the actors something to work with. All of this was done with me trapped at the mixing board (no A2 on this show) and texting back and forth to the Concert Master between songs.
My guess is that either power outage to the keyboard or a loose USB connection finally locked the software. And unfortunately, no-one in the pit realized you had to go into the Aria preferences panel to reset the keyboard connection. Instead they restarted the computer. Which wouldn't have been such an issue (I of course muted the keyboard send to monitors and house as soon as they started having trouble)...except for that powerful monitor I'd tucked under the keyboard.
So right in the middle of the library scene the audience was treated to the full-volume sound of a Sonic Screwdriver (my custom start-up sound on that laptop). Well, The Doctor is a Timelord, after all -- he can show up in Iowa in 1914 if he wants to!
Once they'd ticked the checkbox in Preferences, the software worked properly again, and we finished the show with no further issues (well, aside from the lightboard re-setting in the middle of the show, the Clear-Com intercom shutting down for no particular reason...heck, and even the lights in the men's restroom decided to get in on the act! Gremlins, I say. Must have been gremlins.)
Thursday, February 20, 2014
Circular Motion
Reserved a lathe today and spent four hours on it.
First task was to put a live center on the piece I'd faced the other day. Which I hadn't been trained on (I assumed it is covered in Class #2: Work Holding and Feed Rates). Faced the piece clean again, set up and used a center drill, and then popped a live center in the tailstock.
Then made several poor passes, until between tightening the center, re-grinding the tool bit, and going to a higher speed and a slower feed, I started getting smooth cuts -- and good chips, which I was especially looking for. I even got an acceptable surface when hand-feeding.
Took the stock down to the rim diameter for the grenade, then re-arranged things to cut up to a clean shoulder. Then the final thing I had time for was to set up a parting tool and cut the first of the decorative grooves.
I've now gotten over my confusion on which lever does what, and I practiced for a while on a powered-down lathe until I could throw on and off headstock power and crossfeed/carriage feed without any risk of slamming the thing into reverse unexpectedly.
I'm realizing that I probably should have stuck less out of the chuck, and detailed the nose (which has deep cuts and a convex curve) before taking the body diameter down. But that is an expected learning process; as I get used to the lathe (I never want to be "comfortable," not with a tool that can pick you up and spit you out in the blink of an eye), I learn more about how to properly plan a job.
Which was really what this project was about. It isn't like I particularly need an M40 grenade prop. Although it is a cool prop...!
(I also got a real aluminium Snap-Cap to look at and measure. My estimated dimensions are just slightly short of that, close enough that I'm willing to bet that particular Snap-Cap is the right dimensions for the original prop. And that means my drawing should be adjusted a little.)
But now I'm not sure whether I should run in again and keep working with the tools I have, or sent in an order for some blank tools from McMaster-Carr so I can do the next shaping stages properly. It isn't like there is a deadline on this project. It is just that I am so hooked on lathing at the moment I can't seem to concentrate on other things.
The Holocron got a second coat of paint. Krylon Hammered Finish is cool stuff, but it is finicky about how you apply it. Go too light and you don't get the texture, go too stop-and-go and you get annoying little strings, but go too heavy and it lumps up like all too-heavy paint jobs.
Laser-cut an acrylic "spider" to support the circuitry in the center of the cube, and slowly building the final wiring around that (with lots of double-sided mounting tape). Have no idea what the "behavior" is going to be; that will have to wait until I see how sensitive the sensors are.
Wednesday, February 19, 2014
...Some kind of rudimentary lathe?
The Holocron is proceeding. More errors, but more laser discoveries. I'd be using that tool all the time if it wasn't booked up a week in advance or more. I'll have full documentation on that build when I create the Instructable.
Did my first solo on the lathe, and managed after a lot of effort to turn it on, make a facing pass, and engage the auto crossfeed. Conceptually, engine lathes aren't that complicated, but the way the various feed screws and half nuts and so forth are selected for by the controls varies wildly between models. And the Jet manual is nearly useless for figuring out which levers need to be put in which positions.
Typical entry:
7. Feed/Lead Selector Knob (J, Fig. 14) -
located on front of the gearbox. Used for
setting up for feeding and threading.
That's almost as bad as the Carrara Pro manual, which was filled with; "21a: Face Extrusion Tool. Use to extrude faces. (See 21a for details.)"
But I think I've finally got it straight in my head which levers need to go where for the various operations. Next step is coming to grips with feed rate calculations. Oh, and tool grinding. But, really, the first few minutes I'll spend next time I'm with the lathe will be getting a feel for the on-off and stop-go levers....with the power OFF.
(Yes, it is possible on this lathe to slam the headstock into reverse while trying to turn the lathe off. There is a way of moving the lever that makes that extremely unlikely, but I have to work with that motion until it becomes instinctive before I risk breaking something.)
Sunday, February 16, 2014
Illusions
I had two people come up to me after Opening Night, and I've realized there are basically two classes of comments; those from people who understand what you are dealing with, and those from people who don't.
This is not to say that all sound people who comment will be positive. They may just pat you on the back and say, "Tough show, eh?" We designers also have a tendency to let people design their own way, even if that means letting them dig their own hole, rather than jumping in with a, "Have you considered adding compression here?" All in all, though, comments from people in the biz tend towards, "Good work sorting out the material they gave you to work with."
Anyhow.
The second class of commentators are often very polite in manner, even tentative. The rarer positive comments are, "The show sounded good." The negative are almost always, "I couldn't hear (so-and-so, or this-and-that)."
And I don't know how to take this. I mean, sure, there are some FOH people out there who came from rock and roll and who consider mixing theater to be slumming. They spend their entire time getting a good sound from the drums, they crank the bass up to window-rattling level, and they let the vocals go because they simply don't care about that.
But most of us chose theater. Chose musical theater. Which you would suppose means that we have a love of the medium. Which means you'd think it would have occurred to us sometime during the last decade or two that "hearing" (really, understanding) the lyrics is important. (Heck, one could even say, paramount.)
So it is unlikely to be that I don't know the lyrics need to be audible. How likely is it that I'm just too lazy to do it? Well, let me set the stage for you. Opening night, party on stage following. When this person came up to me, everyone in the building was laughing and chatting with friends and drinking champagne and eating the free pizza. And here I am in the back, still working. Stripping sweat-wet mic bags off the wireless, pulling sticky tape off the elements -- all in all not very nice work.
And I've been working like this for two weeks of a long tech. Lots of twelve hour days. Do you really, really think that I'd do that, but turning the, "don't suck" knob on the board over a few more points was too much effort?
So I don't know what's going through the head of the people who couch their comments in this way. This is why you don't hear this kind of comment from sound professionals. Because they know that the only reason I'm sitting back there at that board for every single show is to put my ears in the space and be able to make the choices that lead to the best possible sound for that show.
I think maybe these comments are more a, "please, someone tell me why this had to happen!" sort of comment. That is, that they didn't have the listening experience they hoped for, and they will ask anyone they can in what they recognize already is a forlorn hope that it can be fixed somehow.
Except that isn't the flavor of most of these comments. As tentative and polite as they are, they are always couched in the accusatory. That I could have simply "turned up the vocals" and then it would have been perfect, but I chose for whatever reason -- cussed-mindedness or gross incompetence -- not to do that.
The illusion that a mix can be resolved to two knobs (how loud the band is, how loud the lyrics are) and getting the ratio right is as simple as turning one of those two knobs is, of course, sister to a host of similar illusions.
When you've got twenty people singing and dancing and a band playing and one of the solo lines isn't as clear as it should be, the illusion is that since David has a body mic, then if you were to turn up the knob connected to David's microphone, his solo would become clear.
Really, more than half the time, if you turn the knob that is indeed connected to the body pack David is wearing, David will not get perceptively louder. Far too often, you can't fix the issue at that simplistic a level. You have to do something else in order to pop David through the mix.
This is of course not exactly true. David may not be singing properly in the first place (meaning there is nothing there.) Or he might be singing, but the choreographer has chosen to have him clapping hands in rhythm at that moment and the clapping sound completely masks the lyrics. Or the system is close to saturation, and turning up any microphone ends up increasing feedback or room nodes or other distortion.
Plus, everything in a show happens in context. David may sing his line moments after a loud cymbal crash. At any other moment of the play he would be fine, but in this moment, ears are still shocked and you'd need more volume to compensate. Or Charley, Susan, David, and Lisa all have solo lines one by one but Lisa doesn't have a body mic -- and the only way you can keep Lisa's solo line from standing out and sounding ghastly is by working the levels down through the solos. Which means you've chosen as part of the total song to make that particular moment not as perfect as it could be.
Directors, I am convinced, too often experience plays in terms of isolated moments. They spend so much time rehearsing single scenes, or even single pages, they lose track of the context. This is why transitions between scenes are so often so bad. They simply didn't occur in rehearsal, and they had to be worked out in Tech. Which plays hobb with sound and light designers, of course, since over half of our work is in the transitions.
(Indeed, even in Tech it isn't unusual for transitions to be skipped over, or not done in time; the cast will break, help shift the set, then rehearsal starts again on the next scene on the work list).
I've touched before on the illusion that volume is everything. Reality is that perception is non-linear and context-dependent. What the audience member knows is that they didn't understand the lyrics. To them, the only translation is that they needed to be louder. To the professional, what is understood is that the ratio between those frequencies containing necessary information and those that confuse the picture has to be large enough. And the values of these two items change from moment to moment with changing context; during a loud moment perceived midrange is lower, and following a loud moment perception of similar frequencies as well as the higher frequency range are both dampened.
I've said this over and over but it still bears repeating. Turning up is not a panacea. At best, turning up is a temporary (and thus dangerous) solution.
Friday, February 14, 2014
The Longest Project Begins with a Single Step
Just some thoughts on how you approach a project, whether it is designing sound for a stage production, building a prop, or writing a program: thoughts inspired by the last post or two and some recent material from elsewhere on the web.
There are several basic elements to my approach. I don't use all of them all of the time, but they all get frequent play.
Plan Hierarchically
Build Iteratively
Work in Pieces
Test Constantly
Integrate Frequently
Include Failure in your build cycle
It is important to have a plan. But it is equally important not to plan too much too early. Don't get bogged down in details to where you can't see the overall picture.
What you want is to leverage tools like Fermi Estimation; instead of trying to make up a detailed list of parts and what they cost, do a detailed analysis of a representative slice then extrapolate. You want to have an idea how much time, how much cost, whether you can handle the size of the thing or the work methods in your available space, but you need to do this without actually knowing in detail how you intend to build it!
Be always aware of the box. All the way through the project, don't let a problem be insurmountable because you are trying to solve it within assumed and invisible constraints. You can't get a circuit to work? Maybe there already exists a commercial substitute. You can't smooth a surface the way you want it? Perhaps it doesn't need to be smooth, because it is going to be hidden under later details.
As an example, the Jedi Holocron I am building is too elaborate for the task. If my project brief said "Assemble Holocron kit and add a light inside" then most of what I'm doing is not necessary.
The actual project brief is, however, "Use a Jedi Holocron build as a test platform to learn laser engraving and cutting, and to experiment with neopixel lighting elements."
This is being aware of the box.
And this is also how you plan heirarchically. You do not want your brief to be, "Build a prop blaster using a resin cast plus a machined nozzle with the fins on quarter inch spacing from 2011 T3 even though 6063 is stronger because anodizing and...."
Your brief needs to be written at the highest level you can imagine. Take it as abstracted as you can, until it includes as alternatives, "Buy a better one pre-made" or "Don't even bother, I've got a better idea."
Only when you have a mission statement that can fit in a single sentence without too many comma splices, breathe, do you move on to make a more detailed spec.
And even then, spec in terms of how much time you are reserving, deadlines if any, estimated cost and other budget issues, general plan of attack. Don't get bogged down in details, again, because -- you don't know all of the details yet.
Which brings us to:
The plan may not work. The material might not work. The concept might not work. Instead of starting out all at once with the final materials and working for days to get the final polished finish only to find out it is too big to fit your hand, start with mock-ups. Start with massing studies. Start with practice shots on the desired material. Start with little bits you can try out molding or machining or soldering on.
There will always be a gotcha you didn't see coming. But as much as possible, solve the large problems early. Solve issues of scale as early as you can, so you are working in finer detail later.
For a prop? Start with mock-ups. Make something you can hold, and see if the basic size and shape is right. It is a lot better to waste a chunk of foam than it is to waste carefully scrollsaw'd MDF.
For electronics, use proof-of-concept and breadboard and perf to work out the bugs before you go spending money on a PCB.
Basically, whenever there is a way of mocking up or substituting part or all of the build with cardboard and duct tape, flashlights and safety pins, boiler-plate code and rehearsal cubes, do it.
And keep this going throughout the project.
This of course blends almost imperceptibly with;
As Volpin said recently over at Tested, don't try to sculpt a Halo Reach Needler. Sculpt the parts of a Halo Reach Needler.
Engineers call this Divide and Conquer.
Look for parts. Look for sub-assemblies. Look for modules.
You want to be working with smaller pieces of the whole whenever possible. Smaller pieces are easier to comprehend, smaller pieces are less scary (building an Iron Man helmet is a lot less scary a project than building an Iron Man suit!) and failure is localized, too; instead of the entire project going up in a puff of magic smoke, you only lose the LED and regulator you were working on at that moment.
Smaller parts take up less workshop space and are easier to manipulate. When you have smaller parts, you can be painting on one while the paint is drying on another. You can be soldering on one while the parts are on back order for another.
And most importantly, when you are working on a single element -- a sub-routine of code, a sleeve, a carved foregrip -- when something goes wrong you can test just that element, instead of trying to track down an error somewhere in the entire five hundred lines of C++.
Which brings us to;
Just like the massing tests and the Fermi Estimates mentioned earlier, any time you can test an idea or an element, do so.
When I'm setting up a sound system, the first thing I do is plug in a laptop (or, more often, my scanner) and play a little music. This is like a dummy check; before I go around looking for shorts in every single mic cable, I'm going to confirm the system actually turns on and sound comes through.
When you are coding, set flags and debug branches and so forth for your functions, and see if they do what you actually expected them to do when called.
When you work in pieces, you very often have pieces that can function on their own in some limited way. So wire them up. Say you are building a ukulele amp with onboard effects. Leave the pre-amp and pickup in their boxes, leave the amp in its box, and test just the effects unit; surrounding it with known working elements. Send it signal by plugging it into a laptop and running iTunes. Confirm the signal is going through by attaching headphones with a jumper cable. It doesn't matter how squirrelly the improvisations are; the important thing is that you are isolating so the only thing that is being tested is the piece you are working on.
When you know every sub-assembly works as designed, you can have more confidence in knowing the whole thing will work as designed. But there is a big caveat:
There are entire classes of problems that only happen when you bring everything together. Hetrodyne effects, interference. But also physical fit, relative massing, visual appeal, even color and surface texture.
Try to find these problems before you have wasted weeks on a spiffy paint job.
Test-fit. Mock up. It doesn't matter if you have to use double-stick tape, alligator clips, rubber bands, etc., but remember to stop at frequent intervals in the project to take all the separate pieces out of their separate worlds and make sure they really do fit together.
You won't do this nearly as often as you test individual units, but you need to do it.
Also, these tests become basic benchmarks of the project. And they play back into the hierarchical design process; at each integration, you learn how the total project conforms to the original plan, and you learn how you need to modify your estimate of remaining time, budget, the need for special tools or materials, etc.
Different projects have different benchmarks, but here's some loose ideas of major integration stages:
Massing Study: This is when you get a general sense for how big something is, the proportional balance. In 3d, a massing study is done with primitives; stack up cylinders and blocks to get a basic sense of the shape of the thing.
Mock-Up: this is a more elaborate massing study; for a prop, this is something you can actually hold (whether it is rough-cut from foam or taped together from tin cans and gun parts). The mock-up for my Hogleg Maverick would probably be the PhotoShop image I created that showed the basic shape, aesthetic balance, color balance, etc.
Proof of Concept: particularly in electronics, this is the first circuit that actually does something, even if it barely works at all. The idea is a step in the build where you can actually turn it on and something happens. In prop-making, the proof of concept may be more a successful trial with a new material or technique.
Signal Test: get the entire thing up to the point where an input will show up at an output. Particularly important in both sound design and programming. The point, again, is not to worry about whether the program spits out the right answer, or the sound from the speakers is any good. The test is there merely to show that all the essential elements of the chain functioned well enough to pass on a signal.
Sanity Check: the first moment during a build when you can look at how much material you ordered, how long it took to actually machine the first of ten emitters, how much molding compound is left in the can after the first pull. It is the moment when you stack up all the unfinished pieces, or all the sketches, or all the components you've ordered, and look at the total mass and go, "Oh, wow." When you look at the total like this, it will tell you things you might not have remembered to estimate. Like, "With this many slashes in the doublet, I'm going to run out of bias tape soon."
Trial Fit: really important for props and costumes, especially the former if electronics are involved. See if the parts you are building are going to fit together. See if there is really going to be as much room inside as you expected.
Muslin: For costumes, before you cut into $16 a yard brocade, build the bodice out of muslin and fit it. This is incremental build at its finest; make the mistakes on cheaper fabric. But there are muslin approximations for many expensive materials, or extensive processes.
Line Check: this is a term from sound engineering. Before you tape down cable runs, and before you start worrying about dialing in the right sound for everything, make sure every mic is getting a signal back to the board, and they are showing up on the right channels. For electronics, make sure every part lights up/turns on/does something.
Remember, at every one of these integration tests you are going back to work on a piece-by-piece level. And you are taking what you learned in the integration test to modify your hierarchical project plan.
Scale Check: this is from my own work in Poser; at some point I bring the prop into Poser and import some random figure into the workspace. When you've been staring at bolt heads and panel lines for days, you lose perspective on just what the thing looks like in context. Putting a human figure in lets you grasp overall scale and level of detail again.
All-Up Test: This is when every bit of active electronics is connected together for the first time.
Plugs-out Test: This is when you remove all external components so the thing is running on internal batteries, no extra jumpers or external keyboards or whatever.
In-Situ Test: This is when you bring it to the theater (or whatever the intended operating environment is) to see if it functions under the actual conditions. Especially important for testing range, brightness, loudness; try it in the actual room. This test does not assume under actual running conditions; just that you are testing in the intended environment.
And, well, that's plenty enough for one entry!
There are several basic elements to my approach. I don't use all of them all of the time, but they all get frequent play.
Plan Hierarchically
Build Iteratively
Work in Pieces
Test Constantly
Integrate Frequently
Include Failure in your build cycle
Plan Hierarchically
It is important to have a plan. But it is equally important not to plan too much too early. Don't get bogged down in details to where you can't see the overall picture.
What you want is to leverage tools like Fermi Estimation; instead of trying to make up a detailed list of parts and what they cost, do a detailed analysis of a representative slice then extrapolate. You want to have an idea how much time, how much cost, whether you can handle the size of the thing or the work methods in your available space, but you need to do this without actually knowing in detail how you intend to build it!
Be always aware of the box. All the way through the project, don't let a problem be insurmountable because you are trying to solve it within assumed and invisible constraints. You can't get a circuit to work? Maybe there already exists a commercial substitute. You can't smooth a surface the way you want it? Perhaps it doesn't need to be smooth, because it is going to be hidden under later details.
As an example, the Jedi Holocron I am building is too elaborate for the task. If my project brief said "Assemble Holocron kit and add a light inside" then most of what I'm doing is not necessary.
The actual project brief is, however, "Use a Jedi Holocron build as a test platform to learn laser engraving and cutting, and to experiment with neopixel lighting elements."
This is being aware of the box.
And this is also how you plan heirarchically. You do not want your brief to be, "Build a prop blaster using a resin cast plus a machined nozzle with the fins on quarter inch spacing from 2011 T3 even though 6063 is stronger because anodizing and...."
Your brief needs to be written at the highest level you can imagine. Take it as abstracted as you can, until it includes as alternatives, "Buy a better one pre-made" or "Don't even bother, I've got a better idea."
Only when you have a mission statement that can fit in a single sentence without too many comma splices, breathe, do you move on to make a more detailed spec.
And even then, spec in terms of how much time you are reserving, deadlines if any, estimated cost and other budget issues, general plan of attack. Don't get bogged down in details, again, because -- you don't know all of the details yet.
Which brings us to:
Build Iteratively
The plan may not work. The material might not work. The concept might not work. Instead of starting out all at once with the final materials and working for days to get the final polished finish only to find out it is too big to fit your hand, start with mock-ups. Start with massing studies. Start with practice shots on the desired material. Start with little bits you can try out molding or machining or soldering on.
There will always be a gotcha you didn't see coming. But as much as possible, solve the large problems early. Solve issues of scale as early as you can, so you are working in finer detail later.
For a prop? Start with mock-ups. Make something you can hold, and see if the basic size and shape is right. It is a lot better to waste a chunk of foam than it is to waste carefully scrollsaw'd MDF.
For electronics, use proof-of-concept and breadboard and perf to work out the bugs before you go spending money on a PCB.
Basically, whenever there is a way of mocking up or substituting part or all of the build with cardboard and duct tape, flashlights and safety pins, boiler-plate code and rehearsal cubes, do it.
And keep this going throughout the project.
This of course blends almost imperceptibly with;
Work in Pieces
As Volpin said recently over at Tested, don't try to sculpt a Halo Reach Needler. Sculpt the parts of a Halo Reach Needler.
Engineers call this Divide and Conquer.
Look for parts. Look for sub-assemblies. Look for modules.
You want to be working with smaller pieces of the whole whenever possible. Smaller pieces are easier to comprehend, smaller pieces are less scary (building an Iron Man helmet is a lot less scary a project than building an Iron Man suit!) and failure is localized, too; instead of the entire project going up in a puff of magic smoke, you only lose the LED and regulator you were working on at that moment.
Smaller parts take up less workshop space and are easier to manipulate. When you have smaller parts, you can be painting on one while the paint is drying on another. You can be soldering on one while the parts are on back order for another.
And most importantly, when you are working on a single element -- a sub-routine of code, a sleeve, a carved foregrip -- when something goes wrong you can test just that element, instead of trying to track down an error somewhere in the entire five hundred lines of C++.
Which brings us to;
Test Constantly
Just like the massing tests and the Fermi Estimates mentioned earlier, any time you can test an idea or an element, do so.
When I'm setting up a sound system, the first thing I do is plug in a laptop (or, more often, my scanner) and play a little music. This is like a dummy check; before I go around looking for shorts in every single mic cable, I'm going to confirm the system actually turns on and sound comes through.
When you are coding, set flags and debug branches and so forth for your functions, and see if they do what you actually expected them to do when called.
When you work in pieces, you very often have pieces that can function on their own in some limited way. So wire them up. Say you are building a ukulele amp with onboard effects. Leave the pre-amp and pickup in their boxes, leave the amp in its box, and test just the effects unit; surrounding it with known working elements. Send it signal by plugging it into a laptop and running iTunes. Confirm the signal is going through by attaching headphones with a jumper cable. It doesn't matter how squirrelly the improvisations are; the important thing is that you are isolating so the only thing that is being tested is the piece you are working on.
When you know every sub-assembly works as designed, you can have more confidence in knowing the whole thing will work as designed. But there is a big caveat:
Integrate Frequently
There are entire classes of problems that only happen when you bring everything together. Hetrodyne effects, interference. But also physical fit, relative massing, visual appeal, even color and surface texture.
Try to find these problems before you have wasted weeks on a spiffy paint job.
Test-fit. Mock up. It doesn't matter if you have to use double-stick tape, alligator clips, rubber bands, etc., but remember to stop at frequent intervals in the project to take all the separate pieces out of their separate worlds and make sure they really do fit together.
You won't do this nearly as often as you test individual units, but you need to do it.
Also, these tests become basic benchmarks of the project. And they play back into the hierarchical design process; at each integration, you learn how the total project conforms to the original plan, and you learn how you need to modify your estimate of remaining time, budget, the need for special tools or materials, etc.
Different projects have different benchmarks, but here's some loose ideas of major integration stages:
Massing Study: This is when you get a general sense for how big something is, the proportional balance. In 3d, a massing study is done with primitives; stack up cylinders and blocks to get a basic sense of the shape of the thing.
Mock-Up: this is a more elaborate massing study; for a prop, this is something you can actually hold (whether it is rough-cut from foam or taped together from tin cans and gun parts). The mock-up for my Hogleg Maverick would probably be the PhotoShop image I created that showed the basic shape, aesthetic balance, color balance, etc.
Proof of Concept: particularly in electronics, this is the first circuit that actually does something, even if it barely works at all. The idea is a step in the build where you can actually turn it on and something happens. In prop-making, the proof of concept may be more a successful trial with a new material or technique.
Signal Test: get the entire thing up to the point where an input will show up at an output. Particularly important in both sound design and programming. The point, again, is not to worry about whether the program spits out the right answer, or the sound from the speakers is any good. The test is there merely to show that all the essential elements of the chain functioned well enough to pass on a signal.
Sanity Check: the first moment during a build when you can look at how much material you ordered, how long it took to actually machine the first of ten emitters, how much molding compound is left in the can after the first pull. It is the moment when you stack up all the unfinished pieces, or all the sketches, or all the components you've ordered, and look at the total mass and go, "Oh, wow." When you look at the total like this, it will tell you things you might not have remembered to estimate. Like, "With this many slashes in the doublet, I'm going to run out of bias tape soon."
Trial Fit: really important for props and costumes, especially the former if electronics are involved. See if the parts you are building are going to fit together. See if there is really going to be as much room inside as you expected.
Muslin: For costumes, before you cut into $16 a yard brocade, build the bodice out of muslin and fit it. This is incremental build at its finest; make the mistakes on cheaper fabric. But there are muslin approximations for many expensive materials, or extensive processes.
Line Check: this is a term from sound engineering. Before you tape down cable runs, and before you start worrying about dialing in the right sound for everything, make sure every mic is getting a signal back to the board, and they are showing up on the right channels. For electronics, make sure every part lights up/turns on/does something.
Remember, at every one of these integration tests you are going back to work on a piece-by-piece level. And you are taking what you learned in the integration test to modify your hierarchical project plan.
Scale Check: this is from my own work in Poser; at some point I bring the prop into Poser and import some random figure into the workspace. When you've been staring at bolt heads and panel lines for days, you lose perspective on just what the thing looks like in context. Putting a human figure in lets you grasp overall scale and level of detail again.
All-Up Test: This is when every bit of active electronics is connected together for the first time.
Plugs-out Test: This is when you remove all external components so the thing is running on internal batteries, no extra jumpers or external keyboards or whatever.
In-Situ Test: This is when you bring it to the theater (or whatever the intended operating environment is) to see if it functions under the actual conditions. Especially important for testing range, brightness, loudness; try it in the actual room. This test does not assume under actual running conditions; just that you are testing in the intended environment.
And, well, that's plenty enough for one entry!
Thursday, February 13, 2014
Working with Failure
The monitors I "repaired" broke again last night, as did the music light I'd "improved." In the morning, I bricked a $60 flash drive. And I also failed to repair my old coffee grinder.
But I'm not depressed or upset. Failure is part of the build cycle. It is why we work incrementally, why we test. And it is one of the basic elements of the Maker mentality; permission to fail.
Today I revised the music light circuit and it is working fine. Fixed the monitors after the show, and after bricking the flash drive made use of the broken parts to test a different way to connect into one; a solution I am confident enough with to use for the next flash drive. And I bought a new coffee grinder -- but my repairs lasted long enough to get me a couple much-needed cups of coffee.
A concept I've been thinking about lately is that problems occur both singly, and in plurals both series and parallel. The series ones are often the worst ones; hardest to track down, and most dangerous when they happen. That's when two totally different things have to go wrong to create a massive failure that is more than the sum of the parts.
I just went through two cases of parallel problems, though. The monitor system was wired wrong and the amp was going into thermal shutdown. And, as it turns out, the wiring to one of the individual speakers was bad (this bleeds into the serial class of problem since the bad wiring was not a serious problem until all the speaker wiring passed through the bad connection). In the other case, I had bad ground on a cable, and a noisy amp; two more-or-less independent speaker system problems each of which produced a frustratingly intermittent hum.
One of the basic tools of the engineer is to divide and conquer. Make a system into smaller systems and test each smaller system. Isolate the place where the problem is, instead of trying to deal with a complex system all in one shot. But, unfortunately, an entire class of problems only arises in the interactions between parts. This is why, among other things, systems integration tests are so important!
(Which is why the most recent test on the Holocron was if having the charger in circuit and the Trinket and Neopixels operating would interfere with normal file access on the thumb drive. They did not.)
Embracing failure is central to Maker philosophy. If there was a standard it was reacting against, it would be the idea that you have to be perfect in order to do anything. That you have to practice and practice, and get proper instruction, so when you finally sit down to repair an engine or paint a painting you do it "correctly" the first time.
The entire Maker outlook is of knowing you don't know what you are doing, going into it in an experimental attitude, and being prepared for a lot of things not to work the first time. Or maybe even the fiftieth time. Because, among other things, a Maker is not learning to do a craft exactly to the standards of the masters (with the only outcomes then being either you did it right, or you did it wrong), but doing things that have never been done before. (Or that have only been done by a small number of experimentalists).
The tricky thing, of course, is knowing enough not to injure or kill yourself. Going forward with a project with nothing but a basic familiarity with concepts and crowd-sourced intelligence is a way to discover tricky principles of science that can seriously mess up your day. Take TechShop, for instance; the basic classes give you about enough to turn the machine on and not have your hands actually on the spinning blades. Not enough to understand the hidden hazards to you and the equipment.
When you can, of course, fail well. Fail in a way that doesn't get you hurt. Fail when there is still time or money to recover (try to fail on practice pieces and trial runs rather than on your only piece of material). And learn from the failure. Unfortunately there isn't always time for forensic engineering. Often you have a Cosplay convention or a show opening or some other deadline and it is more important to get it working than find out exactly what it didn't.
Trouble is, of course, if you don't know how it failed, you don't know if you actually fixed it. That, if nothing else, can be the most satisfying aspect of a good failure. Sure, you failed. But you know why. And the next one will be better.
Wednesday, February 12, 2014
More Instructables Soon
I'm in tech, and more. I've been putting off major repairs at the theater because I always had my personal mics to fall back on. But not this show; someone is renting them opening weekend. So I had to finish up comprehensive inventory and get some of the long put-off repairs done. AND get my own set of mics cleaned and tested and repaired as well.
And the current show has a brass band (which is not as much a problem as it might have been) and a full-stage rake (which is a much worse problem than expected). So it is a tough show to engineer, but once we are open it should be a lightweight gig.
Of course I can't put off everything else until then. So despite being in tech, I'm working on several prop projects. The Holocron is coming along; been priming and sanding the outer shell, and I tested the next level of integration on the electronics. There will be an Instructable on that build once I'm done.
The latest V150 arrived from Shapeways, as did the 1:6 scale print I did of the Claymore Mine I modeled recently. Which is very cute, and I'll have pictures once I've finished painting it.

And the metal arrived for my Aliens grenades, as well as the first shipment of plastic end caps. Which may or may not work; looking at the detailed drawings, I may need to order the next size up. As well as the right sized cut-off bit from McMaster-Carr!
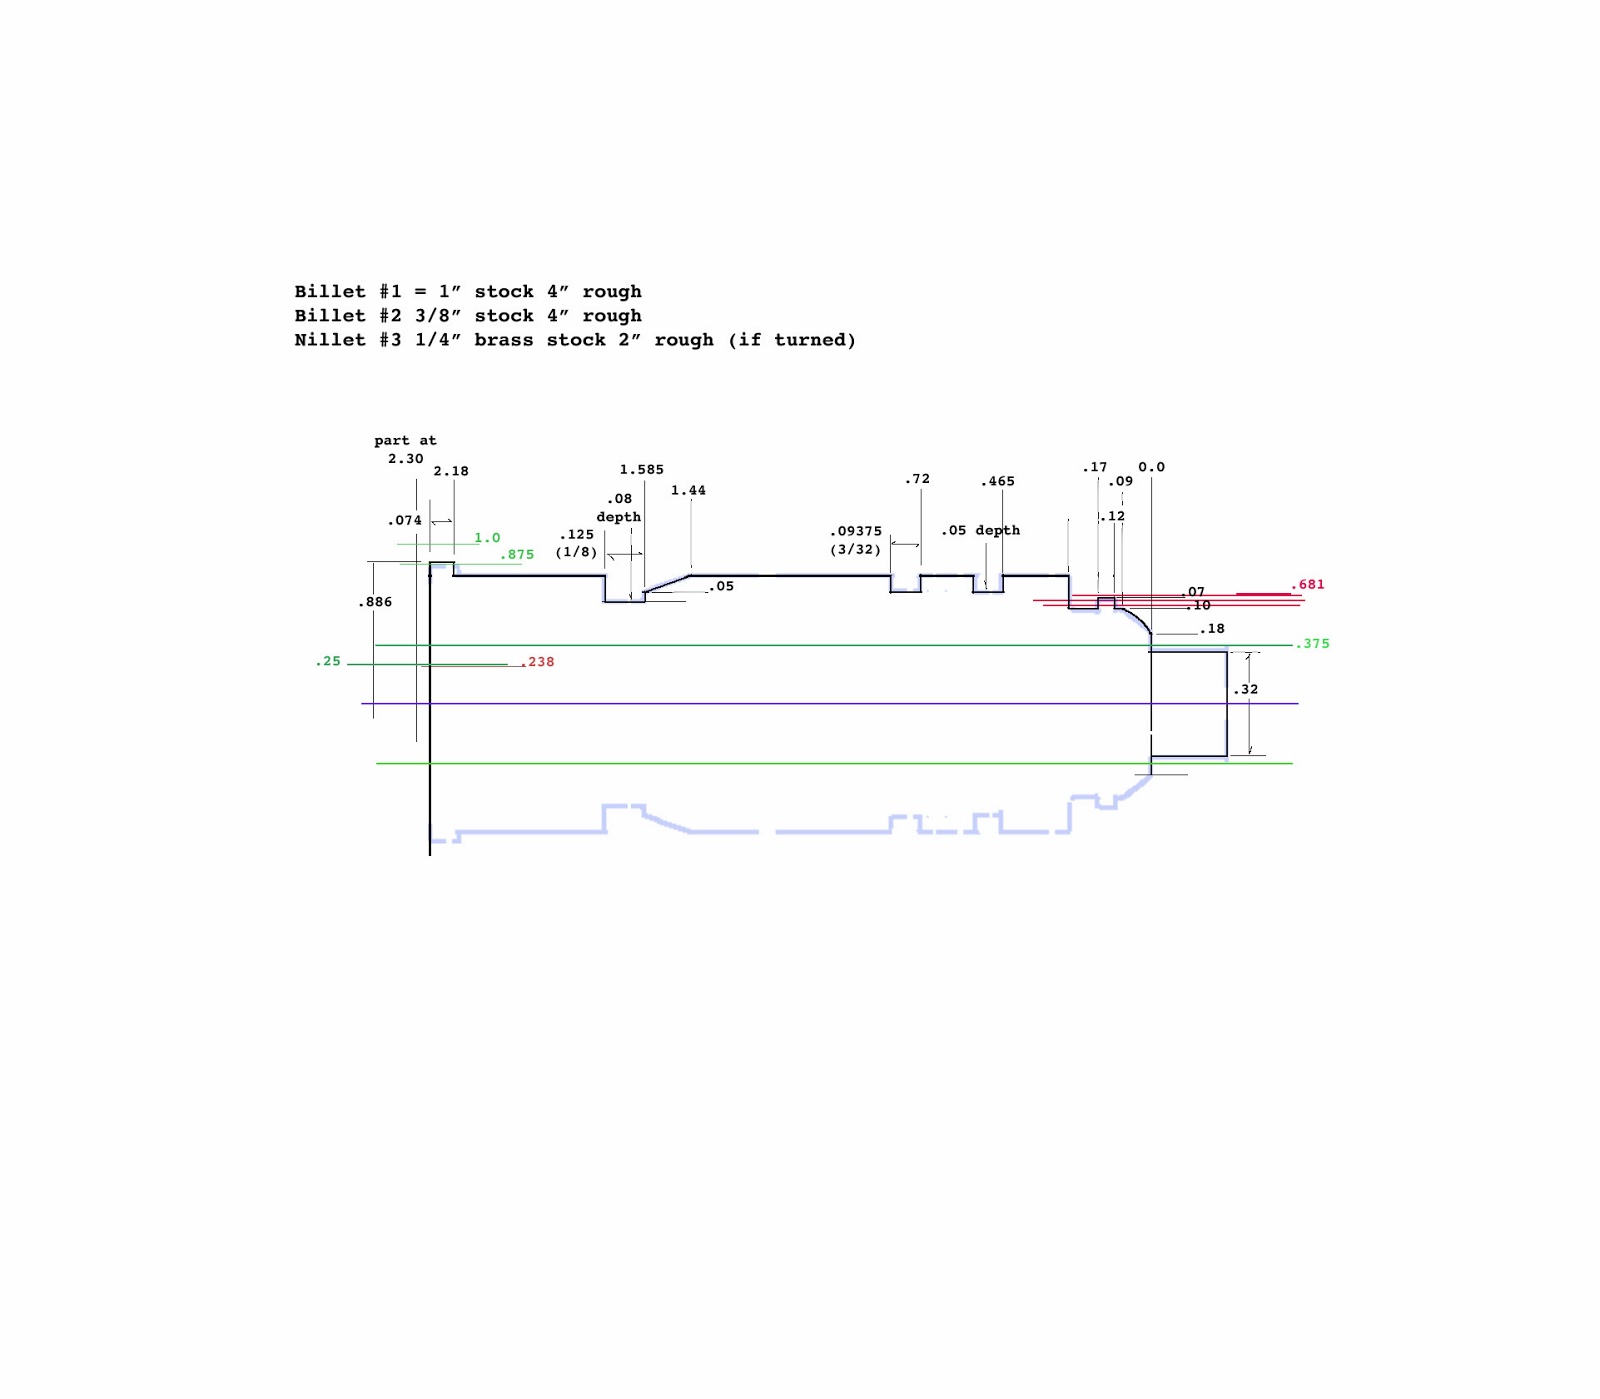
And the current show has a brass band (which is not as much a problem as it might have been) and a full-stage rake (which is a much worse problem than expected). So it is a tough show to engineer, but once we are open it should be a lightweight gig.
Of course I can't put off everything else until then. So despite being in tech, I'm working on several prop projects. The Holocron is coming along; been priming and sanding the outer shell, and I tested the next level of integration on the electronics. There will be an Instructable on that build once I'm done.
The latest V150 arrived from Shapeways, as did the 1:6 scale print I did of the Claymore Mine I modeled recently. Which is very cute, and I'll have pictures once I've finished painting it.
And the metal arrived for my Aliens grenades, as well as the first shipment of plastic end caps. Which may or may not work; looking at the detailed drawings, I may need to order the next size up. As well as the right sized cut-off bit from McMaster-Carr!
Monday, February 10, 2014
How to Make a Poser Prop Prop
I should have added this to the other entry.
If you really must make a prop instead of a figure (because you need smart-propping, or because it isn't worth rigging), the process is simple.
IMPORT the object you want. Poser can handle 3dmf, obj, some dxf, 3ds, all sorts of odd things. Obj seems to have the fewest surprises and is usually preferred.
SCALE and POSITION the object in Poser space. (And texture too, assuming you want to do it all in one).
SAVE to library using the handy "+" button.
Okay, if you want to be pro, you want to have external geometry. What does this mean? If you follow the steps above, Poser will put the mesh data into the pp2 file itself. (Or pz2, if you have compression turned on).
To make the mesh easier to access for editing, UVmapping, and other uses, you want it to be in the form of an .obj file in a different folder (the "geometry" folder) of your Runtime. To achieve this, you need two steps;
EDIT the pp2 in a text editor to take out all the mesh information and replace it with a pointer to the external geometry file (see my example in the entry "How to Make a Poser Prop.")
EXPORT the modified geometry from the workspace. Remember that you scaled and positioned your original mesh when you imported it into Poser? Those changes won't be saved unless you use the Export menu and have Poser create a new .obj file that reflects all those changes.
Friday, February 7, 2014
First TechShop Project
I've been taking classes over there, and yesterday I finally reserved a tool.
Sorta. The tool I'd reserved broke down the night before, so I lurked for five hours until I was able to jump on one for a few minutes between reserved users.
Still, worked out I managed to accomplish all four tasks I'd planned for that trip. So not bad at all.

These are lasered out of 1/8" colored acrylic from Tap Plastics. The light blue is engraved with some lettering and other details, and the dark blue is, obviously, cut out. The intent is to glue six of these together, plus the existing outer pieces, to make a cube, and light that from within.
I taught myself Inkscape just well enough to work up the artwork at home. Then at TechShop I went to one of the workstations and transferred to Illustrator (which is preferred format for the Epilog laser cutters). So I had to learn yet another piece of software, on the fly, on PC (which I don't know). And do so in time to get it to the laser.
And, well, they don't stack up quite like I hoped so I need to rework the artwork and run another set off. When I can get a slot on the laser again (the four machines at TechShop are in almost constant use, and reserved out to a couple weeks!)
The other thing there is a replacement rack adaptor plate for my Sennheisers (one of the people I rented to lost the part and all the screws that go with it, too). I refreshed my memory of the cut-off saw by successfully chucking the work, lowering the blade, then hitting emergency stop when it didn't want to play nice with 1/16" steel. Hammered the piece flat again with a ball-peen and did the cuts on the bandsaw instead. Marked the holes there, but did the drilling at home in my underpowered-but-cute Central Machinery drill press (a Harbor Freight special -- and you know what that means.)
Oh; this is the current electronics package for the Holocron (the light that will be behind the acrylic pieces):
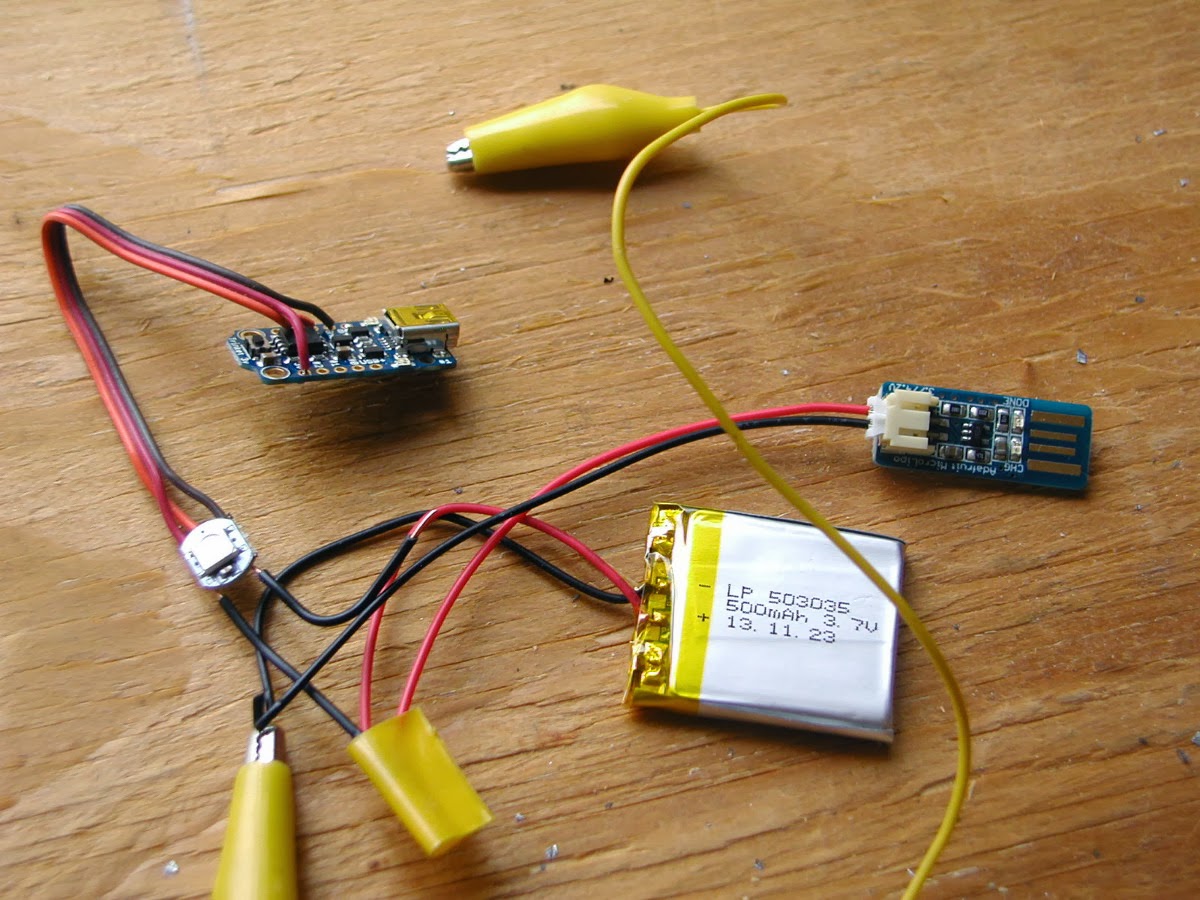
Adafruit neo-pixel being driven by a Trinket (Arduino-compatible ATtiny board), 500 ma/h LiPo and USB charger. The current circuit was a test of whether you could charge the battery in-circuit, and run the lights while charging. You can.
The next test is whether you can put a thumb drive in parallel with all this and charge the batteries, run the lights, and still access the thumb drive. Last step is using the old capsense code once again to allow the end-user to switch the light without opening up the box.
Sorta. The tool I'd reserved broke down the night before, so I lurked for five hours until I was able to jump on one for a few minutes between reserved users.
Still, worked out I managed to accomplish all four tasks I'd planned for that trip. So not bad at all.
These are lasered out of 1/8" colored acrylic from Tap Plastics. The light blue is engraved with some lettering and other details, and the dark blue is, obviously, cut out. The intent is to glue six of these together, plus the existing outer pieces, to make a cube, and light that from within.
I taught myself Inkscape just well enough to work up the artwork at home. Then at TechShop I went to one of the workstations and transferred to Illustrator (which is preferred format for the Epilog laser cutters). So I had to learn yet another piece of software, on the fly, on PC (which I don't know). And do so in time to get it to the laser.
And, well, they don't stack up quite like I hoped so I need to rework the artwork and run another set off. When I can get a slot on the laser again (the four machines at TechShop are in almost constant use, and reserved out to a couple weeks!)
The other thing there is a replacement rack adaptor plate for my Sennheisers (one of the people I rented to lost the part and all the screws that go with it, too). I refreshed my memory of the cut-off saw by successfully chucking the work, lowering the blade, then hitting emergency stop when it didn't want to play nice with 1/16" steel. Hammered the piece flat again with a ball-peen and did the cuts on the bandsaw instead. Marked the holes there, but did the drilling at home in my underpowered-but-cute Central Machinery drill press (a Harbor Freight special -- and you know what that means.)
Oh; this is the current electronics package for the Holocron (the light that will be behind the acrylic pieces):
The next test is whether you can put a thumb drive in parallel with all this and charge the batteries, run the lights, and still access the thumb drive. Last step is using the old capsense code once again to allow the end-user to switch the light without opening up the box.
Wednesday, February 5, 2014
Grenade!
So I got checked out on the metal lathe at TechShop. I've been wanting to lathe for the longest time, but even if one of the little benchtop models was within my price range, it wouldn't be a good fit for an apartment.
Now I need to practice. And the 30mm "pulse rifle" grenade from the James Cameron Action/SF film Aliens seemed a natural. It's basically a cylinder with some grooves cut in it. A little looking around, and I even found a scale drawing.

Except. Except the drawing I found was in millimeters, and the lathe I'm learning on is in thousandths. And you can convert, but as I did so I realized it also wasn't a good fit for available stock metals. And then some of the dimensions didn't seem quite right.
And that ends up making it a better project; research, dimensioning, planning around the stock, planning the cuts. And it isn't entirely unexplored territory because I still have Steven Pasek's wonderful drawings to fall back on when I get confused.
So let's do it the Volpin way. Screen shots are hard to come by, but I did manage to find a good picture of a screen-used prop. One difficulty in researching a popular prop like this is that a lot of people have made their own approximations (some better than others). So if you aren't careful, you end up with pictures of some-one else's mistakes.
Of course photographs and screen shots introduce distortion of various kinds. Foreshortening will change the apparent diameter to length, and cause spacing to appear different at different ends. I layered, rotated, and scaled two different reference pictures to try to zero out some of these factors, and made tick-marks both down centerline and down the sides.
 And I compared what I was getting from these screen shots with the dimensioned drawing I had originally intended to work from:
 Not that bad, really. Could even be acceptable. Except that I need to re-develop the dimensions anyhow (as well as convert them).
Unlike many movie props where the only good reference is an actor's hand in shot, the M40 HE grenade was built from a specific real-world object; 12 gauge snap-caps. (Revealed by the movie's armorer in the Special Edition DVD extras).

Turned out to be a pain to find the dimensions of shotgun brass, (most of the discussion online is of choke.) But I finally found the SAAMI specs, (and eventually got my calipers on actual brass to confirm), and I can be pretty firm with .800" as a base dimension. And that means I can scale the rest of the drawing to that.
So the next step is to combine the different references and bring them where plausible towards standards; standard shotshell dimensions, available metal stocks, and dimensions that are convenient to tool.

In this drawing, each grid line is a hundredth of an inch (here's what I did; I turned on the grid in PhotoShop -- yes, PhotoShop; I'm not quite up on any of my CAD software yet -- reset the dpi until it was in the ballpark, then scaled the image layers until they landed on the grid properly).
The blue is my combined references, the black is the new shape I'm developing, and the green indicates standard sizes for metal stock available from OnlineMetals. The red here is a reference to standard shotgun primer size, which I may or may not use as a dimension. (Would probably require shaving 1/4" stock, under-drilling, then carefully boring the hole to press-fit tolerance. Which I'll be doing far enough of already with the spring pin!)
Or did I mention, I'm going the full distance; spring-loaded trigger, plastic protective cap?
Possibly on this drawing, or more probably in the sketch form it is now, is the order of operations. Machining is quite sensitive as to which cuts you make in what order. As a general outline, I'll bandsaw about a 5" chunk of probably 1" stock, chuck it with less than three inches showing, and the first pass will take down everything but the rim to .8"
The SAAMI standard for the rim on a shotshell is slightly larger than the next-smallest standard aluminium billet, and after correcting to the lathe center I'd be a good tenth smaller than that, too. So starting from 1" gives me some headroom. That removes a full hundred thou from the body of the grenade, and when I was checked out we didn't go over 60 thou, so that comes out to two rough passes and one or two finishing passes.
The grooves in the front are close enough to be scaled to 3/32 -- an available parting bar size (and hopefully I won't have to order tool steel from McMaster-Carr before I can finish this thing!) I haven't decided whether to drill the end and use a live center, but by the time I've milled it down it will be past the 3:1 rule for extending out of the chuck. And of course the most complicated cuts are on the "nose!"
Live center might also help with the knurl (I'm assuming we have a straight knurl in stock; I did see one knurling wheel in the box). But at some point I need to drop the center and bore. Since the bore has to be opened up with a shoulder to retain the trigger pin, I need to swap the grenade in the jaws after parting it. But that's fine, because I'll also be parting with at least 20 thou waste and coming back to face the other end.
And so it goes. I fully expect to wreck several of these trying to do this, and probably break a cutting tool, too. But if I avoid damaging the lathe or myself I will be more than satisfied.
Now I need to practice. And the 30mm "pulse rifle" grenade from the James Cameron Action/SF film Aliens seemed a natural. It's basically a cylinder with some grooves cut in it. A little looking around, and I even found a scale drawing.
(The famous grenade scene in the air vent.)
Except. Except the drawing I found was in millimeters, and the lathe I'm learning on is in thousandths. And you can convert, but as I did so I realized it also wasn't a good fit for available stock metals. And then some of the dimensions didn't seem quite right.
And that ends up making it a better project; research, dimensioning, planning around the stock, planning the cuts. And it isn't entirely unexplored territory because I still have Steven Pasek's wonderful drawings to fall back on when I get confused.
So let's do it the Volpin way. Screen shots are hard to come by, but I did manage to find a good picture of a screen-used prop. One difficulty in researching a popular prop like this is that a lot of people have made their own approximations (some better than others). So if you aren't careful, you end up with pictures of some-one else's mistakes.
Of course photographs and screen shots introduce distortion of various kinds. Foreshortening will change the apparent diameter to length, and cause spacing to appear different at different ends. I layered, rotated, and scaled two different reference pictures to try to zero out some of these factors, and made tick-marks both down centerline and down the sides.
Unlike many movie props where the only good reference is an actor's hand in shot, the M40 HE grenade was built from a specific real-world object; 12 gauge snap-caps. (Revealed by the movie's armorer in the Special Edition DVD extras).
(Wikipedia Commons, uploaded by Magicmatt)
Turned out to be a pain to find the dimensions of shotgun brass, (most of the discussion online is of choke.) But I finally found the SAAMI specs, (and eventually got my calipers on actual brass to confirm), and I can be pretty firm with .800" as a base dimension. And that means I can scale the rest of the drawing to that.
So the next step is to combine the different references and bring them where plausible towards standards; standard shotshell dimensions, available metal stocks, and dimensions that are convenient to tool.
The blue is my combined references, the black is the new shape I'm developing, and the green indicates standard sizes for metal stock available from OnlineMetals. The red here is a reference to standard shotgun primer size, which I may or may not use as a dimension. (Would probably require shaving 1/4" stock, under-drilling, then carefully boring the hole to press-fit tolerance. Which I'll be doing far enough of already with the spring pin!)
Or did I mention, I'm going the full distance; spring-loaded trigger, plastic protective cap?
Possibly on this drawing, or more probably in the sketch form it is now, is the order of operations. Machining is quite sensitive as to which cuts you make in what order. As a general outline, I'll bandsaw about a 5" chunk of probably 1" stock, chuck it with less than three inches showing, and the first pass will take down everything but the rim to .8"
The SAAMI standard for the rim on a shotshell is slightly larger than the next-smallest standard aluminium billet, and after correcting to the lathe center I'd be a good tenth smaller than that, too. So starting from 1" gives me some headroom. That removes a full hundred thou from the body of the grenade, and when I was checked out we didn't go over 60 thou, so that comes out to two rough passes and one or two finishing passes.
The grooves in the front are close enough to be scaled to 3/32 -- an available parting bar size (and hopefully I won't have to order tool steel from McMaster-Carr before I can finish this thing!) I haven't decided whether to drill the end and use a live center, but by the time I've milled it down it will be past the 3:1 rule for extending out of the chuck. And of course the most complicated cuts are on the "nose!"
Live center might also help with the knurl (I'm assuming we have a straight knurl in stock; I did see one knurling wheel in the box). But at some point I need to drop the center and bore. Since the bore has to be opened up with a shoulder to retain the trigger pin, I need to swap the grenade in the jaws after parting it. But that's fine, because I'll also be parting with at least 20 thou waste and coming back to face the other end.
And so it goes. I fully expect to wreck several of these trying to do this, and probably break a cutting tool, too. But if I avoid damaging the lathe or myself I will be more than satisfied.
Sunday, February 2, 2014
Oh, like I needed another project!
I've finally managed to get two or three TechShop classes under my belt. Which gives me access to new tools and methods. And also gives me yet more skills to try to develop and maintain.
I'm really tempted as a practice project on the metal lathe to run off an M40 grenade; that's the distinctive one from the James Cameron action/SF film Aliens.
I've found a nicely dimensioned drawing. Most of the cuts are straight-forward. There are a few exceptions of course.
The best option I've found for the plastic cap is 8 pounds worth (sterling, not avoirdupois.) A stick of aluminium rod stock (7/8", 2011 alloy) is under six bucks. There is however a bit of knurling (in the original, it was a crimp) that could be interesting to fabricate. And then since I'm crazy, the dimensioned drawing I have includes how to do the spring-loaded button and a "primer cap" with press-fit inserts. Which could task my current ability to cut accurate holes.
For that matter, I'm not even sure exactly how you best approach a wide internal cut. I only learned how to start off an edge! So the first stop might be to purchase the recommended book on machining and read up a little...
I have two other TechShop projects in the wings already. I'm pretty set now on laser-cutting a third panel of tinted acrylic to give the "Jedi" Holocron a nice depth when I light it from within. Maybe tonight I'll throw some of the electronics together and see how they work. I need to schedule extra time when I go in to cut, because I have yet to go through importing vector art into Illustrator and prepping it to cut. TechShop has lots of licensed copies and a bank of machines you can walk in and use...oh, but they are all PCs, which isn't a show-stopper with me but does mean I might need just a little more time. And then there's a long waiting list on the lasers, up to a week to be able to reserve a slot on them.
At least for my other project -- a small repair to my rack-mount Sennies -- I won't have to wait in line for the machines. It's just a quick bit of cold saw and drilling, and I already have the steel stock here.
All of these may have to hold a little, though, because those same Sennies are going out for rental soon. Or not. I wouldn't mind the money at all, but I also wouldn't mind having them for my next show, which is going into tech in a week. I've been working the last few days doing inventory and cleaning and testing and I'm going to be pushing to have enough of their mics working again by the time the show starts.
And even more on the long list of projects; I almost wore my new pants last night (they were clean, and they are black, which is more than I can say for anything else I own). But at the last minute I decided the zipper really needs to be reset, and I might as well fix the waistline while I'm at it -- so I threw them back on top of the sewing box.
Ah, so many things to do, so little energy in which to do them! I have no decent clothes, and I'm doing all these period shows anyhow, and I have dreams of making a complete "period" outfit (aka, about as authentic to any specific period Victorian through 1920 as one of the Doctor's outfits). But at the current state of my sewing, the idea of a frock coat is nothing but frightening.
Saturday, February 1, 2014
CBR Revisited
A nice fellow dropped by recently with a comment on the Morrow Project CBR kit (my monster prop project from last year). I looked at the old paperwork and thought about it for a little and I have some lessons I think I learned.

In general, the design process was good, the design itself good, the electronics and coding good enough. The modeling and casting succeeded, which is all that can be hoped for the first time out on a new technique. If I were to go around again on it, I'd be going into unexplored territory again on a couple places; on designing a 3d print with interlocking parts (well, more interlocking than the V150, or the 1/6 scale Claymore Mine I'm currently having printed), and on making a PCB. I've known for a while I've taken perf about as far as I can take it, and for the larger component counts, smaller footprints, and above all more reliability I need to move to PCBs.
I would like greater interactivity, but what I built already exceeded what was likely to come into play, literally; this was a demonstration piece for a table-top game, and probably was turned on and passed around for no more than a few minutes. And may not have been turned on since.
Specifics:
The Dialights are cute, but not really worth it. The visibility and visibility angle is lower than a standard indicator. Standard indicators domes would also mean I could shrink the footprint of the faceplate components a little and improve the overall fit.
I'd make a fresh 3d model, 100% printed, with a tight-fitting lid designed with pockets for neodymium magnets. That would ease assembly, and access for battery changes. There are several other smaller changes in the faceplate, including a larger relief in the shade hood, and a slightly larger footprint (there is space in the pouch for that).
The model would also be more detailed in the body, with better "battery compartment" detailing, some small raised ribs around the terminals, inset for the dataplate, and so forth.
The electronics would be on PCB of course, with the VFD soldered directly to the board instead of soldering each pin individually to ribbon cable (which was a real pain). I'm tempted to go with encoders instead of rotary switches for flexibility, but the main change here is switching to a double-deck so "OFF" actually works! Another change to the electronics would be a hand-rolled high voltage supply, so I could run the VFD brighter. Lastly, the power would be changed to AA instead of 9V, giving a much longer service life.
The speaker was underwhelming when packaged into the device. I'd have to experiment with this; the first idea is to use a true conduction speaker (with a proper speaker driver aka LM386 or similar) and make a speaker out of the printed shell.
But when all is said and done, the prop did what it was supposed to do, and there's no particular impetus to rebuild it.
Funny. It's something I learned while "debating" with Moon Landing Conspiracy buffs; when you try to "rebuild" a project using everything you learned since -- making use of new technologies and new techniques -- it becomes an equivalent job to designing it from scratch all over again. The main thing that stays in this case is the artistic concept, and all the time we spent developing that.
But that artistic concept is the most fun part of the project, so if I were to embark on a similar prop, I'd really want a chance to re-think that as well. Build one for a different period, or build a different device entirely. Because then you not only get to incorporate the lessons learned on fabrication methods, you also get to do some more creation.
(Picture taken before final, printed, knobs were installed)
In general, the design process was good, the design itself good, the electronics and coding good enough. The modeling and casting succeeded, which is all that can be hoped for the first time out on a new technique. If I were to go around again on it, I'd be going into unexplored territory again on a couple places; on designing a 3d print with interlocking parts (well, more interlocking than the V150, or the 1/6 scale Claymore Mine I'm currently having printed), and on making a PCB. I've known for a while I've taken perf about as far as I can take it, and for the larger component counts, smaller footprints, and above all more reliability I need to move to PCBs.
I would like greater interactivity, but what I built already exceeded what was likely to come into play, literally; this was a demonstration piece for a table-top game, and probably was turned on and passed around for no more than a few minutes. And may not have been turned on since.
Specifics:
The Dialights are cute, but not really worth it. The visibility and visibility angle is lower than a standard indicator. Standard indicators domes would also mean I could shrink the footprint of the faceplate components a little and improve the overall fit.
I'd make a fresh 3d model, 100% printed, with a tight-fitting lid designed with pockets for neodymium magnets. That would ease assembly, and access for battery changes. There are several other smaller changes in the faceplate, including a larger relief in the shade hood, and a slightly larger footprint (there is space in the pouch for that).
The model would also be more detailed in the body, with better "battery compartment" detailing, some small raised ribs around the terminals, inset for the dataplate, and so forth.
The electronics would be on PCB of course, with the VFD soldered directly to the board instead of soldering each pin individually to ribbon cable (which was a real pain). I'm tempted to go with encoders instead of rotary switches for flexibility, but the main change here is switching to a double-deck so "OFF" actually works! Another change to the electronics would be a hand-rolled high voltage supply, so I could run the VFD brighter. Lastly, the power would be changed to AA instead of 9V, giving a much longer service life.
The speaker was underwhelming when packaged into the device. I'd have to experiment with this; the first idea is to use a true conduction speaker (with a proper speaker driver aka LM386 or similar) and make a speaker out of the printed shell.
But when all is said and done, the prop did what it was supposed to do, and there's no particular impetus to rebuild it.
Funny. It's something I learned while "debating" with Moon Landing Conspiracy buffs; when you try to "rebuild" a project using everything you learned since -- making use of new technologies and new techniques -- it becomes an equivalent job to designing it from scratch all over again. The main thing that stays in this case is the artistic concept, and all the time we spent developing that.
But that artistic concept is the most fun part of the project, so if I were to embark on a similar prop, I'd really want a chance to re-think that as well. Build one for a different period, or build a different device entirely. Because then you not only get to incorporate the lessons learned on fabrication methods, you also get to do some more creation.
Subscribe to:
Posts (Atom)