I closed a show last night.
I took all the character names off the microphones, the costumes and props were gathered up and returned to the rental places or put in storage, the set was taken apart into lumber and standard platforms. This morning a crew is in there taking down the lights, and I'm backing up my design files onto DVD-ROM before deleting the show from my hard disc.
It was only a two-week run but I worked every single performance. Twelve in all, plus nearly that number of rehearsals. Watching the stage, listening intently to the dialog, following every song. Experiencing the stumbles and the rescues; like the moment the sword broke in the middle of the climactic sword fight, and the actors adapted so well the fight only became more dramatic for it.
It was a self-contained world. These were portrayals of people who will never be done quite that way again. A set under lights that will never quite be replicated. The intangible experience of a live theatrical performance that doesn't survive being recorded (despite the experienced videographer in the back of the house).
More than that. No play, no moment, no presented world is quite like the real one. In every production there are compromises made for what is practical, and choices made for what is dramatic. And every creative department (including the director and the actors) are making these choices, which interact and feed upon each other synergistically.
What emerges is not just complex and nuanced beyond the ability of a single creator, but it has that edge, that unexpected quality of a real thing. It becomes a real place, with its own internal logic, its own style, its own flavor. Your mind begins to fill in the ancillary details; the back sides of sets, the action you can't see, the taste of the foods, even the unique scents of the land.
But this is a place where you can not extend your reservations or apply for a working visa. It is a place that only exists for as long as the play is performed. Each performance, you catch new glimpses of the greater world beyond the characters and actions on stage; each performance, there are new hints and nuances to the unseen and unexperienced, that make the experience of that world broader and deeper and more detailed.
And then Closing Night, and you board your flight; never to return.
No wonder many theater people get depressed on Closing Night!
Monday, January 28, 2013
Sunday, January 27, 2013
Row, Row, Row
So I have a rowboat cue in the current show.
I hasten to add; I'm not happy with that cue. It isn't what it could be. But it did get me thinking once again about the process of creating a sound.
In a sort of Aristotelian ideal, you'd discover and define what the actual sound of the object in question was, then construct and refine a duplication of that. In the real world, jump forward a couple centuries to add a few epicycles; determine what the perception and expectation of the sound is, and discover what is technically feasible.
And then shape for what fits the actual needs of the play. Which is almost never technical accuracy; instead it is the ability to tell the story, and tell it with the desired emotional content. And do so within, of course, the total sonic (and visual!) context of the show.
The show in this case is Peter Pan, and the conceit of this production is that the Darling kids (and maybe the kids of the neighborhood?) are acting out all the various situations and character, from pirates to indians to fairies. The visual for the rowboat, then, is a couple of kids pushing themselves along on a cot-like bed that rolls across the floor.
My conceit for the sound design is this is the world the kids are imagining; so bigger-than-life pirate ships and woods full of strange animals, but with a nod towards the understanding of a child; a non-technical, not-quite-plausble pirate ship. Or a bow that sounds like a toy bow with those suction-cup arrows. Only, you know, really cool.
Anyhow. Start with a recording of the actual thing. First off, it is nice to find out what something "really" sounds like. Second, it is (mostly) an easy start-point. You can find a recording, or go out and make one yourself. The latter is better because, of course, there is no such thing as "the sound of..." -- sound is complex and contextual. What it sounds like from ten inches away is not what it sounds like twenty feet away, on a windy day.
But this real recording is also the first place where the ideal falters. Now, I've actually rowed. Owned a boat, even. So I should have memory of what rowing actually sounds like. But, alas, like so many of us, my expectation is shaped by the sounds chosen by previous generations of sound designers. I subconsciously expect, in short, for a boat to sound like it does in the movies.
And this is not actually a bad choice. I mean, besides the fact that those designers knew what they were doing. Your audience is going to have the same subconscious expectations, and even if you have freshly educated yourself to the real sound, they haven't. Play them the "real" sound, and they are too likely to go, "What is that strange sound we are hearing?"
The other problem with real sounds is that they are dirty. They are complex. Often they have other elements in the recording, often there is recording noise, often it is too short or pans wrong; but even beyond that, the real sound of a real thing contains too much information. Too much is happening.
In the movies, real sound off the sound stage is rarely used. Instead, the sound field is reconstructed, footstep by footstep, jingling coins in the pockets and the slither of a silk scarf and creak of a leather jacket and all. What is created by the dubbing mixer, with the aid of the Foley stage, is an illusion of natural sound. It is sound with the extraneous cut out, sound that is focused on those elements most needed to tell the story, sound that is shaped artificially to elicit emotional reactions.
And we often need to do that in our stage sound effects as well. Instead of the complexities (and lack of instant recognition) of an actual recording, you shape, you rebuild, you sweeten, and you fake; to create a model of a sound that sounds like what we expect it to sound like, and contains only those elements it needs to.
So model an imaginary rowboat. My mind expects two things; a squeak and a splash. There's the squeak of the oarlock. Then the splash and swirl and drip of the oar entering water, pushing, exiting dripping. And a little bow slap and some minor wood creaking.
Actually, most oarlocks don't creak. What they do more is rattle. The recording I used for this show was mostly a dull wooden rattling, and no water noise at all. I spiced it up by adding some water noise.
Because of the dual aspect of this cue -- that it both was a real rowboat and was kids playing rowboat in a backyard -- the water I added was a BBC track of someone taking a bath in a tub. So smaller splashes, with that close bathroom echo. And I EQ'd the boat mercilessly to haul out as much of a squeak as I could and downplay pretty much all of the other sound.
Had I time, I would have constructed the boat bit by bit, with samples that had nothing to do with a rowboat.
Which is how I made the pirate ship.
Again, I've been on real ships. I have internalized the kind of creaking the wood of a large wooden ship makes (among others, I've been on The Golden Hinde.) Also spent enough time on small sailing ships and around marinas to internalize the flapping of sails, the lashing noise of rigging against masts.
My "visual" conceit is that the ship is revealed as if in full sail, at that moment when the sails fill with wind and snap taut. Of course the entire point of Captain Hook's ship is that it doesn't go anywhere, and probably has the sails furled as it lies at anchor in a sheltered bay.
So the primary elements were the body of the ship creaking, some creaking ropes of rigging, a little water lapping against the hull, sail cloth flapping, and of course the big "whooomph!" of the sails opening right at the start of the cue.
The creaking was a library sound effect of a wooden rocking chair, down-sampled and down-pitched. The sails were from a BBC recording of the sails flapping on a small sailing dingy as it is coming about into the wind. I've used it before, but this time used it almost at pitch to make the pirate ship slightly more toy-like and accessible.
The rope I re-used a sound I recorded a long time ago; I tied a knot in a piece of old hemp rope, tied it around a wooden ladder and recorded it on to my mini-disk. I've long since lost the original recording, and what I have made a long side-trip through the 12-bit memory of a W30 sampling workstation, but it is still with me.
The lapping was water against the shore of a lake. For this show, I made a few new sail sounds by setting up an omni microphone on a quiet stage and running around in front of it with a bed sheet. That amused the stage manager no end. Unfortunately the stage was not quiet enough, and by the time SoundSoap had taken the noise of the stage light dimmers out of the recording it was almost unusable.
But only almost. One of those snaps of fabric still begins the completed sound cue. Oh, and I added some gulls and surf at the start of the cue to "sell" it.
This is a very, very useful technique. You want the sound of a train? The audience might get confused by the puffs of a steam engine, and truly lost by the pound of a modern diesel, but add a train whistle/horn...
There are a great many cues that you can add one extra sound that will explain the cue to the audience. Because, after all, they aren't visualizing what you are visualizing, and their auditory memories and associations aren't yours, either.
The technical factor that has hit me every time I have done a similar ship sound (this makes about four times I've build a similar bed, though each had a unique character), is that you need to have something going on all the time in order for there to be, well, a sound playing. But many of the elements are periodic and/or distracting.
So the final balance between all these different elements; lapping water, creaking wood, flapping sails, etc., is as much determined by the need to make a relatively smooth overall level; a sound that tells the story almost continuously, without rising in volume so much as to mask dialog or even as to attract too much attention, and without lowering enough in volume at any moment to attract attention by its absence.
And here, again, constructing a sound from little pieces like this makes it easier to make a sound that has this quality of chunky peanut butter. Of not being too spiky, or too bland, but being of a consistent texture that can be extended for as long as the scene lasts.
Sunday, January 13, 2013
Robot Girl is Awesome
So my youngest niece really liked the "robot" I built for Willy Wonka.

Which was of course basically a carved shell over a cheap mall-store R/C car:


Somehow, the discussion evolved until we decided I'd work with her to build her own robot. The first chance we got to have a real sit-down about it, we went over some of the things she was hoping to do and covered some of the basics of how things worked and how plausible. She's a smart kid, and had been reading up, so she understood the gulf between what is depicted in movies and what real-world robots usually do.
And it is important when brainstorming, no matter what the age, not to start with "No, we can't do that," or "No, that's too expensive, let's try this other thing." Instead you want to start by dreaming of the impossible. THEN you can start working out what is actually possible, in a context of how much you are willing to put in to get there.
So we scribbled some ideas, and talked about ideas such as voice recognition. But it was important to me that we should finish this first "Robot Day" with something built. Something she could take home.
And I got really lucky here.
I'd brought a whole bag full of servos and Arduinos and Xbees and so on. But there just wasn't room in the bags for carving materials, paints, and all the other stuff to make a physical robot shell with working joints. Not that we really had the time!
But I did have my custom BlinkM.

And this wasn't just a color-changing LED; it was one that I'd already programmed with multiple routines. Except that the potentiometer had fallen off. And even better; I didn't have a 4.5V battery pack on me.
So I didn't have a 3xAA power pack. I had a 2xAA I was briefly tempted to hack up, but that is barely enough to light the blue channel on the Piranha. But I DID happen to have, in my grab-bag of parts, a 7805 voltage regulator.
And a chunk of nice Adafruit perma-proto -- which is like what Strip Board wants to be when it grows up:

Which meant I could have HER do half the work of putting together a 7805-based voltage regulator, and at the end of it she'd have a multi-color selectable blinky that ran off a 9v battery.
So I had her look over my shoulder as I looked up a 7805 schematic online, and explained some of the basics of reading a schematic. Soldered the first pins myself. Then handed her the iron.
The first solder joint she did EVER was clean and solid. In fact, it was neater than most of the joints I do! My niece is AWESOME. She also stripped wires...and her uncle showed his great dexterity and skill by puncturing his thumb with one of the ones he prepped.
She did manage to burn her arm (just a white mark, fortunately!) by not paying attention to where the iron was. Which is also a good lesson, although not the kind you really want to happen.
We built the power supply, used a VOM to confirm it was good, then hooked up the BlinkM and it lit.
But that wasn't enough for me. I could tell she was fading but we'd made good use of the built-in bus of the perma-proto and that meant we only had three wires to go to add a tiny trim-pot I also had in my box of random parts. So we added that.
No light. And the 7805 got hot to the touch. Oops! So also a lucky, unplanned, and very useful teaching opportunity. Pulled the connections from the potentiometer, and in the process discovered a solder bridge across the main power bus.
Put the potentiometer back one leg at a time, each time looking carefully for new solder bridges before connecting the battery, and testing at each stage to see if the thing was still lighting. She was getting pretty ragged at this point but when we had the color control knob working she definitely felt that had been worth it.
I didn't have a copy of the original software on my laptop, and I told her to turn the knob slowly and map out the various color nodes.
Which, from my memory, are:
And, yeah, the thing is on a perf board and a little big to hang on a shirt. But that form factor meant she could learn to solder and work with stripping wires and putting parts in holes and diagnosing failures and building and testing modularly.
And maybe she won't do any electronics on the robot she eventually builds. Maybe it will be all software. Maybe she'll be focused on the crafts. But knowing that you can do it, and having a basic familiarity with what it feels like to solder parts to a board and what tools you need is something that will always be a help to you in a whole range of hobby and Maker activities.
So I'd say day well spent. Next session, I'll bring in a Speech Recognition chip and start teaching her C++ !

Which was of course basically a carved shell over a cheap mall-store R/C car:


Somehow, the discussion evolved until we decided I'd work with her to build her own robot. The first chance we got to have a real sit-down about it, we went over some of the things she was hoping to do and covered some of the basics of how things worked and how plausible. She's a smart kid, and had been reading up, so she understood the gulf between what is depicted in movies and what real-world robots usually do.
And it is important when brainstorming, no matter what the age, not to start with "No, we can't do that," or "No, that's too expensive, let's try this other thing." Instead you want to start by dreaming of the impossible. THEN you can start working out what is actually possible, in a context of how much you are willing to put in to get there.
So we scribbled some ideas, and talked about ideas such as voice recognition. But it was important to me that we should finish this first "Robot Day" with something built. Something she could take home.
And I got really lucky here.
I'd brought a whole bag full of servos and Arduinos and Xbees and so on. But there just wasn't room in the bags for carving materials, paints, and all the other stuff to make a physical robot shell with working joints. Not that we really had the time!
But I did have my custom BlinkM.

And this wasn't just a color-changing LED; it was one that I'd already programmed with multiple routines. Except that the potentiometer had fallen off. And even better; I didn't have a 4.5V battery pack on me.
Oh; the BlinkM is factory-set by ThinkM with a custom bootloader and their own software, which allows creation of and uploading of a single multi-step color pattern.
As it happens, though, the core part is an ATtiny45/85 (driving a single RGB Piranha LED.) Which means you can load new software on to it; the programming lines (MISO, MOSI, SCK and RST) are already broken out. And it is even, via the High-Low Tech group at MIT and Alessandro Saporetti, Arduino compatible.
So I'd already used my Adafruit USB TinyISP
to stick new software on a BlinkM. I thought I had a picture of the thing on breadboard where I was trying out the XBee integration, but anyhow...!
The thing is, it had multiple modes already programmed in, which were reached by changing the voltage presented to an Analog Read pin.

So I didn't have a 3xAA power pack. I had a 2xAA I was briefly tempted to hack up, but that is barely enough to light the blue channel on the Piranha. But I DID happen to have, in my grab-bag of parts, a 7805 voltage regulator.
And a chunk of nice Adafruit perma-proto -- which is like what Strip Board wants to be when it grows up:


Which meant I could have HER do half the work of putting together a 7805-based voltage regulator, and at the end of it she'd have a multi-color selectable blinky that ran off a 9v battery.
So I had her look over my shoulder as I looked up a 7805 schematic online, and explained some of the basics of reading a schematic. Soldered the first pins myself. Then handed her the iron.
The first solder joint she did EVER was clean and solid. In fact, it was neater than most of the joints I do! My niece is AWESOME. She also stripped wires...and her uncle showed his great dexterity and skill by puncturing his thumb with one of the ones he prepped.
She did manage to burn her arm (just a white mark, fortunately!) by not paying attention to where the iron was. Which is also a good lesson, although not the kind you really want to happen.
We built the power supply, used a VOM to confirm it was good, then hooked up the BlinkM and it lit.
But that wasn't enough for me. I could tell she was fading but we'd made good use of the built-in bus of the perma-proto and that meant we only had three wires to go to add a tiny trim-pot I also had in my box of random parts. So we added that.
No light. And the 7805 got hot to the touch. Oops! So also a lucky, unplanned, and very useful teaching opportunity. Pulled the connections from the potentiometer, and in the process discovered a solder bridge across the main power bus.
Put the potentiometer back one leg at a time, each time looking carefully for new solder bridges before connecting the battery, and testing at each stage to see if the thing was still lighting. She was getting pretty ragged at this point but when we had the color control knob working she definitely felt that had been worth it.
I didn't have a copy of the original software on my laptop, and I told her to turn the knob slowly and map out the various color nodes.
Which, from my memory, are:
RED-BLUE ALTERNATE
PINK-AQUA ALTERNATE
GREEN PULSE
BLUE FLASH
CANDLE
SLOW COLOR SWIRL
OFF
And, yeah, the thing is on a perf board and a little big to hang on a shirt. But that form factor meant she could learn to solder and work with stripping wires and putting parts in holes and diagnosing failures and building and testing modularly.
And maybe she won't do any electronics on the robot she eventually builds. Maybe it will be all software. Maybe she'll be focused on the crafts. But knowing that you can do it, and having a basic familiarity with what it feels like to solder parts to a board and what tools you need is something that will always be a help to you in a whole range of hobby and Maker activities.
So I'd say day well spent. Next session, I'll bring in a Speech Recognition chip and start teaching her C++ !
Friday, January 11, 2013
Speaking Common(s)
All of my work here falls under Creative Commons. By putting up a circuit diagram or a chunk of code of mine in this blog I make the implicit statement that you may freely use it in your own projects.
The only caveat is that not all of the images are mine. I also refer to other creative properties (such as, say, "The Sound of Music,") and whatever my Creative Commons stance is, I can not give away any rights to the characters or story therein. Same goes for third-party cartoons (I have included cartoons by Gary Larson and Ben Edlund within these pages), and other creative material.
A specific case is the Morrow Project CBR and Med Kit. "The Morrow Project" is a copyright and trademarked creation, and I have no right to give away any element of the story, any name used within or term created specifically for it, or graphics created by the original artists.
I do, however, have the rights to my own depiction of the CBR and Med Kit. These I make freely available, along with all circuit diagrams, software, graphics created for, graphic depictions of (including the photographs of the props I created) and 3d meshes.
I retain full rights to the same materials. You can make your own, you can use my photographs in a blog or in a book, you can take my mesh and make a pepakura and make that available. You can even chose to sell it. I would prefer you credit me, and I would prefer you respect the Commons by making any derivative work as freely available as the original, but that is not a legal requirement. The only thing I hold is that no use or derivative work will ever prevent me from being able to make whatever use of my own designs and work I may chose to in the future.
This will be the stance of this blog into the foreseeable future as well. I will make a stronger attempt to clearly label all resources which are not uniquely mine. Any other diagram, photograph, software snippet, explanatory text, or sound sample may be reproduced, copied to other media, and used personally or commercially, except in any future case where I specifically indicate otherwise.
Thursday, January 10, 2013
Build your own Morrow Project CBR Kit

Assuming you want to make a prop vastly similar to this one, this post assembles all the parts, links and diagrams I can provide.
Wednesday, January 9, 2013
Penultimate Morrow Post
This is the threatened "How we designed them" post. I'm going to try to make it short with lots of pictures.
The design process was exploratory and iterative, but it was framed into two distinct sections; the "on spec" preparatory work, then a firm commitment to build. The only late adjustment in contract was pushing the deadline back. Of course I was consulting at every step, floating lots of sketches and renders back and forth as ideas developed.
As is usual with such things, it ends up being as much compromise and circumstance as it is art and science. We were always aware of how things should "really" be both in the world of the Morrow Project and in the real world we pretended this project might exist in. We chose to go in different ways not due to ignorance, but due to need.
Tuesday, January 8, 2013
Loose Ends
You know the village..it's up North, not far from Loose Chippings.
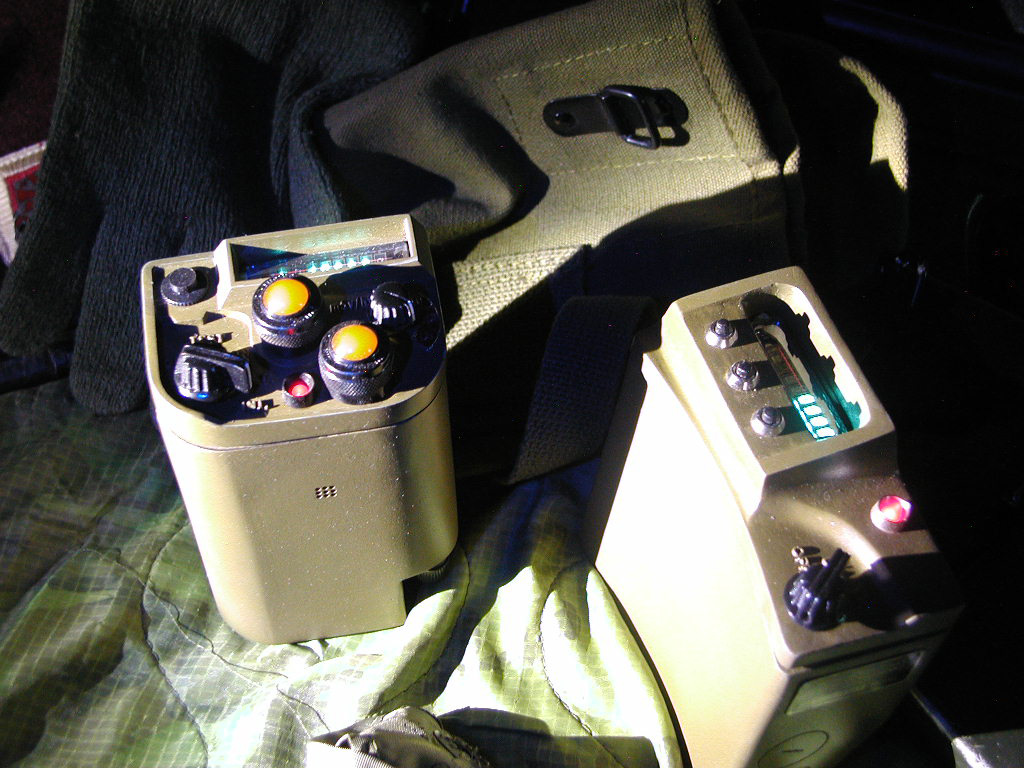
The Morrow Project CBR and Medkit are done.
 I can finally put away the tools and clean up the dust and debris that's been cluttering up my work table since, well, the Wonka Robot:
 Maybe it's just the paint fumes calling. I'm feeling this odd gap now. As I work to repair audio cables and clean up some voice-over recordings for a friend, I keep thinking I'm supposed to put another coat of Krylon Crystal Clear on, or finish sanding the latest bit of Bondo spot putty.
Well, fortunately or unfortunately, the same friend who had me build the Morrow boxes gave me a couple of other toys to play with. There's this (a Wilco resin cast, just needs to be assembled and painted):

(If you don't recognize the prop, it is a third-party replica of THIS):
 I also have a NERF "Maverick" that is wanting to get a Steampunk treatment. But I'd love to get away from a few things that really bug me about the usual conversion -- like that ugly pistol grip. The below is NOT a build, but is instead a PhotoShop collage -- with the base being someone else's very nice steampunk paint job (I could only hope to do one as nice):

The new grip would be carved softwood (I'm not THAT crazy), with either basswood or, perhaps, 1/4" aluminium stock as a frame. Rebuilding the cylinder to make a hollow, Gatling-gun shape would be lovely, but I'm not sure I'm that crazy, either.
In any case, I've learned a little during the last few projects. I can cast now, though not well, and I need very much to learn how to make glove molds with mother molds (a box mold is a waste of material for anything much larger than a pencil).
If I ever do anything like those Morrow Project boxes again, I'll remember a few things, like plan the closure in the original model, clear the lid space for controls, build insets for such things as data plates; use two-piece molds, mix pigment into the plastic...
Whatever project I try to sneak in between the cracks of the next two or three shows, though, is going to have to be simpler than the Fury Gun, my first really big prop:

(One of these days I may make an entry about the Fury Gun here. Its got a bunch of moving parts and weighs about 20 lbs. Involved welding steel, hot-bending mild steel with MAPP gas, 3d printing, Apoxie Sculpt, carving aluminium and brass with Dremel and files...)
All in all, I really, really want to do another project like this:

Six hours scattered over three days...and most of that was spent waiting for paint to dry!
The Morrow Project CBR and Medkit are done.

Well, fortunately or unfortunately, the same friend who had me build the Morrow boxes gave me a couple of other toys to play with. There's this (a Wilco resin cast, just needs to be assembled and painted):

(If you don't recognize the prop, it is a third-party replica of THIS):


The new grip would be carved softwood (I'm not THAT crazy), with either basswood or, perhaps, 1/4" aluminium stock as a frame. Rebuilding the cylinder to make a hollow, Gatling-gun shape would be lovely, but I'm not sure I'm that crazy, either.
In any case, I've learned a little during the last few projects. I can cast now, though not well, and I need very much to learn how to make glove molds with mother molds (a box mold is a waste of material for anything much larger than a pencil).
If I ever do anything like those Morrow Project boxes again, I'll remember a few things, like plan the closure in the original model, clear the lid space for controls, build insets for such things as data plates; use two-piece molds, mix pigment into the plastic...
Whatever project I try to sneak in between the cracks of the next two or three shows, though, is going to have to be simpler than the Fury Gun, my first really big prop:

(One of these days I may make an entry about the Fury Gun here. Its got a bunch of moving parts and weighs about 20 lbs. Involved welding steel, hot-bending mild steel with MAPP gas, 3d printing, Apoxie Sculpt, carving aluminium and brass with Dremel and files...)
All in all, I really, really want to do another project like this:
Six hours scattered over three days...and most of that was spent waiting for paint to dry!
Okay, I Lied
Like a REMF on a nice cot in an air-conditioned barracks.
Boxes are finished, and to celebrate I took some spooky pics on top of what few props I still own (having given away most of my own field gear years ago):

I think my CCD hates me now. These were shot with the light of a couple of LED's -- the blue nightlight from my bathroom (on the end of an extension cord), and my steampunk-modified Energizer headlamp, propped up on books and things to get the right angle. Shutter times were on the order of a quarter of a second and I got a LOT of blown pixels which I had to touch up in PhotoShop.
Boxes are finished, and to celebrate I took some spooky pics on top of what few props I still own (having given away most of my own field gear years ago):


I think my CCD hates me now. These were shot with the light of a couple of LED's -- the blue nightlight from my bathroom (on the end of an extension cord), and my steampunk-modified Energizer headlamp, propped up on books and things to get the right angle. Shutter times were on the order of a quarter of a second and I got a LOT of blown pixels which I had to touch up in PhotoShop.
Sunday, January 6, 2013
Kanobses
The latest Shapeways order arrived. The saga of the Morrow Project boxes is almost at a close. I intend only two more posts on the subject; one an overview of the design and development, the other, a gathering together of all the resources I can to allow someone else to make their own in the same style.
The whole basic concept of these was "green boxes with 1970's era controls on top." But it was too much of a chore to find existing knobs that were affordable and of the right dimensions. Thus, printing.

This was the concept; a fusion of elements from various period controls, intended to have a strong resemblance to the bar knobs of the venerable PRC-77 series military radios.

 Modeled in Carrara (same place the top of the box was modeled, and that meant it was already to scale as well).
After a check against the Design Rules for printing in high-detail plastic (which it very nearly flunked due to the small size), model is smoothed several times and exported.
(I have to export via Hexagon because of problems with the implementation of STL on Carrara.)
After a few weeks turn-around (slowed mostly by having a stainless steel print in the order), the raw knobs came back from Shapeways:

Sanding and filing to smooth out the burrs, several coats of Tamiya gloss black. Drilled out the hex key access holes (unfortunately, I'd guessed wrong and the guide holes I included in the print were in the wrong place). And cut apart a couple of one-dollar knobs from Allelectronics to use the pre-threaded brass insert inside them, which got superglued inside the new knobs.
Last step is the indicator line. On the model, I'd intended to fill this with a thin strip of white styrene plastic. But when I got the knobs in hand and saw how small they were (and how rough the slot was) I painted it white instead. Using Opaque White left lying around from my attempts at drawing a comic book!
And this is what they look like installed:


(The sensitivity knob is off the dial because that's the only way to truly turn off the power to the box!)
Wednesday, January 2, 2013
New Pictures on the Morrow
Costello: Look, You gotta pitcher on this team?Abbott: Sure.Costello: The pitcher's name?Abbott: Tomorrow.Costello: You don't want to tell me today?Abbott: I'm telling you now.Costello: Then go ahead.Abbott: Tomorrow!Costello: What time?Abbott: What time what?Costello: What time tomorrow are you gonna tell me who's pitching?Abbott: Now listen. Who is not pitching.
No, seriously. I have better pictures today. I hope. Shapeways just sent me a tracking number, though, so with any luck I'll be able to replace those stand-in knobs, stuff the final electronics inside, and fasten down the lids properly.


Incidentally, now that the cat is out of the bag, the capacitance sensor on the CBR triggers the "injector" light to pretend to give a dose of Universal Antidote (not to be confused with Universal Antibody). There's a vibration motor in there, and in my original tests made for a nice joy-buzzer effect. Alas, in the final configuration you can hear the vibration more than you can feel it.
The Medkit is making use of a cheap one-shot sound chip I wished I had bought more of when I saw it at All Electronics. Like the venerable Radio Shack board, it lets you record a sample and play it back on a press of a button. What I did for this one, is clipped a pair of leads to the microphone connection, attached the other end to my laptop, and played a sample off my sound effects collection on an endless loop. The sound is that of a SCUBA diver underwater, and I got lucky with when I hit the "Record" button because it is a great, slightly-mechanical sloshing/bubbling sort of sound. For whatever weird thing is actually inside that Medkit!
The chip is a 4.5v supply, the VFD requires at least 9v, so there is a pack of AA's plus a 9v transistor packed away inside there. Plus the speaker, and the circuit board with the 555 on it.
Anyhow. Rest of today's pics:


Tuesday, January 1, 2013
More Bad Pics
By the time I'd finished setting up, I'd lost the light. Ah well. I still don't have the final knobs on them (still assuming the prints from Shapeways come out okay!)


Subscribe to:
Posts (Atom)